Air Fryer Cauliflower: Shatter Crisp Edges
- Time: Active 5 minutes, Passive 12 minutes, Total 17 minutes
- Flavor/Texture Hook: Shatter crisp charred edges with a tender, nutty center
- Perfect for: Hearty family dinners, low carb meal prep, or a bold snack
- Mastering The Crispiest Air Fryer Cauliflower Ever
- Why This Dish Hits Different
- Essential Timing and Heat Stats
- The Elements of Bold Flavor
- Tools for Golden Success
- Step by Step Flavor Building
- Solving Common Texture Problems
- Scaling
- Creative Seasonal Flavor Twists
- Myths About Air Frying
- Keeping Leftovers Hearty and Crisp
- What to Serve Alongside This
- Recipe FAQs
- 📝 Recipe Card
Mastering The Crispiest Air Fryer Cauliflower Ever
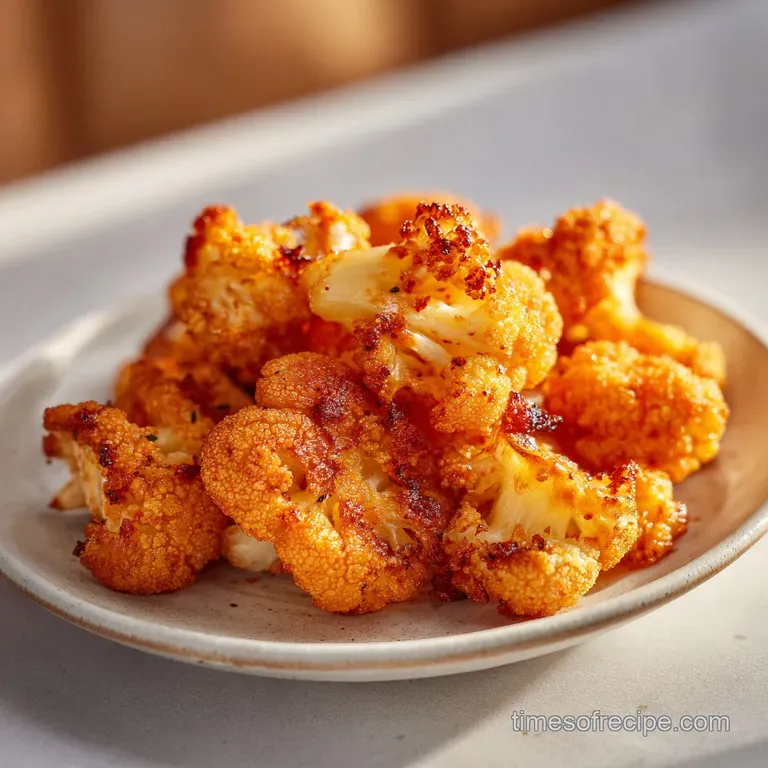
The kitchen fills with the scent of toasted garlic and warm paprika, a smell that always brings my family wandering in to see what's for dinner. I remember the first time I pulled a batch of this cauliflower from the basket, the edges were dark and lacy, looking almost charred but tasting incredibly nutty and sweet.
It was a far cry from the boiled, mushy versions I grew up with, and even the pickiest eaters in my house reached for seconds before the main course was even on the table.
We are focusing on building big, hearty flavors here by treating the vegetable with the respect it deserves. It’s about more than just cooking a side dish, it’s about creating a satisfying experience where the texture provides a real crunch that gives way to a velvety interior.
This recipe has become a staple in our home because it’s reliable, bold, and pairs with almost anything.
You can expect a result that rivals any restaurant appetizer without the greasy cleanup or the long wait for the oven to preheat. The air fryer is the real hero here, concentrating the natural sugars of the cauliflower through rapid air movement.
Trust me, once you see those golden brown edges sizzle, you’ll never want to make it any other way.
Why This Dish Hits Different
Convection Heat: The high speed fan moves hot air around every surface, stripping away moisture for a superior crunch.
Maillard Reaction: Rapid surface heating browns the natural sugars, creating a complex, nutty flavor profile that boiling cannot achieve.
Oil Atomization: Using avocado oil allows for high temperature roasting without smoke, ensuring the spices stay bold rather than bitter.
Aromatic Layering: Adding garlic and onion powder before cooking builds a base, while lemon juice after provides a bright, acidic contrast.
| Method | Time | Texture | Best For |
|---|---|---|---|
| Air Fryer | 12 minutes | Shatter crisp edges | Maximum crunch and speed |
| Oven Roast | 25 minutes | Soft and caramelized | Large batches for crowds |
| Steaming | 8 minutes | Soft and tender | Simple, mild side dishes |
Getting the right texture depends heavily on how the heat interacts with the cell walls of the vegetable. When we use the air fryer, the dry heat works quickly to firm up the exterior while the internal moisture steams the floret from the inside out, keeping it from becoming tough.
Component Analysis
| Ingredient | Science Role | Pro Secret |
|---|---|---|
| Cauliflower (600g) | Structural base | Cut into flat faced florets for more surface contact. |
| Avocado Oil (2 tbsp) | Heat conductor | Use oil with a high smoke point to prevent acrid flavors. |
| Smoked Paprika (1/2 tsp) | Flavor depth | Toasting the paprika in the air fryer intensifies its woodsy aroma. |
Essential Timing and Heat Stats
When we talk about precision, the air fryer is unforgiving but rewarding. For this 600g head of cauliflower, we want to hit that sweet spot where the centers are tender but the stalks still have a bit of a bite.
If you cut the florets too small, they’ll turn into carbon before the middle softens, so aim for a consistent 1 inch size.
I have found that a temperature of 200°C is the "Goldilocks" zone for this dish. It is hot enough to create that satisfying sizzle immediately upon contact, but not so hot that the garlic powder burns before the cauliflower is cooked through.
If you’re using a larger air fryer, you might find you need an extra minute or two, but 12 minutes is usually the magic number for a standard basket.
| Feature | Fresh Cauliflower | Frozen Florets |
|---|---|---|
| Texture | Shatter crisp edges | Softer, slightly more tender |
| Prep Time | 5 minutes chopping | 0 minutes |
| Flavor | Bold and nutty | Milder, more watery |
Using frozen cauliflower is a great shortcut, but be aware that the moisture content is much higher. You’ll need to add at least 4 to 5 minutes to the cook time to evaporate that extra water before the browning can actually start.
The Elements of Bold Flavor
- 1 large head Cauliflower (approx. 600g): Cut into 1 inch florets. Why this? Fresh cauliflower provides the best structural integrity for a crisp finish.
- Substitute: Broccoli florets (creates a crispier, leafier texture).
- 2 tbsp Avocado oil: High smoke point fat. Why this? It stays stable at 200°C without breaking down into bitter compounds.
- Substitute: Ghee or melted coconut oil.
- 1/2 tsp Fine sea salt: Enhances natural sweetness.
- Substitute: Kosher salt (use 3/4 tsp).
- 1/4 tsp Freshly cracked black pepper: Provides a subtle, sharp heat.
- Substitute: White pepper for a more floral note.
- 1 tsp Garlic powder: Essential for that savory, hearty base.
- Substitute: Granulated garlic.
- 1/2 tsp Smoked paprika: Adds a deep, woodsy flavor. Why this? It mimics the flavor of a charcoal grill.
- Substitute: Sweet paprika for less smoke.
- 1/4 tsp Onion powder: Adds a savory sweetness.
- 1 tbsp Fresh lemon juice: Brightens the entire dish after cooking.
- Substitute: Apple cider vinegar.
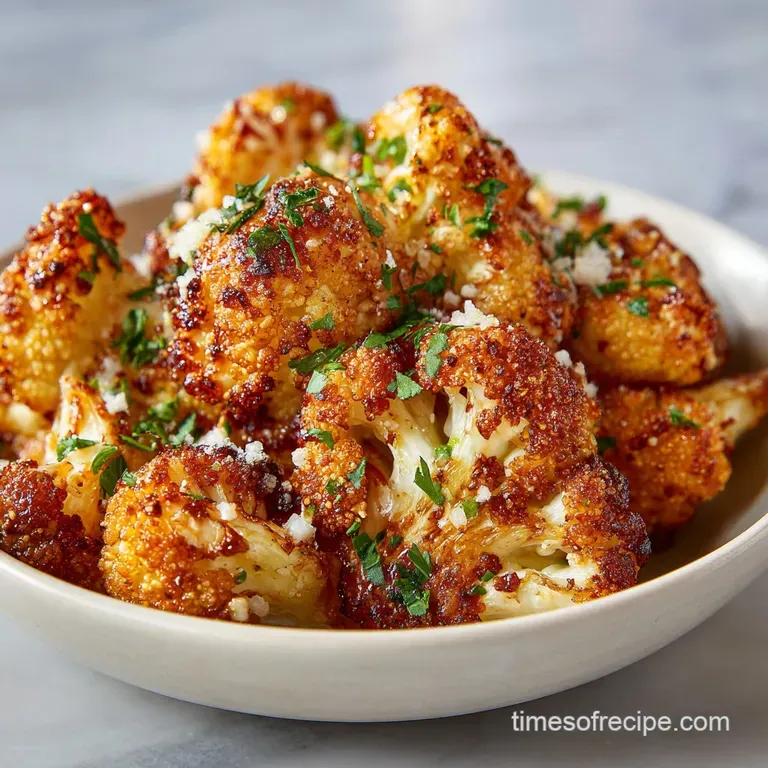
- 2 tbsp Freshly grated Parmesan cheese: Adds umami and a salty crust.
- Substitute: Nutritional yeast for a dairy-free option.
Tools for Golden Success
You don't need a pantry full of gadgets, but a good air fryer is non negotiable here. I personally use a basket style fryer because the airflow is more concentrated than the oven style ones.
A large glass or stainless steel mixing bowl is also vital so you can really toss the florets and ensure every nook and cranny is coated in oil and spices.
Don't forget a pair of silicone tipped tongs. You’ll need to shake the basket halfway through, but sometimes the florets get cozy and stick together. Tongs help you separate them without scratching the non stick coating of your fryer basket.
A microplane is also helpful for that Parmesan cheese, as the finer the grate, the better it sticks to the hot cauliflower.
step-by-step Flavor Building
- Prep the cauliflower. Wash and dry the 600g head thoroughly, then cut into uniform 1 inch florets. Note: Surface moisture is the enemy of the crunch, so pat them dry with a clean towel.
- Preheat the fryer. Set your air fryer to 200°C and let it run for 5 minutes. Note: Starting with a hot basket ensures the cauliflower starts searing the moment it hits the metal.
- Coat with oil. Place florets in a large bowl and drizzle with 2 tbsp avocado oil. Toss vigorously until every piece looks glossy and wet.
- Apply dry spices. Sprinkle 1/2 tsp sea salt, 1/4 tsp pepper, 1 tsp garlic powder, 1/2 tsp smoked paprika, and 1/4 tsp onion powder over the cauliflower.
- Toss again. Mix the spices thoroughly. You want to see the red tint of the paprika evenly distributed across all the white surfaces.
- Load the basket. Place the seasoned florets into the preheated basket in a single layer. Note: If they are piled too high, they will steam instead of roast.
- First fry. Cook at 200°C for 6 minutes until the edges start to turn pale gold.
- Shake it up. Remove the basket and give it a firm shake or use tongs to flip the pieces.
- Final fry. Cook for another 6 minutes until the florets are deeply browned and crackling.
- Finish with finesse. Transfer to a bowl, toss with 1 tbsp lemon juice and 2 tbsp Parmesan cheese. The residual heat will melt the cheese into the crevices.
If you are feeling adventurous, you can use this same layering technique to make a Gobi Manchurian recipe by swapping the paprika and Parmesan for a spicy soy based glaze at the end. The goal is always to build the flavor in stages so it's not just sitting on the surface.
Solving Common Texture Problems
The Soggy Floret Syndrome
If your cauliflower comes out limp rather than crisp, it's almost always due to overcrowding. When the florets are packed too tightly, the moisture they release has nowhere to go, creating a steam sauna inside your basket. The fix is simple: cook in two batches if you have to.
It's better to wait an extra 12 minutes for a satisfying crunch than to eat a bowl of mush.
The Problem of Burnt Garlic
Garlic powder is prone to burning if it's not well incorporated into the oil. If you notice a bitter taste, try mixing your spices into the oil first to create a slurry before tossing with the vegetables. This encapsulates the spice particles in fat, protecting them from the direct blast of the heating element.
| Problem | Root Cause | Solution |
|---|---|---|
| Soggy florets | Overcrowded basket | Air cannot circulate; cook in smaller batches for better airflow. |
| Burnt spices | Temp too high | Spices like garlic powder burn at high heat; lower temp to 190°C. |
| Uneven browning | Varied floret sizes | Cut everything to a uniform 1 inch size to ensure even cooking. |
Common Mistakes Checklist
- ✓ Pat the cauliflower completely dry before adding oil (prevents steaming)
- ✓ Preheat the air fryer for at least 5 minutes before cooking
- ✓ Don't skip the oil; it's necessary for heat transfer and browning
- ✓ Shake the basket halfway through to ensure all sides hit the hot air
- ✓ Add the lemon juice only at the very end to keep the crust from softening
Scaling
Down (1/2 batch): If you're only cooking for one, use 300g of cauliflower. You can keep the temperature at 200°C, but check it at the 8 minute mark as it will cook significantly faster with more space in the basket.
Up (2x-4x batches): Never double the amount in the basket at once. Instead, cook in batches. Keep the first batch warm in a 90°C oven while the second cooks. For the spices, use 1.5x the amount instead of 2x to avoid over salting, then adjust to taste at the end.
| Problem | Cause | Fix |
|---|---|---|
| Too salty | Excess sea salt | Toss with extra lemon juice |
| Bland taste | Under seasoned | Add more smoked paprika |
| Hard center | Undercooked | Add 2 minutes cooking time |
Creative Seasonal Flavor Twists
The beauty of this base is how well it takes to different seasonings. For a spicy, sticky version that my kids love, I often transform this into a Hot Honey Garlic recipe by tossing the finished florets in a mix of honey, sriracha, and extra garlic. It changes the texture from a dry crunch to a tacky, bold glaze that is incredibly satisfying.
In the autumn, you might swap the smoked paprika for cumin and coriander, creating an earthy, warm profile that pairs beautifully with roasted meats. You can even lean into a Mediterranean vibe by adding dried oregano and swapping the Parmesan for crumbled feta after the cook is done.
Just remember that the lemon juice is the "secret" ingredient that makes any of these variations pop.
Myths About Air Frying
One common misconception is that you don't need any oil at all. While the air fryer is efficient, oil is what facilitates the Maillard reaction. Without those 2 tablespoons of avocado oil, your cauliflower will look "dusty" and dry rather than golden and crisp.
The oil acts as a bridge between the hot air and the vegetable's surface.
Another myth is that parboiling the cauliflower first makes it better. In my experience, parboiling just adds unnecessary moisture. The air fryer is powerful enough to cook the floret through from raw in 12 minutes.
Starting from raw ensures the centers stay "al dente" and hearty rather than turning into a puree inside the crispy shell.
Keeping Leftovers Hearty and Crisp
Storage: Keep any leftovers in an airtight container in the fridge for up to 3 days. I find that glass containers work best to prevent the cauliflower from picking up other fridge odors. It will lose its crunch as it sits, but the flavor actually deepens as the spices meld.
Reheating: Never use the microwave, as it will turn your beautiful florets into soggy sponges. Instead, pop them back into the air fryer at 180°C for 3 to 4 minutes. This will revive the edges and bring back that sizzle.
Zero Waste: If you have stems or leaves from the cauliflower head, don't throw them away. Chop the stems small and throw them in with the florets; they get incredibly sweet when roasted.
The leaves can be tossed in a little oil and salt and air-fried for 2 minutes to make "cauliflower chips" that are a fun, crunchy snack.
What to Serve Alongside This
This dish is a chameleon in the kitchen. It provides a bold, savory contrast to creamy main courses like a mushroom risotto or a heavy pasta. For a complete vegetable feast, I often serve it alongside an OvenRoasted Brussels Sprouts Recipe to give the plate a variety of textures and charred flavors.
If you are looking for a dip, a cool Greek yogurt sauce with dill and more lemon juice creates a beautiful temperature contrast with the hot, spicy florets. It's also a fantastic addition to a grain bowl, providing the "meatiness" that keeps you full without feeling weighed down.
Regardless of how you serve it, the key is to bring it to the table while it's still crackling hot from the fryer.

Recipe FAQs
How do you cook cauliflower in the air fryer?
Toss the florets with oil and spices, then cook at 200°C. Cut cauliflower into uniform 1 inch pieces, coat well with avocado oil and seasonings like paprika and garlic powder, and cook for 12 minutes, shaking halfway through to ensure all sides brown evenly.
What are some common mistakes when air frying cauliflower?
Overcrowding the basket is the primary error that leads to sogginess. When florets are piled too high, they trap moisture and steam instead of crisping. Cook in a single layer, using multiple small batches if necessary for true crispness.
Can you air fry cauliflower without oil?
No, minimal oil is crucial for good results. While the machine is high heat, the oil is necessary to conduct heat efficiently and promote the Maillard reaction, which creates browning and nutty flavor rather than just drying the surface.
How long to cook a whole cauliflower in the air fryer?
You must cut a whole head into florets first for even cooking. A whole cauliflower will take over 30 minutes and will likely have burnt exterior areas before the center is tender, so aim for 12 total minutes after cutting into uniform 1 inch pieces.
Why is my air-fried cauliflower tasting bitter?
Garlic powder or certain spices are likely burning on the surface. This happens when the temperature is too high or the spices are not properly coated in oil; try mixing spices into the oil first to create a protective slurry before tossing with the vegetables.
Can I use frozen cauliflower florets instead of fresh?
Yes, but you must adjust the cooking time significantly. Frozen florets release excess water, which means you need to add an extra 4 to 5 minutes to the total cook time to evaporate that moisture before the crisping process can begin.
What is the best way to reheat leftover air-fried cauliflower?
Return it to the air fryer basket at a lower temperature. Never use a microwave, as it will ruin the texture; instead, reheat at 180°C for 3 to 4 minutes to revive the crispy edges that you mastered during the initial cook.
Air Fryer Cauliflower Bites

Ingredients:
Instructions:
Nutrition Facts:
| Calories | 114 kcal |
|---|---|
| Protein | 3.8 g |
| Fat | 8.2 g |
| Carbs | 8.3 g |
| Fiber | 3.0 g |
| Sugar | 2.9 g |
| Sodium | 335 mg |
