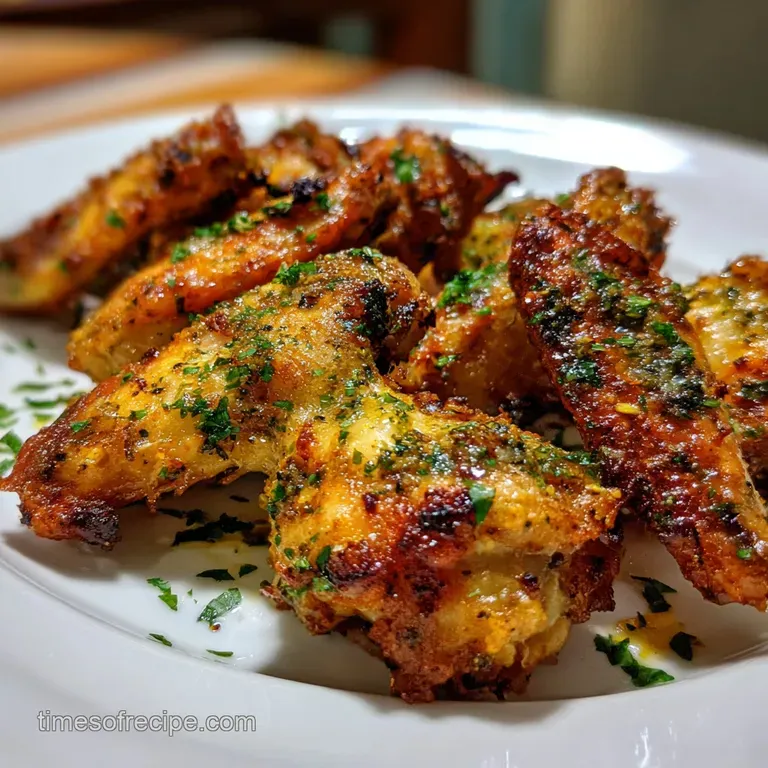
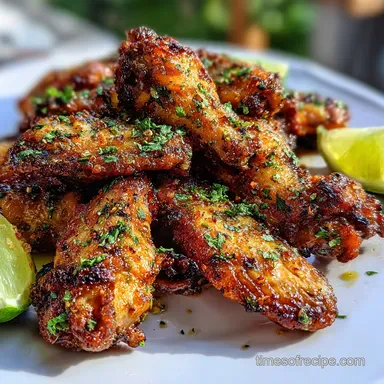
Baked Chicken Wings Recipe: Shatteringly Crisp
- Time: Active 15 minutes, Passive 45 minutes, Total 1 hour
- Flavor/Texture Hook: Shatter crisp skin with a bold, smoky garlic punch
- Perfect for: Game day gatherings or a satisfying family comfort dinner
- Master the Ultimate Hearty Baked Chicken Wings Recipe
- The Physics of Developing a Bold Shatter Crust Crunch
- Component Analysis for Maximizing Bold and Savory Flavor
- Essential Elements and Bold Substitutes for Every Kitchen
- The Tool Kit Required for Massive Family Style Batches
- Layering Savory Flavors Through a over High heat Roasting Process
- Solving Texture Issues and Avoiding Common Kitchen Mistakes
- Modifying the Batch for Big Parties or Small Meals
- Debunking Old School Myths About Achieving Crispy Poultry
- Preserving Bold Flavors Through Smart Storage and Reheating
- Hearty Sides That Pair with Your Satisfying Chicken Feast
- High in Sodium
- Recipe FAQs
- 📝 Recipe Card
Master the Ultimate Hearty Baked Chicken Wings Recipe
You know that specific sound? The one where you bite into a wing and it sounds like a dry leaf crunching under a boot? That's what we're chasing today. For years, I struggled with rubbery, sad oven wings that looked more like they’d been steamed than roasted.
I tried high heat, low heat, and even blowing them dry with a hairdryer (don't ask, it was a dark time in my kitchen history). My family would politely chew through them, but the "wow" factor was missing until I stumbled upon the science of the alkaline rub.
This isn't just about cooking meat, it's about a total texture transformation. We are building layers of flavor starting with a bold, smoky base and finishing with a skin that has a genuine snap.
When you pull these out of the oven, the aroma of toasted garlic and smoked paprika will fill your house, signaling to everyone that a truly satisfying meal is ready. It's the kind of dish that turns a regular Tuesday into a family event where everyone is fighting over the last drumette.
The beauty of this method is that it's remarkably consistent. Once you understand how to manipulate the surface of the chicken, you'll never settle for soggy wings again. We're going to use a few pantry staples to achieve a result that honestly rivals any bar or restaurant wing I've ever had.
Get your napkins ready, because we're about to dive into the secrets of the most satisfying crunch you've ever made in your own oven.
The Physics of Developing a Bold Shatter Crust Crunch
The Science of the Shatter Crust: The addition of baking powder raises the pH level on the chicken skin, which breaks down the peptide bonds and allows the skin to blister more effectively.
This reaction, combined with high heat, accelerates the Maillard reaction and creates a paper thin, crackling texture that stays crispy even after saucing.
| Thickness | Internal Temp | Rest Time | Visual Cue |
|---|---|---|---|
| Small (Flats) | 165°F (74°C) | 3 minutes | Skin is golden and tight |
| Medium (Mixed) | 175°F (79°C) | 5 minutes | Bubbling surface, bone pulls easy |
| Large (Drums) | 185°F (85°C) | 5 minutes | Dark gold, fat rendered completely |
While many people aim for the standard safety temp of 165°F, wings actually benefit from going higher. Since they are rich in collagen and connective tissue, taking them to 175°F or 185°F allows those tissues to melt into gelatin, giving you a velvety, juicy bite inside that crispy shell.
Component Analysis for Maximizing Bold and Savory Flavor
To get that deep, hearty flavor we want, every ingredient in this rub serves a specific structural or flavor purpose. We aren't just seasoning; we are engineering a better crust.
| Ingredient | Science Role | Pro Secret |
|---|---|---|
| Baking Powder | pH Modifier | Ensure it is aluminum free to avoid a bitter, metallic aftertaste. |
| Sea Salt | Moisture Draw | Fine salt penetrates faster, drawing out surface moisture for better browning. |
| Smoked Paprika | Color Catalyst | Beyond flavor, the oils in paprika help the skin take on a rich, deep mahogany hue. |
1. The Alkaline Lift
The baking powder is our heavy lifter here. It creates tiny bubbles on the surface of the skin, increasing the surface area. More surface area means more places for the heat to create that "shatter" effect we love.
If you've ever wondered why some wings look smooth and others look rugged and crispy, this is the difference maker.
2. The Convection Effect
Even if you don't have a convection oven, we can mimic the effect by using a wire rack. Elevating the wings allows hot air to circulate under the meat, preventing the "soggy bottom" syndrome that happens when chicken sits in its own rendering fat. This is similar to the airflow technique used in a high-quality Air Fryer Chicken Wings recipe, ensuring every millimeter of skin gets hit by the heat.
3. The Moisture Evaporation Phase
Water is the enemy of the crunch. During the first 20 minutes of cooking, the salt and heat work together to drive off any remaining moisture. Once the skin is dry, the fat begins to render, essentially "frying" the skin from the inside out. This transition is where the bold, savory magic happens.
Essential Elements and Bold Substitutes for Every Kitchen
For this Baked Chicken Wings Recipe, we're sticking to high-quality basics that pack a punch. Each element is chosen to stand up to the high roasting temperatures without burning or losing its personality.
- 2 lbs chicken wings: Drums and flats separated. Why this? Separated pieces cook more evenly and are easier to toss in seasonings.
- Substitute: Drumsticks or thighs (increase cook time by 15-20 minutes).
- 1 tbsp aluminum free baking powder: This is the crisping agent. Why this? It creates the signature bubbling texture on the skin.
- Substitute: Cornstarch (it provides crunch but lacks the pH altering bubbling effect).
- 1 tsp fine sea salt: Essential for flavor and moisture control. Why this? Fine grains distribute more evenly across the irregular wing surface.
- Substitute: Kosher salt (use 1.5 tsp to account for larger grain size).
- 1 tsp garlic powder: Provides a savory, umami base note. Why this? Powder won't burn at high heat like fresh minced garlic will.
- Substitute: Onion powder for a sweeter, more mellow savory profile.
- 1/2 tsp smoked paprika: For that signature bold, campfire aroma. Why this? It adds depth and a beautiful red gold color to the finished wing.
- Substitute: Sweet paprika or a pinch of chipotle powder for extra heat.
- 1/2 tsp black pepper: Adds a subtle, sharp bite to the back of the palate. Why this? Freshly ground pepper has more volatile oils for better aroma.
- Substitute: White pepper for a more earthy, floral spice level.
Chef's Tip: If you have the time, let your wings sit uncovered in the fridge on a wire rack for 4 hours (or overnight) before seasoning. This "air chilling" makes the skin incredibly thin and brittle once baked.
The Tool Kit Required for Massive Family Style Batches
Having the right gear makes the difference between a smooth cooking experience and a smoky kitchen disaster. You want tools that allow for maximum heat distribution and easy cleanup.
- Large Rimmed Baking Sheet: A standard half sheet pan (about 45x33 cm) is perfect for 2 lbs of wings.
- Stainless Steel Wire Cooling Rack: This must fit inside your baking sheet. It keeps the chicken off the pan.
- Large Mixing Bowl: You need plenty of space to toss the wings so every nook and cranny gets coated in the rub.
- Tongs: Essential for flipping the wings halfway through without tearing the delicate skin.
- Parchment Paper or Foil: Line the bottom of your baking sheet (under the rack) to catch the dripping fat and make cleanup a breeze.
If you find yourself cooking for a larger crowd, you might want to look into techniques for handling bulk protein, much like the efficiency found in a Shredded Chicken in recipe which focuses on high yield results.
Layering Savory Flavors Through a over High heat Roasting Process

This process is all about patience and heat management. We are moving through distinct phases to ensure the fat renders fully while the skin reaches its maximum potential.
- Dry the poultry. Use paper towels to pat the 2 lbs of chicken wings until they are completely dry to the touch. Note: Any surface moisture will create steam and prevent the skin from crisping.
- Mix the rub. Combine the baking powder, sea salt, garlic powder, smoked paprika, and black pepper in a small bowl. Note: Mixing beforehand ensures even distribution of the active baking powder.
- Dust the wings. Place the wings in a large bowl and sprinkle the rub over them, tossing vigorously. Until every wing is lightly and evenly coated.
- Arrange for airflow. Place the wings on the wire rack set over your prepared baking sheet. Note: Leave space between each wing so the air can circulate freely.
- Start the roast. Place the tray in a preheated 425°F (220°C) oven for 20 minutes. Until the skin begins to turn opaque and pale gold.
- Flip for balance. Use tongs to turn each wing over carefully. Note: Flipping ensures the underside gets direct heat from the top of the oven.
- Continue cooking. Bake for another 20 to 25 minutes. Until the wings are deep golden brown and the skin is visibly bubbling.
- Internal check. Verify the thickest part of a drumette has reached at least 165°F (74°C) with an instant read thermometer.
- The final rest. Remove the tray from the oven and let the wings sit on the rack for 5 minutes. Until the internal juices settle and the crust hardens.
- Toss and serve. Serve them dry with the bold rub or toss them in your favorite hearty sauce while they are still hot.
Solving Texture Issues and Avoiding Common Kitchen Mistakes
Even the best cooks run into a snag now and then. The key is knowing how to pivot when things don't look quite right.
1. My Wings Taste Metallic
This is almost always caused by using baking powder that contains sodium aluminum sulfate. When heated, the aluminum can react with the chicken's proteins to create a tinny or bitter flavor. Always check the label for "Aluminum Free" to keep your flavors bold and clean.
2. The Wings are Sticking to the Rack
If the skin tears when you try to flip them, it means the proteins haven't fully set or the rack wasn't prepared. A light coating of neutral oil on the rack before adding the chicken can help, but usually, it just means they need 5 more minutes of cooking before the "release" happens naturally.
3. Smoke in the Kitchen
As the chicken fat renders and drips onto the baking sheet, it can smoke if the pan is too hot or if there's old residue on the tray. Placing a layer of parchment paper or a thin layer of water in the bottom of the pan (under the rack) can help catch the fat without it reaching the smoking point.
| Problem | Root Cause | Solution |
|---|---|---|
| Soggy Skin | Overcrowded pan | Ensure at least 2 cm of space between wings for airflow. |
| Burned Spices | Oven rack too high | Move the tray to the middle rack to prevent the paprika from scorching. |
| Dry Meat | Overcooked | Check temp at 40 mins; remove once they hit 175°F for the best texture. |
Common Mistakes Checklist:
- ✓ Never skip the pat drying step; even a little moisture ruins the crunch.
- ✓ Don't use baking soda by mistake it will taste terrible and won't crisp the same way.
- ✓ Avoid skipping the wire rack; baking directly on a pan leads to greasy bottoms.
- ✓ Resist the urge to sauce them before baking, as the sugars will burn before the skin crisps.
- ✓ Let the wings rest for at least 5 minutes after cooking to allow the crust to fully set.
Modifying the Batch for Big Parties or Small Meals
Scaling this recipe is straightforward because the ratios are simple. Whether you're making a snack for yourself or feeding a whole football team, the physics remains the same.
Scaling Down (1 lb / 2 servings): You can easily halve the rub. Use a smaller toaster oven tray or a quarter sheet pan. Since there is more air space in the oven, check the wings 5-10 minutes earlier than the recipe suggests, as they may brown faster.
Scaling Up (4-6 lbs / Large Party): When doubling or tripling, do not just double the salt and spices multiply them by 1.5 first and taste, as spices can become overwhelming in large volumes. You will likely need multiple baking sheets. Rotate the trays between the top and bottom racks halfway through the cooking time to ensure even browning across all batches. If you are serving a crowd that loves variety, you might consider pairing these with a Tasty Buffalo Chicken recipe to provide a creamy contrast to the crispy wings.
If you want a specific outcome, try these adjustments: If you want extra heat, add 1/2 tsp of cayenne pepper to the dry rub. If you want a sticky finish, toss the baked wings in a honey glaze and return to the oven for 2 minutes.
If you want maximum crunch, increase the baking powder to 1.5 tbsp and air dry in the fridge for 8 hours.
Debunking Old School Myths About Achieving Crispy Poultry
There is a lot of "grandma's advice" out there that actually hinders the perfect wing. Let's clear up a few of those misconceptions.
Myth: You need oil to make the skin crispy in the oven. Actually, adding oil to the surface can sometimes lead to a "fried" but greasy texture that loses its crunch quickly. The chicken skin already contains a massive amount of fat.
Our goal is to render that natural fat out so the skin becomes thin and brittle. The baking powder method relies on drying the skin, not adding more fat to it.
Myth: High heat (450°F+) is always better for wings. While high heat is good, going too high (like 450°F or 475°F) often burns the spices and the tips of the wings before the fat in the thicker parts has a chance to render.
425°F is the "sweet spot" where the fat renders efficiently while the skin reaches a perfect golden brown without scorching the garlic and paprika.
Preserving Bold Flavors Through Smart Storage and Reheating
If you happen to have leftovers which is rare in my house you need to store them properly to maintain that satisfying texture.
Storage Guidelines: Place cooled wings in an airtight container and keep them in the fridge for up to 4 days. Avoid stacking them too deeply while they are still warm, as the trapped steam will turn the crispy skin soft.
In the freezer, these wings stay good for up to 3 months if stored in a heavy duty freezer bag with the air squeezed out.
The Reheating Secret: Never use the microwave. It will turn your beautiful shatter crust into something resembling wet cardboard. Instead, put them back on a wire rack in a 400°F (200°C) oven for 8 to 10 minutes.
This re renders the fat and brings the crunch back to life.
Zero Waste Tip: Don't toss the wing tips if you bought whole wings and trimmed them yourself! Throw them into a freezer bag. Once you have a couple of pounds of tips and bones, you can boil them with some celery, carrots, and onions to create a rich, bold chicken stock that beats anything in a box.
Hearty Sides That Pair with Your Satisfying Chicken Feast
A bold plate of wings deserves side dishes that can hold their own. Think about textures and flavors that provide a counterpoint to the salty, smoky crunch of the chicken.
For a classic comfort meal, I love serving these alongside a cool, crisp celery salad or a heavy hitting blue cheese dip. If you're looking for something more substantial to round out the table, a creamy pasta or a rich vegetable side works wonders. The tanginess of these wings pairs beautifully with something like a Whole30 Buffalo Chicken recipe if you're keeping things on the spicy side of the spectrum.
If you want to keep the "shatter" theme going, try serving them with some home style potato wedges that have been roasted in the same 425°F oven. The starch from the potatoes and the protein from the wings create a hearty, satisfying meal that feels like a real treat for the whole family.
Whatever you choose, make sure you have plenty of cold drinks and even more napkins on hand you’re going to need them!

High in Sodium
985 mg of sodium per serving (43% of daily value)
The American Heart Association recommends limiting sodium intake to about 2,300mg per day for overall cardiovascular health.
Simple Swaps for Lower Sodium Wings
-
Reduce the Salt-25%
The easiest way to cut sodium is to reduce the amount of salt used. Try using just 1/4 tsp of salt instead of 1 tsp, then adjust to taste after cooking. This alone can significantly lower the sodium content.
-
Omit Salt Entirely-15%
For a more drastic reduction, try making the recipe without any added salt. The other spices will still contribute flavor and you may not even miss it!
-
Flavor Boost
Use more garlic powder, smoked paprika and black pepper to increase the flavor profile without adding sodium.
Recipe FAQs
What is the best method for cooking wings in the oven?
Bake them on a wire rack set over a rimmed baking sheet at 425°F (220°C). This elevated setup allows hot air to circulate completely around the wing, which is crucial for rendering the fat and achieving a shatteringly crisp skin without steaming the bottom.
Should chicken wings be at 350 or 400?
Use 425°F (220°C) for the best balance of crisping and internal cooking. Lower temperatures like 350°F cause the fat to render too slowly, often resulting in rubbery skin, while temperatures much higher can scorch the seasoning before the interior finishes cooking.
Should you cover chicken wings when baking in the oven?
No, never cover them when aiming for a crispy skin. Covering traps steam, which is the enemy of crispiness, resulting in moist, soft skin instead of the desired brittle texture. Keep them uncovered for the entire bake time.
How long do I put wings in the oven at 400 degrees?
Bake for a total of 40 to 45 minutes, flipping halfway through. At 400°F, you'll need roughly 20 minutes per side. However, for a better crust, move the temperature up to 425°F and aim for an internal temperature of 175°F for optimal texture.
What is the secret ingredient for extra crispy baked wings?
Aluminum free baking powder is the key ingredient. This ingredient raises the skin’s pH, which speeds up the Maillard reaction and dries out the surface effectively. If you enjoyed mastering the surface chemistry here, apply the same logic to controlling crust development in our Lemon Garlic Butter recipe for beautifully textured poultry.
Why are my baked wings still tasting rubbery?
The skin hasn't rendered its internal fat yet, usually due to insufficient temperature or time. Wings benefit from higher internal temperatures than breast meat; aim for 175°F to 185°F to melt the collagen into gelatin, ensuring juicy meat beneath that thin, crisp exterior.
How do I prevent my spices from burning before the wings are done?
Mix spices with the baking powder rather than applying them separately after baking. The baking powder acts as a buffer and helps the seasoning adhere evenly. To prevent scorching, ensure your oven rack is in the middle position and use a blend heavy on powdered spices rather than fresh garlic.
Crispy Baked Chicken Wings
Ingredients:
Instructions:
Nutrition Facts:
| Calories | 438 kcal |
|---|---|
| Protein | 41.5 g |
| Fat | 27.2 g |
| Carbs | 1.2 g |
| Fiber | 0.2 g |
| Sugar | 0.1 g |
| Sodium | 985 mg |
