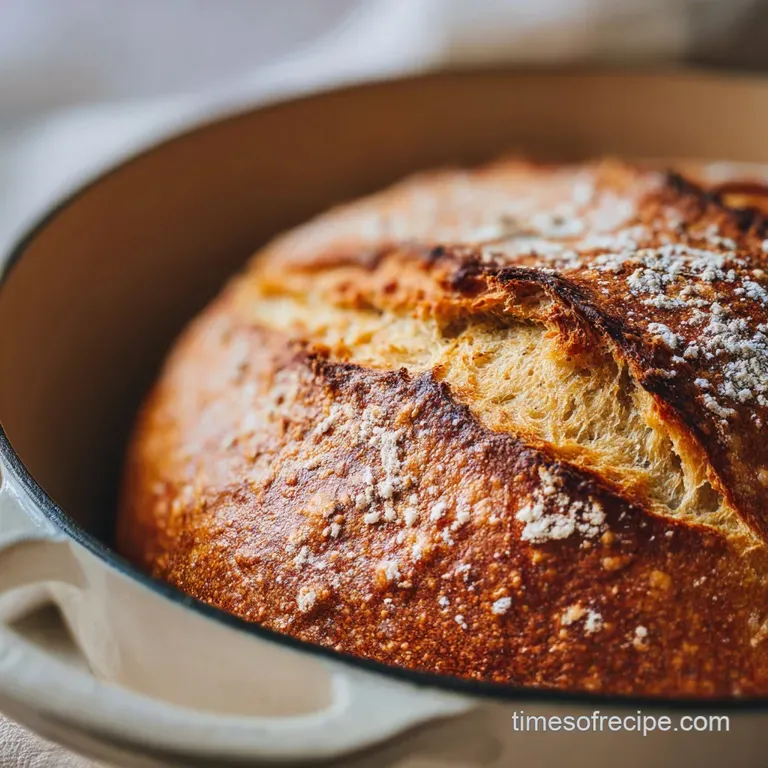
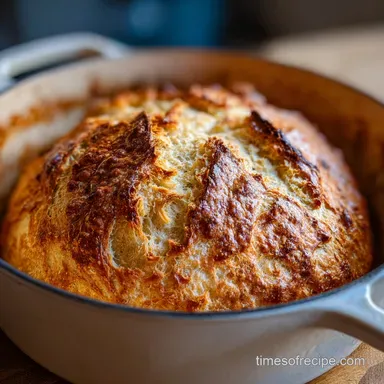
Easy Dutch Oven No Knead Bread
- Time: Active 15 minutes, Passive 18 hours 35 mins, Total 18 hours 50 mins
- Flavor/Texture Hook: A shatter crisp dark mahogany crust with a pillowy, airy, and slightly tangy interior.
- Perfect for: Slow weekend mornings, serving alongside hearty family roasts, or beginner bakers who hate cleaning up floury counters.
- Master the Easy Dutch Oven No Knead Bread
- The Magic of Lazy Molecules
- Essential Specifications for This Recipe
- Choosing Your Basic Ingredients
- Essential Tools for a Loaf
- Step by Step Baking Guide
- Solving Common Baking Problems
- Creative Flavor Variations
- Preserving That Fresh Texture
- Hearty Pairings for Your Bread
- Myth: Kneading is Mandatory
- Myth: Sugar is Needed to "Feed" Yeast
- Recipe FAQs
- 📝 Recipe Card
Master the Easy Dutch Oven No Knead Bread
You know that sound when you pull a fresh loaf out of the oven and it actually starts to "sing"? It's this tiny, high pitched crackle as the cool air hits the hot crust, and it is honestly one of the most satisfying things you can experience in a kitchen.
For years, I avoided bread because I thought I needed some massive stand mixer or the arm strength of a professional wrestler to get it right. Then I discovered this easy dutch oven no knead bread method, and it changed my entire Sunday routine.
This isn't about perfection or fancy techniques; it's about the contrast between a rugged, almost charred exterior and a snow white, velvety crumb that feels like a cloud. I remember the first time I made this for my family - the house smelled like a professional bakery, and my kids were hovering by the oven door like it was Christmas morning.
We didn't even wait for it to cool; we just tore into it with cold butter and a sprinkle of flaky salt. It was messy, it was hot, and it was the best thing we'd eaten all week.
We're going to use a ridiculously small amount of yeast and let time do all the heavy lifting for us. You don't need to sweat over a counter or worry about "developing the windowpane." If you can stir a spoon in a bowl, you can make this loaf.
It’s hearty, it’s bold, and it’s the kind of comfort food that makes a house feel like a home. Let's get into the science of why this works so well without any elbow grease.
The Magic of Lazy Molecules
Fermentation as a Natural Kneader: When you leave the dough alone for 18 hours, enzymes break down the proteins into gluten, while the CO2 bubbles act like tiny, microscopic hands that stretch the dough from the inside out.
This slow process creates a much deeper, more complex flavor than a quick rise bread ever could.
The Steam Chamber Effect: The heavy lid of your dutch oven traps the moisture evaporating from the dough, creating a humid environment that keeps the surface soft and allows the bread to expand fully before the crust sets.
This is how you achieve that incredible "shatter" texture rather than a tough, leathery skin.
| Cooking Method | Cook Time | Texture Outcome | Best For |
|---|---|---|---|
| Dutch Oven | 45 minutes | Shatter crisp crust, high rise | Classic artisan loaves |
| Standard Oven (Tray) | 35 minutes | Thinner, softer crust, wider spread | Focaccia style or rolls |
| Cast Iron Skillet | 40 minutes | Very crunchy bottom, rustic look | Smaller, denser boules |
The choice of vessel really changes the game, but the dutch oven remains king for that professional bakery look. If you find yourself wanting something a bit faster on a weeknight, you might enjoy experimenting with a Soft Naan Bread recipe which uses a skillet for a completely different kind of pillowy softness.
Essential Specifications for This Recipe
This recipe is built on a high hydration ratio, which means the dough will feel shaggy and sticky at first - don't panic. We are looking for a wet environment to ensure those big, beautiful air pockets form during the long ferment.
Since we are using exactly 400g of flour and 350ml of water, every gram counts for that specific crumb structure.
| Ingredient | Science Role | Pro Secret |
|---|---|---|
| All purpose Flour | Provides the starch matrix | Weigh it for consistency; 400g is about 3 loose cups. |
| Sea Salt | Tightens gluten & regulates yeast | Never skip it; it's the difference between "flat" and "flavorful." |
| Active Dry Yeast | Biological leavener | 1g is enough because the long time frame allows for massive colonies. |
Chef's Tip: If your kitchen is particularly cold (below 18°C), move your bowl to the top of the fridge or inside a turned off oven with the light on to help the yeast stay active during the long rest.
Choosing Your Basic Ingredients
To get that hearty, satisfying result, you only need four staples. I always keep these in my pantry because you never know when the craving for warm bread will hit.
- 400g All purpose flour: Why this? Provides a tender crumb while still being strong enough to hold air bubbles.
- Substitute: Bread flour for a chewier, more "rubbery" artisan texture.
- 8g Sea salt: Why this? Enhances the natural sweetness of the wheat and controls fermentation speed.
- Substitute: Kosher salt (use 10g if it’s a coarse grain).
- 1g Active dry yeast: Why this? A tiny amount prevents the bread from tasting overly "yeasty" or sour.
- Substitute: Instant yeast (same amount, no need to bloom).
- 350ml Lukewarm water: Why this? Hydrates the flour and wakes up the dormant yeast gently.
- Substitute: Room temperature light beer for a malty, sourdough adjacent flavor profile.
Essential Tools for a Loaf
You don't need a lot of gear, but a heavy bottomed pot is non negotiable for this easy dutch oven no knead bread. I use a 5 quart enameled cast iron pot, but a plain seasoned cast iron one works just as well.
- Large Mixing Bowl: Plenty of room for the dough to double or triple in size.
- Sturdy Spatula or Wooden Spoon: For that initial "shaggy mass" mix.
- Parchment Paper: Essential for transferring the sticky dough into a screaming hot pot safely.
- Digital Scale: This is my best friend for bread; it’s so much more accurate than measuring cups.
- Oven Mitts: Heavy duty ones, because we’re cranking the heat up to 230°C.
step-by-step Baking Guide

1. Initial Dough Mixing
Whisk the 400g flour, 8g salt, and 1g yeast in your bowl. Pour in the 350ml lukewarm water and stir until a sticky, shaggy ball forms. Note: Don't overmix; you just want no dry flour streaks visible.
2. The Long Nap
Cover the bowl tightly with plastic wrap and let it sit at room temperature for 18 hours. Wait until the surface is dotted with bubbles and the dough has doubled in size.
3. Preheating and Shaping
Place your empty dutch oven inside the oven and preheat to 230°C for 30 minutes. While that heats, scrape the dough onto a floured surface and fold it over itself a few times until it forms a rough ball.
4. The Transfer
Carefully place the dough onto a piece of parchment paper. Lift the paper and drop the whole thing into the hot dutch oven. Note: The steam from the dough will start to sizzle against the hot iron immediately.
5. The Controlled Bake
Cover with the lid and bake for 30 minutes. This is the "steam phase" where the bread gets its height.
6. Achieving the Final Crisp
Remove the lid and bake for another 15 minutes until the crust is dark golden brown. The aroma in your kitchen right now should be incredible.
7. The Final Checkpoint
Tap the bottom of the loaf; it should sound hollow. If you have a thermometer, the internal temperature should hit 98°C.
8. The Cooling Torture
Transfer to a wire rack and let it sit for at least 1 hour. Wait until it's completely cool before slicing to prevent the inside from becoming gummy.
| Problem | Root Cause | Solution |
|---|---|---|
| Crust is pale | Oven temp too low | Ensure a full 30 min preheat at 230°C. |
| Loaf is flat | Dead yeast or over proofed | Check yeast expiration and stick to the 18 hour window. |
| Bottom is burnt | Pot is too close to heat | Place a baking sheet on the rack below the pot. |
Solving Common Baking Problems
Handling Sticky Dough
If your dough feels more like batter than bread, don't keep adding flour. This recipe is meant to be wet! Use a well floured bench scraper or just floured hands to move quickly. The high hydration is what gives you those "holey" artisan results that look so bold on a dinner table.
Fixing Gummy Crumb
Cutting into hot bread is the biggest mistake you can make. The cooking process actually continues while the loaf cools. If you slice it while it's steaming, that steam escapes, and the starches collapse into a gummy, sticky mess. Give it the full hour - it's worth it.
Common Mistakes Checklist: ✓ Forgot to preheat the pot (results in bread sticking to the bottom). ✓ Using cold water (slows down the yeast too much for the 18 hour window). ✓ Not covering the bowl tightly (creates a dry "skin" on the dough).
✓ Slicing too early (ruins the internal texture and makes it chewy). ✓ Skimping on the salt (results in a very bland, boring loaf).
Creative Flavor Variations
Once you’ve mastered the base recipe, you can start getting bold with your additions. My family loves it when I fold in 100g of sharp cheddar and some pickled jalapeños during the shaping phase. If you're looking for something simpler to pair with tea, you might want to check out my Filipino Recipe Pandesal for a softer, sweeter roll option.
Rosemary Garlic Twist
Fold in 2 tablespoons of chopped fresh rosemary and 3 cloves of minced garlic before the long ferment. The garlic mellows out during the bake, creating a sweet, savory aroma that fills the whole house. It’s perfect for dipping into balsamic vinegar and olive oil.
Everything Bagel Swap
After the 30 minute covered bake, brush the top of the loaf with a tiny bit of water and sprinkle generously with everything bagel seasoning. Finish the bake uncovered. The seeds get toasted and nutty, adding a satisfying crunch to every bite.
Whole Wheat Adjustment
Replace 100g of the all purpose flour with whole wheat flour. You might need an extra tablespoon of water, as whole grains absorb more liquid. This adds a hearty, nutty flavor and a slightly denser, more satisfying bite that feels very "farmhouse rustic."
| Goal | If you want... | Then do this... |
|---|---|---|
| Extra Crunch | A thicker, darker crust | Leave it uncovered for 20 mins instead of 15. |
| Softer Loaf | A sandwich style texture | Add 1 tbsp of olive oil to the water. |
| Sourdough Tang | That signature sour flavor | Let the dough sit in the fridge for an extra 24 hrs. |
Preserving That Fresh Texture
Storing homemade bread is different than store-bought because we haven't added any preservatives. To keep that crust shatter crisp, never store it in a plastic bag at room temperature; it will turn soft and rubbery within hours.
- Room Temp
- Keep it cut side down on a wooden board for 24 hours. Or wrap it in a clean tea towel.
- Fridge
- Honestly, don't do it. The fridge recrystallizes the starches and makes bread go stale faster.
- Freezer
- Slice the loaf first, wrap it tightly in foil, and freeze for up to 3 months. You can toast the slices straight from frozen!
Zero Waste Tip: Don't you dare throw away those stale ends! They make the best croutons you've ever had. Cube them, toss with olive oil and garlic powder, and bake at 180°C until they are golden and loud when you crunch them.
You can also pulse stale chunks in a food processor for high-quality breadcrumbs.
Hearty Pairings for Your Bread
This bread is a meal in itself, but it really shines when it’s playing backup to something bold. Because it has such a sturdy structure, it’s the ultimate tool for mopping up sauces and soups.
Perfect Soup Companion
There is nothing more satisfying than a thick slice of this bread dunked into a creamy tomato basil soup or a chunky beef stew. The airy holes in the crumb act like little sponges, soaking up all that hearty broth without falling apart.
Skip Restaurant Prices
You can easily turn this loaf into a gourmet appetizer. Slice it thick, toast it under the broiler, and top it with smashed avocado, chili flakes, and a poached egg. If you’re feeling like a bit of a fusion night, use the bread as a base for a Garlic Bread Pizza recipe by adding marinara, mozzarella, and pepperoni before a quick second bake. It’s a huge hit for family movie nights!
Myth: Kneading is Mandatory
Many people believe that without 10 minutes of intense kneading, your bread will be a brick. This is completely false. Time is the most effective kneader in nature. By allowing the dough to sit for 18 hours, you are allowing the chemical bonds to form naturally.
You get the same, if not better, gluten structure with zero physical effort.
Myth: Sugar is Needed to "Feed" Yeast
You'll often see recipes adding a teaspoon of sugar to "activate" the yeast. While sugar does speed things up, it's not necessary. Yeast is perfectly happy eating the complex sugars naturally found in the flour.
In a long ferment recipe like this, adding sugar would actually make the fermentation happen too fast, robbing the bread of its deep, characteristic flavor.

Recipe FAQs
Must I use a Dutch Oven for this recipe?
No, but it is highly recommended. The heavy, lidded pot traps steam, which creates the signature crackling, artisan crust and allows for maximum oven spring.
Why does the dough feel so sticky and loose?
This is correct for a no-knead bread. The high hydration (wetness) is what allows time, not physical work, to develop the necessary internal gluten structure.
How long exactly does the initial room temperature rest need to be?
Aim for 18 hours, give or take 2 hours. The dough should significantly increase in volume, be bubbly, and show signs of fermentation activity.
How to transfer the sticky dough into the preheated Dutch Oven?
Use parchment paper as a sling. Gently fold the dough into a rough ball on a generously floured surface, then lift it using the parchment paper underneath and lower it directly into the screaming hot pot.
Is it true that I can substitute all-purpose flour with whole wheat flour?
Yes, but adjust the liquid slightly. You can substitute up to 100g of the white flour with whole wheat, but be prepared to add an extra tablespoon of water as whole grains are more absorbent.
Why is my crust pale instead of deeply browned?
The oven temperature dropped or the bake time was too short. Ensure your oven is fully preheated at 230°C for at least 30 minutes with the pot inside, and bake uncovered for the final 15 minutes to set the color.
What is the best way to store leftover bread to maintain the crust texture?
Store at room temperature, cut-side down, on a wooden board. Avoid plastic bags, which trap moisture and turn the crispy crust soft; this technique preserves the shatter effect longer.
Dutch Oven No Knead Bread
Ingredients:
Instructions:
Nutrition Facts:
| Calories | 146 calories |
|---|---|
| Protein | 4.0 g |
| Fat | 0.4 g |
| Carbs | 30.4 g |
| Fiber | 1.1 g |
| Sugar | 0.1 g |
| Sodium | 310 mg |
