Bisquick Chicken Pot Pie: Chefs Quick-Fix Recipe for Busy Nights
- Setting the Stage: The Sunday Night Star: Chef’s Quick-Fix Bisquick Chicken Pot Pie
- The Science of Comfort: Why the Bisquick Topping is Superior
- Essential Components for the Bisquick Chicken Pot Pie
- Baking Your Ultimate Bisquick Chicken Pot Pie (The Method)
- Troubleshooting: Chef’s Secret Tips for a Flawless Bake
- Planning Ahead: Storing and Reheating Your Casserole
- What to Serve Alongside This Hearty Supper
- Recipe FAQs
- 📝 Recipe Card
Setting the Stage: The Sunday Night Star: Chef’s Quick Fix Bisquick Chicken Pot Pie
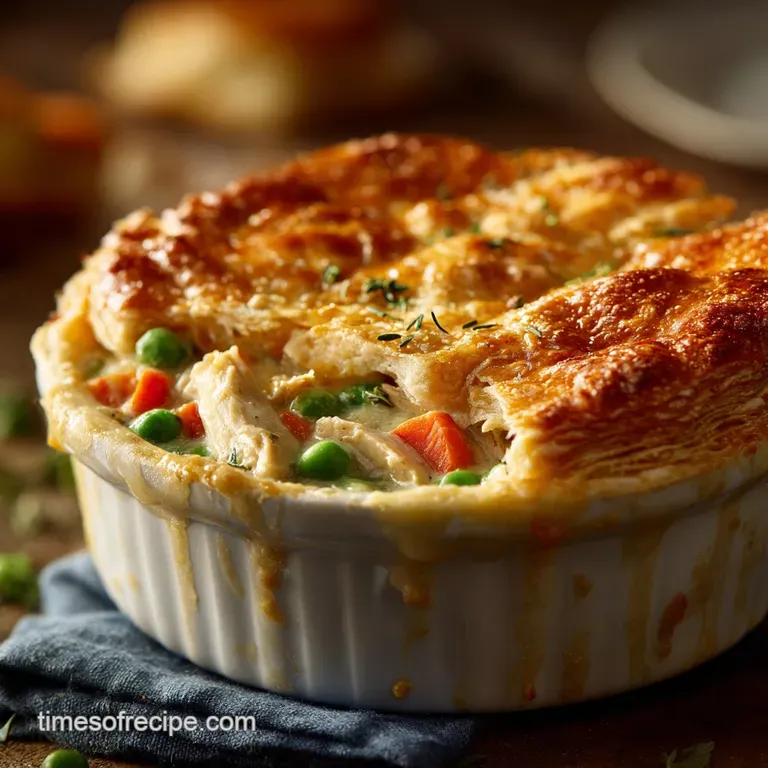
The moment that dish comes out of the oven is pure magic. That rich, savory steam hits you immediately, promising deep, soothing comfort in every spoonful. Seriously, the golden brown, biscuit style topping is so delightfully puffy and tender; it cradles the creamy filling perfectly.
This particular bisquick chicken pot pie recipe is a true lifesaver for busy weeknights, or for when you just can’t be bothered with fiddly pastry. Forget complicated doughs that demand chilling time.
We’re leaning on the brilliance of a pantry staple to deliver maximum flavor with minimum fuss. It’s fast, it’s cheap, and it tastes like you slaved all day.
If you’re ready to conquer the ultimate comforting bisquick chicken pot pie casserole without breaking a sweat, grab your apron. Let’s crack on with the secrets to making this dish thick, creamy, and undeniably superior.
The Science of Comfort: Why the Bisquick Topping is Superior
The Anatomy of a Perfect Pot Pie Supper
Every successful pot pie needs two things: a rich, well seasoned filling that doesn’t run everywhere, and a light, structural topping. This recipe focuses on creating a stable, luscious sauce using a proper roux.
That means your filling stays exactly where you want it coating the chicken and vegetables beautifully.
More Than a Shortcut: The Fluffy Bisquick Advantage
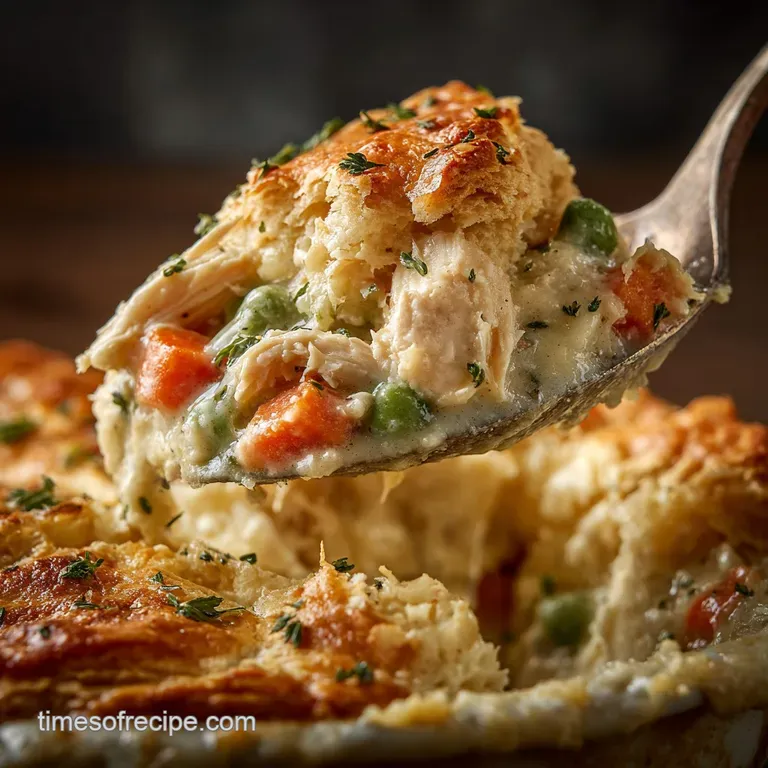
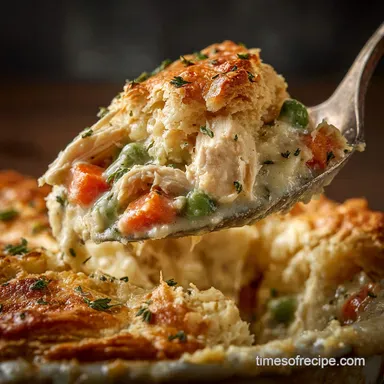
Using Bisquick isn't just about speed, although that's huge. The biggest advantage of the bisquick chicken pot pie topping is its texture; it puffs up much higher and softer than traditional pastry. It has this incredible cloud like quality that absorbs some of the steam from the filling, keeping it moist while the top crisps up. It's truly a genius move, creating that nostalgic, fluffy biscuit feel over your savory stew. If you love quick savory bakes, this easy topping method is similar to the genius we use in recipes like my Breakfast Hand Pies: Flaky, Fully Loaded Savory Pockets .
Preparation Time Snapshot (Prep, Cook, Total)
We are talking about pure efficiency here. You can easily have this savory bisquick chicken pot pie bubbling on the table in under an hour. Most of that time is hands off baking.
Achieving the Ideal Biscuit Style Consistency
The secret to the perfect bisquick chicken pot pie crust is minimal mixing. You want a thick, shaggy batter not a smooth paste. Overmixing develops gluten, which makes the topping tough and heavy, and we are aiming for light and airy comfort food here.
Creating the Rich, Creamy Filling Base
The depth of flavor comes from cooking the flour (making a roux) until it smells slightly nutty before adding the liquids. This simple step eliminates that unpleasant, raw flour taste that ruins otherwise good casseroles. Don't skip the seasoning step!
The Golden Ratio: Filling-to-Topping Balance
I prefer a slightly deeper filling than a mountain of topping, which is why this recipe uses a generous amount of liquid. If you use a wide, shallow dish (like a 9x13 pan for a larger batch), ensure you increase the topping mixture slightly so you get adequate coverage.
You want a decent layer of fluffy topping over every scoop of filling.
Essential Components for the Bisquick Chicken Pot Pie
Mastering the Pot Pie Filling Ingredients List
This recipe is designed to be pantry friendly, utilizing ingredients you likely already have on hand. The non-negotiables are the Bisquick mix, some kind of creamy liquid, and cooked chicken. Using low-sodium broth allows you to control the final seasoning perfectly.
Selecting the Best Bisquick Mix (Original vs. Reduced Fat)
Honestly, stick to the Original Bisquick Baking Mix if you can. The slight extra fat content results in a richer, more tender biscuit topping. The reduced fat versions can sometimes dry out faster or result in a tougher texture. Remember, this is comfort food, not diet food!
Dairy and Seasoning Notes: Ingredient Swaps for the Base
If you don't have exactly what the recipe calls for, don’t panic! Substitutions are the mark of a true home cook.
| Ingredient to Swap | Viable Alternative | Chef’s Reasoning |
|---|---|---|
| Cooked Chicken | Cooked Turkey, or two 5oz cans of Tuna (well drained) | Great use for Thanksgiving leftovers! Just ensure the protein is already cooked. |
| Whole Milk | Half and Half or Evaporated Milk | Adds extra richness and helps thicken the filling beautifully. |
| Dried Thyme | Dried Poultry Seasoning or Dried Sage | These herbs complement the filling flavor perfectly, offering a similar earthy warmth. |
| Bisquick Mix | Specific gluten-free All-Purpose Baking Mix | Ensure the GF mix is formulated for biscuits/pancakes and designed to be "just add milk." |
Baking Your Ultimate Bisquick Chicken Pot Pie (The Method)
Step 1: Preparing and Simmering the Pot Pie Base
Start by preheating your oven to 400°F. Melt your butter, then soften your diced onion until it's beautifully translucent about five minutes. Now, sprinkle in the flour to make the roux. Cook that roux for a full minute, stirring constantly, until you smell a subtle, nutty aroma.
This is critical! Slowly whisk in your broth and then your milk, whisking until smooth and lump free. Simmer until the sauce thickens enough to coat the back of a spoon. Finally, fold in the cooked shredded chicken and the thawed, drained mixed vegetables.
Transfer this hot, creamy filling to your prepared baking dish.
Step 2: Mixing the Cloud Like Bisquick Topping Batter
In a separate bowl, gently combine the Original Bisquick Baking Mix with the cold milk. You need to stir it just until everything is moistened. A few lumps are totally fine; in fact, they’re preferred for a light topping!
Overmixing will lead to a tough, bready result, which we are absolutely avoiding.
Step 3: Layering and Baking Until Golden Brown
Spoon the thick Bisquick mixture directly over the hot filling in your dish. Don’t worry about spreading it perfectly or making it look immaculate. It will spread out as it bakes. Place the dish into the preheated oven and bake for 25 to 30 minutes.
You know it’s ready when the topping is gorgeously golden brown and a clean toothpick inserted into the thickest part comes out clean. The filling edges should be actively bubbling.
Step 4: Resting Time: Why You Must Wait Before Serving
I know, you're starving. But trust me, you must wait! Pull the pot pie out and let it rest on a cooling rack for 5 to 10 minutes. This mandatory resting period allows the piping hot filling to set up slightly, making it scoopable instead of a runny mess.
It also prevents you from scalding your mouth, which I may or may not have done once in my impatience.
Chef’s Note: The temperature difference between the hot filling and the cool Bisquick batter is essential. The heat immediately hits the batter, helping it rise and minimizing the time the bottom spends soggy. Make the topping last!
Troubleshooting: Chef’s Secret Tips for a Flawless Bake
Why Your Filling Might Be Runny (And How to Fix It)
This is the number one complaint with pot pies! If you have a runny filling, it’s usually because you didn't cook the roux long enough in Step 1, or you didn't let the sauce simmer long enough to thicken before adding the chicken.
Fix: If the pie comes out runny, let it rest for a full 15 minutes instead of 5. If it’s still too thin, next time, add an extra tablespoon of flour to your roux.
Ensuring the Topping Cooks Through Completely
If your topping is golden on top but still raw underneath, your oven might be too hot or the dish is too close to the heating element. Try moving the rack lower for the last 10 minutes, or tent the top with foil if it’s browning too fast.
Boosting the Flavor Profile (Salt and Herb Adjustments)
Don't be shy about seasoning. Since you are starting with cooked chicken and canned broth, you need to add plenty of salt and pepper to ensure the bisquick chicken pot pie recipe easy doesn't taste bland.
Taste the filling just before you add the chicken and veg; it should taste slightly too salty and herbaceous at that stage, because once the Bisquick absorbs some of that moisture, the flavor will balance out.
Planning Ahead: Storing and Reheating Your Casserole
Refrigerating Leftovers Safely (Up to 4 Days)
Leftovers store beautifully! Cool the pot pie completely, then cover the baking dish tightly with plastic wrap or transfer portions to airtight containers. It keeps well in the refrigerator for up to 4 days.
Freezing Unbaked vs. Baked Pot Pie
I highly recommend freezing this baked rather than unbaked. The Bisquick topping texture changes when frozen raw. To freeze a fully baked bisquick chicken pot pie casserole , cool it completely, wrap it tightly in plastic wrap, and then foil. It lasts for up to 3 months.
Thaw overnight in the fridge before reheating.
Reheating the Casserole Without Drying Out the Crust
To reheat leftovers, the oven is best. Preheat to 325°F (160°C). Cover the dish loosely with foil and bake for 20– 25 minutes until the filling is bubbling hot. Microwaving works in a pinch, but the topping will lose its crispness and get a bit soft.
What to Serve Alongside This Hearty Supper
This dish is rich and substantial, so you definitely want something fresh to cut through the creaminess. I usually opt for a simple, bright side. A basic green salad tossed in a sharp Dijon vinaigrette is perfect. If you’re really leaning into the comfort food theme, a side of roasted root vegetables, lightly tossed in olive oil and rosemary, also pairs beautifully. This meal provides the same kind of deep satisfaction as a good, slow cooked dish, much like my favorite Pastalaya: The Creamy One-Pot Cajun Chicken and Andouille Recipe .

Recipe FAQs
Why is my Bisquick topping tough or crumbly instead of fluffy?
A tough topping usually results from overmixing the Bisquick dough; you should only mix until the ingredients are just combined to avoid developing the gluten. If it's crumbly, ensure you are using the correct amount of milk or water, as proper hydration is key to that signature pillowy texture.
Always use cold milk for the best rise.
My chicken pot pie filling is too runny. How can I fix this?
The filling is likely too runny if the roux (butter and flour base) wasn't cooked long enough or if the mixture wasn't allowed to simmer and reduce sufficiently. For future batches, ensure the filling simmers gently for a full five minutes before baking, which allows the starches to fully activate and thicken the sauce.
If it's too late, you can serve the pie with a slotted spoon to leave excess liquid behind.
Can I use leftover roasted turkey or canned chicken for this recipe?
Absolutely. Cooked, shredded turkey or pre-cooked chicken works perfectly and significantly cuts down on preparation time. You should aim for about two cups of shredded meat to maintain the proper meat-to-filling ratio specified in the recipe for the best savory balance.
Just ensure the meat is well drained if using canned varieties.
How can I convert this classic pot pie into a vegetarian dish?
To make this vegetarian, substitute the chicken with hearty vegetables like diced butternut squash, cubed potatoes, and sautéed mushrooms for texture and depth. Use high-quality vegetable broth instead of chicken broth, and consider adding a savory element like nutritional yeast or a dash of soy sauce to replicate the umami profile.
Can I prepare the pot pie filling ahead of time?
Preparing the filling 24 hours in advance is an excellent time saver and does not negatively affect the finished product. Cool the filling completely before covering and refrigerating it.
Note that the filling will thicken significantly when chilled, so you may need to stir in a small splash of broth or milk when reheating it slightly just before topping and baking.
What is the best way to store leftovers, and does Bisquick Pot Pie freeze well?
Leftovers can be stored in the refrigerator for 3 to 4 days in an airtight container and reheated in the oven or microwave. While the filling freezes very well, the Bisquick topping tends to become slightly mushy and lose its texture upon thawing and reheating.
For the best quality, freeze the filling separately before adding a freshly made topping upon baking.
My topping is browning too quickly before the filling is heated through; what should I do?
If the biscuit topping is achieving a deep golden color too rapidly, loosely tent the baking dish with a sheet of aluminum foil. This crucial step deflects the direct heat from the top element, allowing the filling ample time to fully heat through without burning the delicate biscuit surface.
Check it again about 10 minutes before the end of the baking time.
Easy Bisquick Chicken Pot Pie Recipe
Ingredients:
Instructions:
Nutrition Facts:
| Calories | 765 kcal |
|---|---|
| Protein | 50.7 g |
| Fat | 17.8 g |
| Carbs | 86.7 g |
