Creamy Chickpea Skillet: an Easy Vegan Dinner
- Time: Active 5 minutes, Passive 10 minutes, Total 15 minutes
- Flavor/Texture Hook: Shatter crisp chickpea skins in a glossy, smoked paprika cream
- Perfect for: High protein weeknight dinner or post workout refueling
- Make a 15 Minute Easy Vegan Recipe with Chickpeas
- Efficiency Metrics and Nutritional Success
- Component Analysis and Ingredient Roles
- Sourcing High Impact Vegan Ingredients
- Tools for Minimalist Kitchen Workflow
- Precision Cooking Steps for Maximum Flavor
- Avoiding Mistakes and Solving Texture Issues
- Scaling Formulas for Any Group Size
- Freshness Retention and Resourceful Repurposing
- Flavor Variations and Kitchen Myths
- Recipe FAQs
- 📝 Recipe Card
Make a 15 Minute Easy Vegan Recipe with Chickpeas
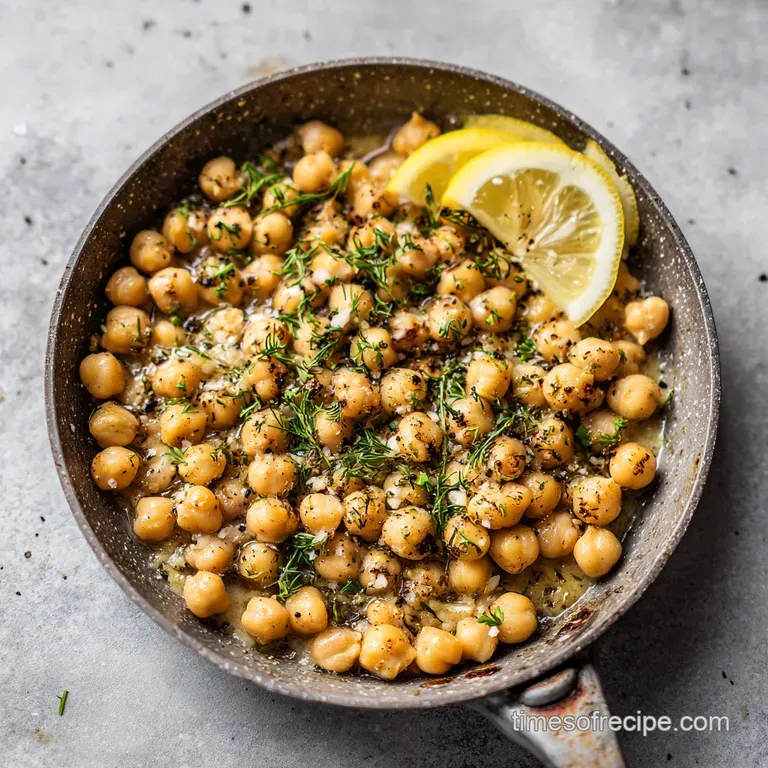
The sound of chickpeas hitting a hot, oiled skillet is one of my favorite kitchen triggers. It starts as a sharp hiss and settles into a steady, rhythmic pop and crackle. I remember the first time I tried this technique.
I was rushing home from the gym, staring at a pantry that looked bleak, and I just wanted something that didn't taste like "health food" mush. I threw the beans in the pan, got distracted by a text, and let them sit for three minutes. That mistake changed everything.
The skins hadn't just browned, they had become mahogany and crisp, providing a structural snap that most chickpea recipes lack.
We've all had those vegan meals that feel like a compromise, especially when you're busy and just grabbing whatever is in the cupboard. This recipe is the antidote to the "soggy bean" syndrome.
It relies on a heavy bottomed skillet and a few high impact pantry staples to create a meal that feels intentional rather than accidental. We aren't just heating things up; we're building layers of texture in a single pan with minimal cleanup.
It's efficient, nutrient dense, and honestly, the smoky aroma that fills the kitchen in under ten minutes is better than any takeout.
Right then, let's talk about what you're actually getting here. You’re looking at 12.6 grams of protein per serving and a texture profile that ranges from the crunch of the sear to the silkiness of the coconut milk.
By the time the lemon juice hits the pan at the very end, brightening the heavy fats and the earthy spices, you'll realize that "quick" doesn't have to mean "flat." This is the strategy I use when I have zero mental energy but still want a meal that hits every sensory note.
Efficiency Metrics and Nutritional Success
Success in a fast kitchen depends on understanding how heat and moisture interact. This isn't about complex chemistry, it's about making sure your ingredients don't fight each other in the pan. We want to maximize the "browning" of the beans while keeping the garlic from turning bitter.
- Surface Dehydration: Drying the chickpeas is the most critical step because moisture on the surface creates steam, which prevents the skins from reaching the 300°F (150°C) required for a crispy texture.
- Fat Soluble Infusion: Smoked paprika and red pepper flakes release their aromatic compounds much more effectively when toasted in oil rather than boiled in liquid.
- Aquafaba Emulsion: The starch and protein in the reserved 2 tablespoons of chickpea liquid act as a natural binder, helping the fat in the coconut milk cling to the beans.
- Staggered Thermal Management: We start with high heat for the sear, then drop it significantly before adding garlic and greens to preserve their delicate oils and prevent scorching.
| Method | Total Time | Texture Outcome | Best For |
|---|---|---|---|
| Fast Skillet (This Recipe) | 15 minutes | Crispy skins, silky sauce | Busy weeknights, 1-2 people |
| Traditional Braise | 45 minutes | Soft, melt in-mouth beans | Meal prep, large batches |
| Sheet Pan Roast | 30 minutes | Very crunchy, dry finish | Salads, snacking |
Building a meal around a single can of beans requires a specific workflow to ensure everything finishes at the same time. While the chickpeas are searing undisturbed for 3 minutes, you have the perfect window to slice your garlic and chop the parsley.
This overlap is how we keep the total clock under 15 minutes without feeling rushed or chaotic.
Component Analysis and Ingredient Roles
The choice of ingredients in this recipe with chickpeas is dictated by how much flavor they can provide in a very short window. Since we don't have hours to develop a base, we use nutritional yeast and smoked paprika to do the heavy lifting.
| Ingredient | Science Role | Pro Secret |
|---|---|---|
| Chickpeas | Starch/Protein Base | Use "no salt added" to control the seasoning profile exactly. |
| Coconut Milk | Fat/Emulsifier | Full fat is mandatory; the medium chain triglycerides provide the "mouthfeel" of cream. |
| Nutritional Yeast | Glutamate Source | Adds a savory "cheese like" depth without the need for fermentation. |
| Lemon Juice | Acid Catalyst | Brightens the fats and breaks down the iron rich spinach for better absorption. |
Every element here serves a dual purpose. The olive oil isn't just for sautéing; it carries the heat into the tiny crevices of the chickpea skins. The smoked paprika adds both color and a wood fired depth that mimics the flavor of a slow smoked dish. If you find yourself frequently making vegan pasta dishes, you'll recognize this balance of fat and acid as the key to a satisfying finish.
Sourcing High Impact Vegan Ingredients
When you're making an easy vegan recipe, the quality of your canned goods actually matters more because there's nowhere for "off" flavors to hide. I always look for chickpeas that aren't overly mushy in the can brands that use less calcium chloride often have a better, more natural texture.
- Chickpeas (1 can, 15 oz): Drain them, but keep those 2 tablespoons of liquid. Why this? The liquid provides essential starches for the sauce.
- Extra Virgin Olive Oil (1 tbsp): Use something with a peppery finish. Why this? high-quality oil adds a necessary fruity top note.
- Garlic (3 cloves): Slice them into thin "chips" rather than mincing. Why this? Thin slices brown evenly without burning as fast.
- Full fat Coconut Milk (1/2 cup): Shake the can before measuring. Why this? Ensures the fat and water are integrated before hitting the heat.
- Nutritional Yeast (1 tbsp): This is your umami bomb. Why this? It bridges the gap between the earthiness of the beans and the richness of the milk.
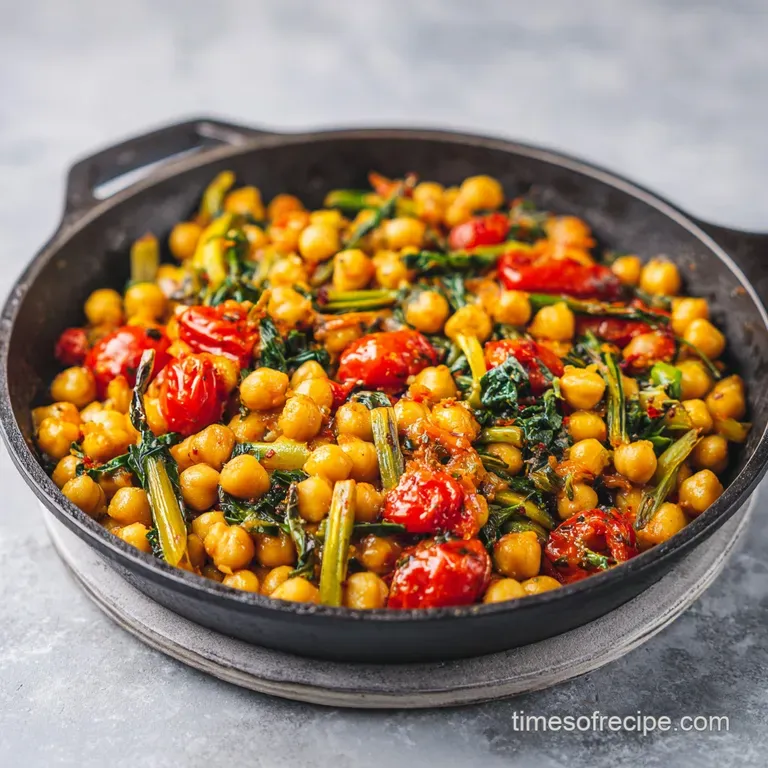
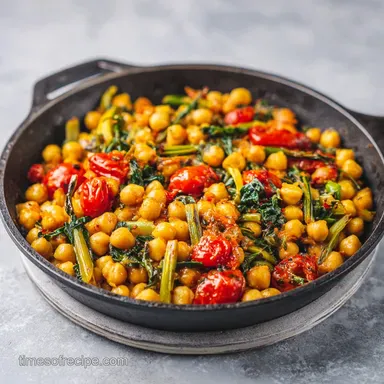
- Fresh Baby Spinach (2 cups): Use pre washed for speed. Why this? It wilts in seconds and adds essential color and iron.
- Smoked Paprika & Red Pepper Flakes: Why this? Paprika for depth, flakes for a controlled, back of-the throat heat.
For substitutions, if you aren't a fan of coconut, you can use cashew cream or a very thick oat milk. Just be aware that oat milk is much higher in sugar and might result in a sweeter sauce than intended. If you're out of spinach, kale works beautifully, but you'll need to add it a minute earlier as the leaves are tougher. This recipe is as flexible as a sheet pan bake, so don't be afraid to swap the greens based on what’s in your crisper drawer.
Tools for Minimalist Kitchen Workflow
You don't need a pantry full of gadgets for this. In fact, using too many tools just adds to the cleanup time, which defeats the purpose of a 15 minute meal. I recommend a 12 inch heavy bottomed skillet cast iron or heavy stainless steel is best.
The mass of the pan helps maintain a consistent temperature when the cold chickpeas hit the oil.
Chef's Tip: If using stainless steel, wait for the "Leidenfrost effect" before adding oil. If a drop of water dances on the surface like a bead of mercury, your pan is ready. This prevents the chickpeas from sticking.
You will also need a fine mesh strainer for the chickpeas and a basic silicone spatula. Avoid using a wooden spoon if your pan is stainless steel, as you really want to be able to scrape the "fond" (those browned bits) off the bottom of the pan once the liquid goes in.
A sharp chef's knife for the garlic and parsley is the only other "heavy" equipment required. I’m a big fan of efficiency, so I usually just juicing the lemon directly over the pan through my fingers to catch the seeds.
Precision Cooking Steps for Maximum Flavor
- Prep the beans. Drain the chickpeas and reserve 2 tablespoons of the liquid. Dry the chickpeas thoroughly between two layers of paper towels. Note: Any moisture left will cause the oil to splatter and stop the browning process.
- Sear the base. Heat the olive oil in your 12 inch skillet over medium high heat. Add the chickpeas in a single, even layer. Cook 3 minutes undisturbed until the skins are crackling and mahogany colored.
- Season the crunch. Toss the chickpeas with sea salt and smoked paprika. Move them to the outer edges of the skillet.
- Sauté the aromatics. Reduce the heat to medium low. Add the thinly sliced garlic to the center of the pan. Cook 60 secondsuntil fragrant and golden edged.
- Build the emulsion. Pour in the coconut milk, nutritional yeast, red pepper flakes, and the reserved chickpea liquid.
- Deglaze the pan. Use your spatula to scrape the bottom of the pan. Simmer 2 minutes until the sauce is glossy and coats the back of a spoon.
- Wilt the greens. Fold in the fresh baby spinach. Stir constantly for about 30 seconds until the leaves are bright green and collapsed.
- Finish and brighten. Remove the skillet from the heat immediately. Stir in the fresh lemon juice and chopped parsley.
- Final check. Taste a chickpea with a bit of sauce. It should be savory, creamy, and have a sharp hit of citrus. Adjust salt if needed.
- Serve immediately. This dish is best when the contrast between the crispy beans and the velvety sauce is at its peak.
Avoiding Mistakes and Solving Texture Issues
The biggest hurdle with this easy vegan recipe is often the heat management. If the pan is too cold, the chickpeas soak up the oil and become greasy rather than crispy. If it's too hot, the garlic burns before the coconut milk can stabilize the temperature.
Why Your Chickpeas Aren't Crispy
The most common culprit is overcrowding. If you try to double this recipe in a small pan, the chickpeas will release moisture and steam each other. Work in batches or use two pans if you're scaling up. Also, check your drying technique if they aren't bone dry, they won't shatter when you bite them.
| Problem | Root Cause | Solution |
|---|---|---|
| Burnt Garlic | Pan was too hot after searing | Remove pan from heat for 30 seconds before adding garlic. |
| Separated Sauce | Coconut milk boiled too hard | Keep the simmer gentle; high heat breaks the fat emulsion. |
| Bland Finish | Not enough acid | Add an extra teaspoon of lemon juice or a dash of apple cider vinegar. |
Another issue people run into is the "tinny" taste of canned beans. This is usually solved by the heavy hit of smoked paprika and the nutritional yeast, but if it persists, a tiny pinch of sugar (less than 1/8 tsp) can help balance the metallic notes of the canning liquid.
Common Mistakes Checklist
- ✓ Pat chickpeas completely dry with paper towels (prevents steaming).
- ✓ Let chickpeas sit undisturbed for the full 3 minutes for that "shatter" texture.
- ✓ Slice garlic thin rather than pressing it (pressed garlic burns in seconds).
- ✓ Use full fat canned coconut milk, not the carton version used for cereal.
- ✓ Add lemon juice only after removing from heat to keep the flavor vibrant.
- ✓ Reserve the aquafaba; it’s the "glue" that holds your sauce together.
Scaling Formulas for Any Group Size
If you're cooking for one, half the recipe is simple. Use a smaller 8 inch skillet and reduce the cook times by about 1 minute per step, as smaller pans lose moisture faster. You can keep the remaining coconut milk in a sealed jar in the fridge for up to 5 days it's great in coffee or smoothies.
When doubling the recipe for 4 people, don't just dump two cans of beans into one skillet unless it's a massive 14 inch pan. The beans need surface area to crisp up. I recommend searing the beans in two separate batches, then combining them once you add the coconut milk and spinach.
For the spices, I find that you don't need to strictly double them use 1.5x the salt and paprika initially, then taste and adjust.
Scaling for baking is a different beast, but for this stovetop method, it's mostly about pan real estate. If you overcrowd, you’ll end up with a stew. There’s nothing wrong with a chickpea stew, but you’ll lose that specific "fried" texture that makes this recipe with chickpeas stand out from the crowd.
Freshness Retention and Resourceful Repurposing
This dish is a rare vegan meal that actually holds up reasonably well, though you will lose some of that initial chickpea crunch. Store leftovers in an airtight glass container in the fridge for up to 3 days. When you’re ready to eat, don’t just microwave it.
Reheat it in a small skillet over medium heat with a splash of water or more coconut milk to loosen the sauce.
- Fridge: 3 days. The flavors actually deepen as the garlic and paprika mingle.
- Freezer: I don't recommend freezing this. The coconut milk can grain up, and the spinach turns to mush.
- Zero Waste: Those parsley stems you chopped off? Don't toss them. Thinly slice them and add them into the pan at the same time as the garlic. They have a more intense flavor than the leaves and add a nice bit of "snap."
If you have leftovers but not quite enough for a full meal, this makes an incredible topping for a baked potato or a thick slice of sourdough toast. I’ve even tossed cold leftovers into a salad bowl with some extra cucumber and tomatoes for a quick lunch the next day. The creamy sauce acts as a built in dressing.
Flavor Variations and Kitchen Myths
One of the biggest myths in vegan cooking is that you need "fake meat" to get a satisfying texture. The "searing" technique we use here proves that plant proteins can have structural integrity if treated with high heat. Another myth is that canned beans are nutritionally inferior.
In reality, the pressure canning process often makes the nutrients more bioavailable, and for a 15 minute meal, the convenience is unbeatable.
Mediterranean Flavor Swap
If you want to move away from the smoky profile, swap the paprika for dried oregano and the nutritional yeast for a tablespoon of capers. Use a splash of white wine instead of the aquafaba to deglaze the pan. This version pairs beautifully with some toasted pine nuts on top.
The Nut Free/Oil Free Twist
While I don't recommend skipping the oil for flavor reasons, you can "dry sear" the chickpeas in a non stick pan if you're being very strict. For a nut free version that avoids coconut, a sunflower seed cream (blended soaked sunflower seeds) provides a similar fatty base without the tropical flavor profile.
| Variation | Key Swap | Resulting Profile |
|---|---|---|
| Zesty Curry | Swap Paprika for Curry Powder | Warm, earthy, and aromatic |
| Tuscan Style | Swap Spinach for Kale + Rosemary | Hearty, rustic, and woodsy |
| Spicy Buffalo | Swap Lemon for Hot Sauce | Tangy, sharp, and bold |
If you ever find yourself with extra vegetables, this formula is incredibly forgiving. I’ve thrown in leftover roasted cauliflower or even a handful of frozen peas. The core "science" remains the same: crisp the protein, bloom the spices, and emulsify the fat.
Once you master this 15 minute workflow, you'll find yourself reaching for a can of chickpeas every time the "what's for dinner" panic sets in.

Recipe FAQs
What dishes can I make with chickpeas easily?
Create a fast, protein rich skillet meal by searing chickpeas with aromatics. You can transform canned beans into a restaurant quality dinner in just 15 minutes by crisping them in olive oil and finishing them with a simple coconut milk emulsion.
Are there any downsides to eating chickpeas?
No, there are no significant downsides for most people. They are nutrient dense, but because they are high in fiber, some individuals may experience mild digestive gas if they are not used to eating legumes regularly.
What to do with chickpeas vegan?
Combine them with nutritional yeast and coconut milk for a savory, creamy vegan dish. Using aquafaba the reserved liquid from the can is a pro move to help thicken your sauce perfectly, similar to the technique used to bind the sauce in this 30-minute chicken dish.
Can you eat chickpeas if you have diabetes?
Yes, they are generally considered a blood sugar-friendly food. Their combination of protein and high fiber content helps slow down the absorption of carbohydrates, potentially preventing rapid spikes in glucose levels.
How to get the skin of the chickpea crispy?
Dry the chickpeas thoroughly between paper towels before placing them in the skillet. Once the olive oil is shimmering over medium high heat, add the chickpeas in a single layer and let them sit undisturbed for 3 minutes to achieve that signature mahogany color.
How to prevent the garlic from burning?
Reduce the heat to medium low before adding the sliced garlic to the center of the pan. Sautéing for only 60 seconds ensures the garlic becomes fragrant and infused into the oil without turning brown or bitter.
How to ensure the sauce coats the spoon?
Simmer the coconut milk and nutritional yeast mixture for exactly 2 minutes. Make sure to scrape any browned bits from the bottom of the skillet to incorporate that extra flavor into the emulsion before folding in the spinach.
Easy Vegan Chickpea Skillet
Ingredients:
Instructions:
Nutrition Facts:
| Calories | 377 kcal |
|---|---|
| Protein | 12.6 g |
| Fat | 21.8 g |
| Carbs | 34.6 g |
| Fiber | 9.2 g |
| Sugar | 1.8 g |
| Sodium | 725 mg |
