Garlic Hummus Recipe No Tahini
- Time: Active 15 minutes, Passive 0 minutes, Total 15 minutes
- Flavor/Texture Hook: Silky smooth chickpea base with a sharp, punchy garlic finish
- Perfect for: Last minute hosting, budget-friendly meal prep, or tahini allergies
- Bold Flavor Garlic Hummus Recipe No Tahini
- Why This Creamy Spread Works
- Crucial Recipe Specs To Know
- Pantry Elements For Success
- Essential Tools For Silky Results
- Step By Step Preparation Guide
- Avoid Common Recipe Blunders
- Flavor Variations And Substitutions
- Smart Storage And Waste Tips
- Beautiful Plating And Garnish Ideas
- Recipe FAQs
- 📝 Recipe Card
Bold Flavor Garlic Hummus Recipe No Tahini
You know that frantic pantry scramble when you’ve already opened the chickpeas but realize the tahini jar is bone dry? I’ve been there more times than I care to admit. For the longest time, I thought tahini was the only way to get that velvety, rich mouthfeel we all crave, but I was wrong.
This version leans into the hearty nature of the beans themselves, using a few clever tricks to make sure you don't miss that sesame bitterness one bit.
We are going for a bold, comfort forward spread that doesn't hide behind layers of complex ingredients. It’s about the marriage of zingy lemon and the raw, spicy heat of fresh garlic.
When you whir this up in your kitchen, the aroma of the citrus hitting the oils in the garlic is enough to make anyone wander in and ask what’s for dinner. It’s satisfying, thick, and perfect for a big family gathering where you need a reliable crowd pleaser.
Honestly, I’ve served this to "hummus snobs" who didn't even notice the tahini was missing. The secret is all in how we treat the chickpeas and the oil. We aren't just mashing things together; we are building an emulsion that coats the palate in a way that feels indulgent.
Let's get into how we make this magic happen with just a few staples you definitely already have in your cupboard.
Why This Creamy Spread Works
The success of this dish relies on a few fundamental culinary principles that transform humble beans into a luxurious dip.
- Mechanical Emulsification: High speed blending forces the extra virgin olive oil into tiny droplets that are suspended within the chickpea starch, creating a thick, creamy structure without needing seed butter.
- Starch Gelatinization: Using canned chickpeas that have been slightly warmed or processed with friction allows the starches to soften and mesh, leading to a velvety finish rather than a grainy one.
- Acid Base Mellowing: Soaking the chopped garlic in lemon juice before blending initiates a mild chemical "cook," which reduces the harsh sulfurous bite of raw garlic while keeping the flavor bold.
- Temperature Shock: Adding ice cold water at the very end of the process causes the fats to tighten and aerate, resulting in a lighter, fluffier texture that holds its shape on a pita chip.
| Feature | Fresh Dried Beans | Canned Shortcut |
|---|---|---|
| Prep Time | 12 hours soaking + 2 hours boiling | 2 minutes draining and rinsing |
| Texture Result | Extremely buttery and soft | Denser, more hearty "bite" |
| Flavor Profile | Nutty and deep | Neutral, absorbs aromatics better |
Choosing canned chickpeas is a fantastic shortcut for a weeknight, as they provide a consistent texture that stands up well to the bold garlic. While fresh beans have their place, the convenience of the canned version allows the lemon and cumin to really take center stage in this specific preparation.
Crucial Recipe Specs To Know
Before you start the food processor, it’s helpful to understand the scale of what we are creating. This recipe is designed to be a substantial side or a central appetizer for a small group.
| Servings | Chickpea Amount | Oil Ratio | Best Container |
|---|---|---|---|
| 2 People | 1/2 can (212g) | 40 ml | Small Nutri Bullet |
| 6 People | 1 can (425g) | 80 ml | Standard Food Processor |
| 12 People | 2 cans (850g) | 160 ml | Large 12 Cup Processor |
If you are cooking for a larger crowd, I highly recommend processing in batches if your equipment is small. Overcrowding the blade can lead to uneven chunks of garlic, and we want this spread to be as smooth as silk. If you’re looking for a heavier meal to pair this with, it works wonders alongside a Cevapi Recipe where the cool garlic dip cuts through the charred, savory Balkan meats perfectly.
Pantry Elements For Success
The beauty of this spread is that it uses standard ingredients but treats them with respect to maximize flavor.
Component Deep Dive
| Ingredient | Science Role | Pro Secret |
|---|---|---|
| Chickpeas | Provides the structural starch base | Simmer them in their liquid for 5 minutes for extra softness |
| Extra Virgin Olive Oil | Acts as the primary fat for emulsification | Use a fruity, mild oil to avoid an overpowering bitter finish |
| Lemon Juice | Denatures garlic proteins and balances fat | Always use fresh; bottled juice lacks the bright volatile oils |
- 1 can (15 oz/425g) chickpeas: Drained and rinsed. Why this? Canned beans are perfectly salted and consistently cooked for instant blending.
- 1/3 cup (80ml) extra virgin olive oil: The heart of the texture. Why this? high-quality oil replaces the richness lost by omitting tahini.
- 4 cloves fresh garlic: Peeled and roughly chopped. Why this? Raw garlic provides the "zing" that defines this specific style.
- 1/4 cup (60ml) fresh lemon juice: The necessary acid. Why this? It brightens the heavy starches and helps preserve the light color.
- 1/2 tsp ground cumin: Added for earthy depth. Why this? Cumin mimics the savory, nutty notes usually provided by tahini.
- 1/2 tsp sea salt: Essential for flavor extraction. Why this? Sea salt has a cleaner finish than standard table salt.
- 2 tbsp (30ml) ice cold water: The "secret" for fluffiness. Why this? It lightens the color and creates a mousse like consistency.
Essential Tools For Silky Results

You don't need a professional kitchen, but the right gear makes the difference between a chunky mash and a velvety spread. A standard food processor is the gold standard here because the wide bowl allows the ingredients to move freely against the blades.
If you only have a high speed blender, you may need to use a tamper or stop frequently to scrape the sides. The blades in a blender move faster, which can actually heat up the chickpeas; this isn't necessarily a bad thing, but it may require an extra tablespoon of ice water to keep the emulsion stable. For those who love the punch of raw aromatics, the technique we use for the garlic here is quite similar to the sharp, savory base of a classic Escargot recipe, proving that simple garlic and oil can be incredibly sophisticated.
step-by-step Preparation Guide
Follow these steps closely, especially the order of operations, to ensure the garlic is well distributed and the texture is uniform.
- Prep the chickpeas. Drain the can into a colander and rinse thoroughly under cold water until the foam disappears. Note: Removing the canning liquid prevents a "metallic" aftertaste.
- Mellow the garlic. Place the 4 cloves of chopped garlic and 1/4 cup lemon juice in the food processor bowl.
- Pulse the aromatics. Pulse 5-7 times until the garlic is finely minced in the juice. Let it sit for 2 minutes. Note: This softens the raw garlic "burn."
- Add the base. Pour in the 1/3 cup olive oil, 1/2 tsp salt, and 1/2 tsp cumin.
- Whir the oil. Blend for 30 seconds until the mixture looks shimmering and pale yellow.
- Incorporate the beans. Add the rinsed chickpeas to the processor.
- Primary blend. Process for 2 full minutes until the mixture is thick and mostly smooth.
- The ice water trick. While the motor is running, drizzle in the 2 tbsp of ice cold water.
- Final emulsification. Continue blending for another 1 minute until the hummus turns noticeably lighter and velvety.
- Taste and adjust. Swipe a finger through the spread; it should be creamy but hold a peak. Add a pinch more salt if the flavor feels flat.
Avoid Common Recipe Blunders
Even with a simple list of ingredients, things can go sideways if the ratios or temperatures are off.
Grainy Hummus Texture
The most common complaint is a "sandy" or grainy feel on the tongue. This usually happens if the chickpea skins are too tough or if the mixture wasn't processed long enough. If you have an extra 5 minutes, you can simmer the canned chickpeas in water with a pinch of baking soda before rinsing; this breaks down the skins completely.
Troubleshooting Spread Problems
| Problem | Root Cause | Solution |
|---|---|---|
| Hummus is too thick | Low moisture content | Add 1 tbsp of cold water at a time while blending |
| Overpowering garlic bite | Garlic wasn't "cooked" in acid | Blend in an extra tablespoon of olive oil to coat the palate |
| Flavor feels one dimensional | Lack of salt or acid balance | Add a tiny splash of lemon juice or a pinch of salt |
Common Mistakes Checklist
- ✓ Don't skip the rinsing step; the liquid in the can (aquafaba) can be bitter if not balanced with tahini.
- ✓ Ensure the water is truly ice cold; room temperature water won't aerate the fats as effectively.
- ✓ Avoid using "Light" olive oil; you need the flavor and viscosity of Extra Virgin for this recipe.
- ✓ Give the processor a rest if it smells hot; over heating the chickpeas can make the oil separate.
- ✓ Do not use pre minced jarred garlic; it has a sour, preserved taste that ruins the fresh profile.
Flavor Variations And Substitutions
While the base recipe is a classic, you can easily pivot based on what you have in the fridge or your personal flavor preferences.
Creative Adjustments
- Roasted Garlic Version: Swap the raw cloves for 6-8 cloves of roasted garlic. This creates a much sweeter, mellow, and brown toned spread that is incredibly comforting.
- Spiced Oil Topping: If you miss the richness of tahini, bloom a teaspoon of smoked paprika in two tablespoons of warm olive oil and drizzle it over the top before serving.
- Herbaceous Green Hummus: Throw in a handful of fresh parsley or cilantro during the final blending stage for a bright, garden fresh variation.
Decision Shortcut
- If you want a smokier profile, add 1/2 tsp of smoked paprika to the main blend.
- If you want a thinner dip for drizzling over salads, increase the lemon juice and water by 1 tbsp each.
- If you want a zesty kick, add the finely grated zest of half a lemon along with the juice.
Chef's Tip: If you find the flavor too sharp, add a teaspoon of honey or maple syrup. It sounds strange, but that tiny hit of sugar cuts the acidity of the lemon and the heat of the garlic perfectly, creating a more rounded flavor profile.
Smart Storage And Waste Tips
Hummus stores beautifully, which makes it a staple for my Sunday meal prep sessions. I usually make a double batch because it disappears so fast during the week.
Storage Guidelines: Keep your spread in an airtight container in the fridge for up to 5 days. You might notice a little oil pooling on the top after a day or two this is totally normal! Just give it a vigorous stir with a spoon to re incorporate the fats.
If it firms up too much in the cold, let it sit on the counter for 10 minutes before serving.
Zero Waste Ideas: Don't toss that chickpea can liquid (aquafaba) if you are feeling adventurous! You can whip it into a vegan meringue or use a few tablespoons to thicken soups. Also, if you have leftover hummus that’s starting to dry out, use it as a thickener for a creamy pasta sauce.
Just whisk it into some warm pasta water and toss with noodles it's an instant, healthy comfort meal for the family.
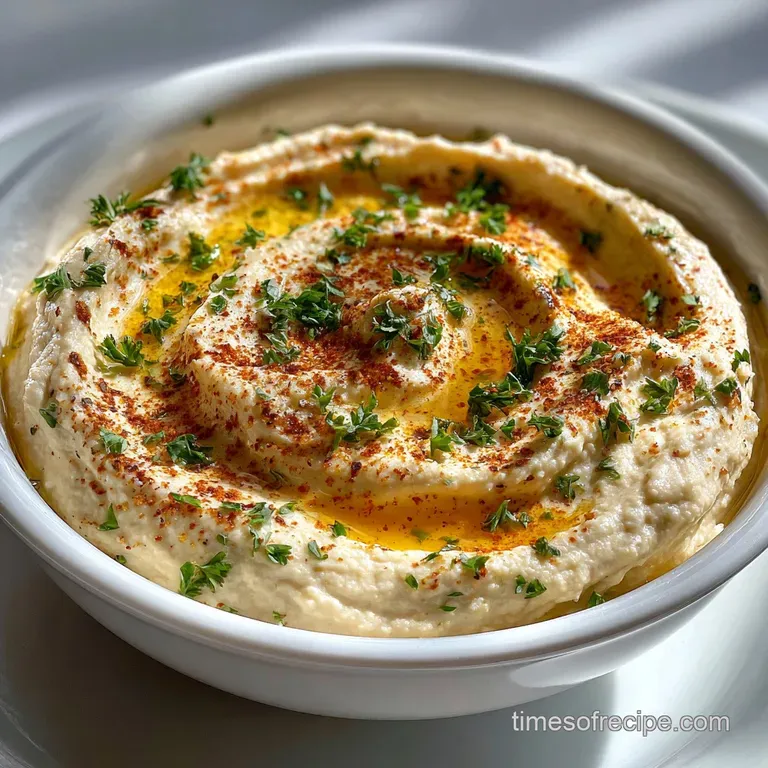
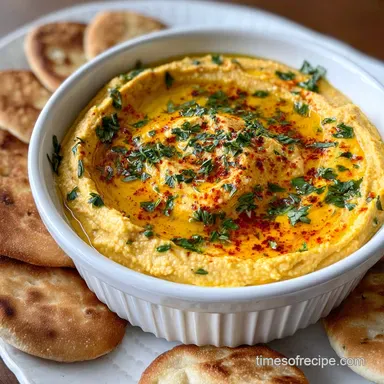
Beautiful Plating And Garnish Ideas
Presentation is where you turn a simple bowl of beans into a centerpiece. Since this recipe has a very clean, pale look, I like to use garnishes that offer a sharp color contrast.
Visual Cues for Serving
Start by scooping the hummus into a shallow bowl. Use the back of a large spoon to create a deep "moat" or swirl in the center. This isn't just for looks; it’s a functional vessel to hold your toppings and extra oil.
Garnishing Like a Pro
- The Classic Drizzle: Fill the center swirl with a generous glug of extra virgin olive oil until it nearly overflows the edges.
- Crunch Factor: Sprinkle a few whole, reserved chickpeas on top along with a dusting of cumin or sumac for a pop of deep red.
- Fresh Finish: A few torn mint leaves or a sprinkle of toasted pine nuts adds texture and a "fancy" feel to a very humble dish.
Serving this with warm, fluffy pita bread is non negotiable in my house, but if you want to keep it lighter, crunchy cucumber spears and radishes provide a wonderful snap that contrasts with the velvety spread.
It’s a satisfying, bold addition to any table that proves you don't need a pantry full of specialty ingredients to make something truly world class.
Frequently Asked Questions
Can I use a blender instead of a food processor? Yes, but you will need to stop and scrape the sides more often. A high speed blender like a Vitamix will produce an even smoother result, but be careful not to over process and heat the mixture, which can change the flavor of the olive oil.
Why is my hummus bitter even without tahini? This usually comes from the olive oil. If you over blend extra virgin olive oil at very high speeds, the polyphenols can break down and release a bitter taste.
To fix this, blend the chickpeas with the water and lemon first, then stir or pulse in the olive oil at the very end.
Can I freeze this hummus? You can! Hummus freezes surprisingly well. Place it in a freezer safe container, leaving a little room at the top for expansion. Thaw it in the fridge overnight and give it a good stir or a quick pulse in the processor to bring back the creamy texture.
Is this recipe keto friendly? While chickpeas are high in fiber, they do contain a significant amount of carbohydrates. For a keto style dip using the same garlic lemon profile, you could substitute the chickpeas with steamed cauliflower or roasted zucchini, though the texture will be much lighter.
What can I use instead of lemon juice? If you’re out of lemons, a light vinegar like white wine vinegar or apple cider vinegar can work in a pinch. Start with half the amount, as vinegar is more pungent than citrus juice, and adjust to your taste.

Recipe FAQs
Can you make hummus without tahini?
Yes, absolutely. This recipe proves you can achieve a creamy, satisfying hummus by relying on good quality olive oil and proper emulsification techniques, without missing the tahini.
What can I use instead of tahini when making hummus?
Extra virgin olive oil is the primary substitute. Supplementing with ingredients like cumin can mimic some of the nutty depth tahini provides, while lemon juice helps balance the richness. For similar flavor profiles, consider our Dove Recipe with Garlic and Herbs: Pan-Seared which also relies on bold aromatics.
What is the secret to creating the smoothest hummus?
The secret is mechanical emulsification and patience. Blending thoroughly until the mixture is velvety, and adding ice-cold water at the end to create a lighter texture, are key. If you enjoyed mastering the stable emulsion here, use the same whisking method in our Chicken Bryan: The Best Copycat Recipe with Lemon Butter Sauce for a different application.
Can I make hummus with sesame oil instead of tahini?
While possible, it's not ideal for replicating traditional hummus. Sesame oil has a much stronger, distinct flavor than tahini and can easily overpower the other ingredients. Extra virgin olive oil is a better choice for a tahini free base.
How do I get my tahini free hummus extra creamy?
Achieve creaminess through thorough blending and the addition of ice-cold water. Process the ingredients until completely smooth, then drizzle in ice-cold water while the machine is running to aerate the mixture and create a lighter, fluffier texture. You'll find similar emulsification techniques beneficial for dishes like Chicken Spiedini Recipe: Shatter Crisp & Lemon Butter Glazed.
What can I use if I don't have chickpeas for hummus?
You can substitute with white beans or cannellini beans. These beans have a milder flavor and a similar starchy texture that will blend up smoothly, though you might need to adjust the liquid content slightly.
Why does my garlic hummus taste too strong?
The garlic's intensity can be mellowed by soaking it in lemon juice first. This acidic soak helps break down some of the pungent compounds. For a less raw garlic flavor, consider roasting the garlic before adding it to the hummus.
Garlic Hummus No Tahini
Ingredients:
Instructions:
Nutrition Facts:
| Calories | 184 kcal |
|---|---|
| Protein | 3.7 g |
| Fat | 13.6 g |
| Carbs | 12.6 g |
| Fiber | 3.2 g |
| Sugar | 0.8 g |
| Sodium | 250 mg |
