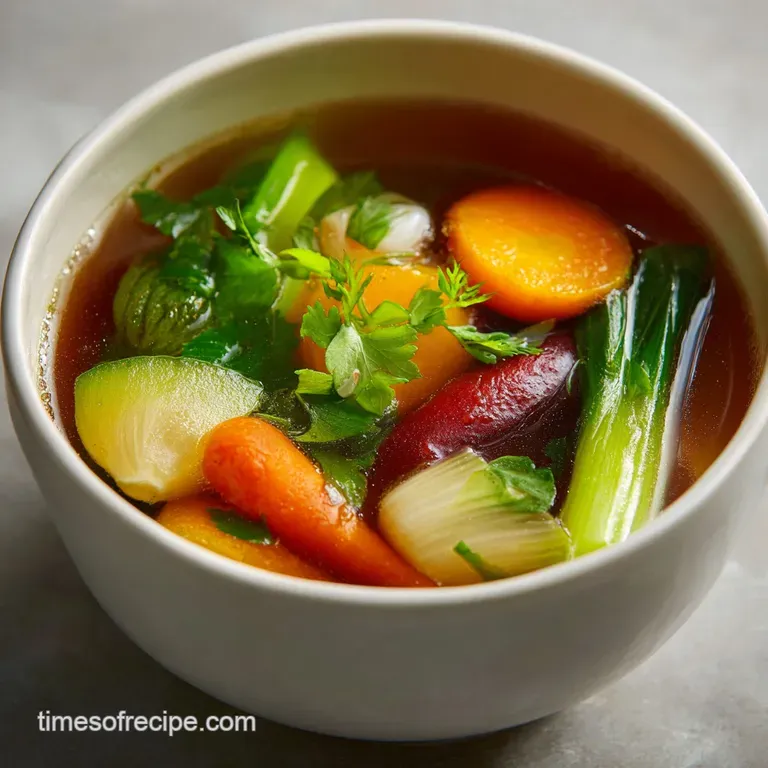
Homemade Vegetable Broth: Savory and Concentrated
- Time: Active 10 minutes, Passive 45 minutes, Total 55 minutes
- Flavor/Texture Hook: Savory, clear, and concentrated
- Perfect for: Batch cooking, budget meal prep, and base soups
- A Flavorful Vegetable Broth Recipe Strategy
- Essential Techniques for Flavor Extraction
- Official Recipe Specifications and Metrics
- Exploring Core Ingredients and Substitutions
- Required Equipment for Efficient Cooking
- Detailed Step-by-Step Preparation Guide
- Resolving Flavor and Clarity Issues
- Creative Variations and Budget Swaps
- Smart Storage and Freezing Strategies
- Serving Ideas and Meal Pairings
- Recipe FAQs
- 📝 Recipe Card
A Flavorful Vegetable Broth Recipe Strategy
Most homemade vegetable broths are a disappointment. You spend an hour simmering a pot of water and end up with what I call "hot carrot water" - a thin, translucent liquid that tastes like nothing but wet cardboard and overcooked celery.
I used to make this mistake constantly, throwing random vegetables into a pot and hoping for the best, only to find my finished soups tasted flat and uninspired.
The problem is usually a lack of foundation. If you don't build layers of flavor before the water even hits the pan, you're just making tea out of compost. To get a broth that actually carries a dish, you need to understand how to extract natural sugars and glutamates from your ingredients.
This isn't about fancy techniques, it's about being efficient with the science of heat and water.
This vegetable broth recipe is designed to be the fix for that watery mess. We're going to use specific browning methods and a few secret pantry staples to ensure every spoonful is packed with a savory punch.
We're focusing on a budget smart approach that uses every part of the vegetable, ensuring nothing goes to waste while maximizing the nutritional output of your kitchen.
Essential Techniques for Flavor Extraction
The difference between a "good" broth and a "functional" broth comes down to how you handle the initial heat. Most people simply dump everything into a pot of water and boil it. This is a massive tactical error.
Boiling too hard can emulsify fats and starches, leading to a cloudy, greasy liquid that looks unappealing and tastes muddy.
Cold Water Extraction: Starting with cold filtered water allows the vegetable cell walls to break down slowly, releasing nutrients and flavors gradually as the temperature rises.
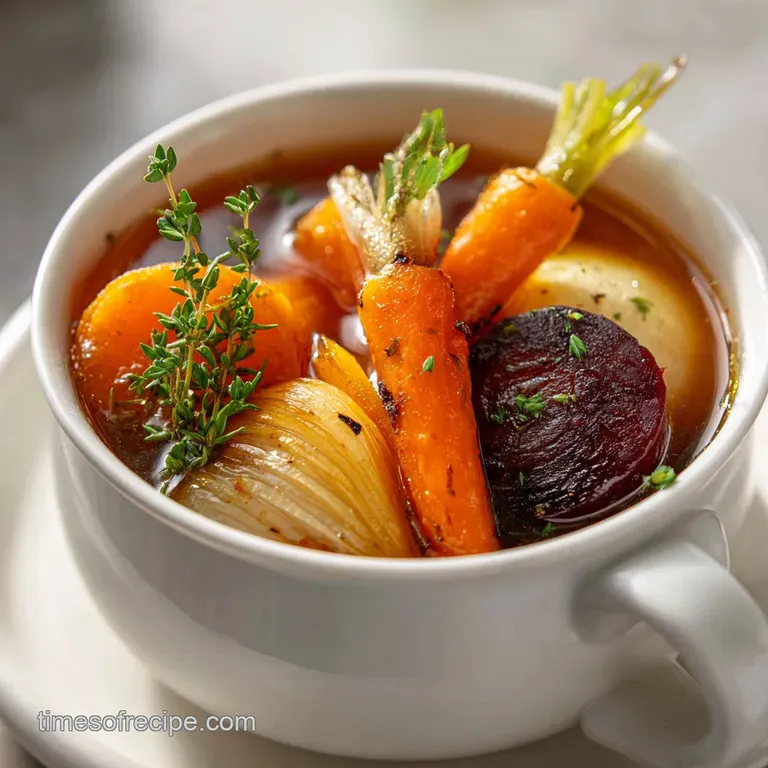
The Maillard Effect: Sautéing your base aromatics - the onions, carrots, and celery - creates new flavor compounds through the browning of natural sugars.
Glutamate Concentration: Ingredients like dried shiitake mushrooms and tomato paste provide a concentrated source of umami, giving the broth a "meaty" backbone without the meat.
Skin On Infusion: Keeping the skins on your onions provides a deep golden hue and extra antioxidants that you'd otherwise lose in the trash.
Stovetop Versus Fast Methods
Before you start chopping, it's worth deciding which method fits your schedule. While the stovetop method is our standard for clarity and control, other tools can shave off time or allow for a hands off approach.
| Method | Total Time | Resulting Texture | Best For |
|---|---|---|---|
| Standard Stovetop | 55 minutes | Clear and bright | Fine soups and risottos |
| Pressure Cooker | 35 minutes | Deeply extracted | Fast weeknight dinners |
| Slow Cooker | 8 hours | Dark and heavy | Rich stews or gravies |
Choosing the right method depends on your goal. If I'm making a clear consommé, I always stick to the stovetop to prevent the violent agitation of a pressure cooker. If I'm just looking for a quick liquid to cook rice in, the faster methods are perfectly acceptable.
Official Recipe Specifications and Metrics
Accuracy in liquid to solid ratios is what separates a concentrated broth from a diluted one. If you add too much water, you're back to square one with a thin flavor profile. If you add too little, you'll end up with a reduction that might be too salty or intense for a standard soup base.
For this specific method, we are targeting a yield of 8 servings, which is approximately 2 liters of finished broth after accounting for evaporation and absorption by the vegetables. We use exactly 2.5 liters of cold filtered water to start.
This ratio ensures that the aromatics are fully submerged while still allowing for a concentrated extraction during the 45 minutes of simmering.
The temperature should never exceed a "bare simmer." This means you should see only a few small bubbles breaking the surface every few seconds. If the pot is rolling and splashing, you're going to lose too much liquid and break down the vegetables into a mushy silt that is nearly impossible to strain out completely.
Exploring Core Ingredients and Substitutions
Every ingredient in this list serves a functional purpose. We aren't just adding things for the sake of it; we are building a structural flavor profile. The onions and garlic provide the aromatic base, the carrots and celery add sweetness and earthiness, and the mushrooms provide the "bass notes" of the flavor spectrum.
| Ingredient | Science Role | Pro Secret |
|---|---|---|
| Onions (with skins) | Provides color and base sweetness | Leave skins on for a darker, richer golden broth |
| Dried Shiitake | Natural source of guanylate (umami) | Do not soak beforehand; let them hydrate in the pot |
| Tomato Paste | Adds acidity and concentrated glutamates | Brown it in the oil first to remove the raw metallic taste |
| Cold Filtered Water | The solvent for all flavor molecules | Always start cold to ensure a clear, clean extraction |
When it comes to the ingredients, quality matters, but being budget conscious is also a priority. You can easily adapt this based on what is in your crisper drawer.
- Olive oil (14g): Provides the fat necessary to carry fat soluble flavors from the herbs. Why this? Essential for sautéing aromatics.
- Sub: Grapeseed oil for a more neutral flavor.
- Medium onions (300g): The foundational aromatic. Why this? Provides sweetness and depth.
- Sub: Leeks or shallots if you have them.
- Large carrots (200g): Adds natural sugar. Why this? Balances the bitter notes of herbs.
- Sub: Parsnips for a spicier, earthier tone.
- Celery stalks (150g): Provides saltiness and herbal notes. Why this? Essential for the classic mirepoix base.
- Sub: Fennel bulbs for a slight anise flavor.
- Head of garlic (50g): Deep aromatic pungency. Why this? Smashed cloves release oils slowly.
- Sub: 1 tablespoon of garlic powder in a pinch.
- Vegetable scraps (500g): The budget smart volume builder. Why this? Uses leek tops and parsley stems for free flavor.
- Sub: Any non cruciferous veggie scraps.
- Dried shiitake (15g): The umami anchor. Why this? Provides depth that vegetables alone lack.
- Sub: Dried porcini or a dash of soy sauce.
- Tomato paste (15g): Color and richness. Why this? Adds a savory "meatiness" to the finish.
- Sub: 1 sun dried tomato, finely chopped.
- Black peppercorns (3g): Subtle heat. Why this? Whole peppercorns infuse without clouding.
- Sub: A pinch of white pepper.
- Bay leaves & Thyme: Herbal finish. Why this? Essential for a classic aromatic bouquet.
- Sub: Rosemary or sage for a woodier profile.
Required Equipment for Efficient Cooking
You don't need a kitchen full of gadgets, but the right pot and strainer make the process significantly more efficient. An 8 quart stockpot is ideal because it provides enough surface area for the initial sauté while being deep enough to prevent excessive evaporation during the simmering phase.
A fine mesh strainer is non negotiable. If you use a colander with large holes, you'll end up with bits of onion skin and peppercorns in your broth. For a truly professional, silky finish, I always line my strainer with cheesecloth. This catches the tiny particles that make a broth look cloudy.
Finally, heat proof storage containers are essential. Never pour boiling hot broth into thin plastic containers, as they can warp or leach chemicals. Glass jars or stainless steel bowls are the safest bet.
If you plan on freezing the broth, make sure to leave at least two inches of "headspace" at the top of the jar to allow for expansion as the liquid turns to ice.
Detailed step-by-step Preparation Guide
- Heat 14g of olive oil in an 8 quart stockpot over medium high heat. Ensure the oil is shimmering before adding any vegetables to prevent sticking.
- Add 300g of roughly chopped onions, 200g of carrots, and 150g of celery. Sauté for 6-8 minutes until the edges are browned and the onions are translucent. Note: This browning is critical for color and flavor.
- Stir in 15g of tomato paste and cook for an additional minute. You want the paste to turn from bright red to a brick brown color as it caramelizes.
- Add 50g of smashed garlic, 500g of vegetable scraps, 15g of dried shiitake, 3g of peppercorns, 2 bay leaves, and 3 sprigs of thyme.
- Pour in 2.5 liters of cold filtered water. Stir once to incorporate the browned bits from the bottom of the pot.
- Bring the mixture to a bare simmer over medium heat. Once you see the first bubble, drop the heat to low.
- Simmer uncovered for 45 minutes. Avoid stirring the pot during this time, as physical agitation breaks down the vegetables and creates cloudiness.
- Check the liquid level. It should have reduced by about 10-15%. The aroma should be savory and the color a deep amber.
- Set a fine mesh strainer lined with cheesecloth over a large heat proof bowl. Carefully pour the contents of the pot through the strainer.
- Discard the solids. Let the broth cool completely at room temperature for about 30 minutes before transferring it to the refrigerator.
Resolving Flavor and Clarity Issues
One of the most common issues people face when following a vegetable broth recipe is a bitter aftertaste. This usually happens because they've included too many cruciferous vegetables like broccoli, cauliflower, or cabbage. These contain sulfur compounds that become incredibly pungent and bitter when boiled.
Another issue is a "thin" mouthfeel. Unlike beef or chicken stock, which contains gelatin from bones, vegetable broth is naturally very watery. We fix this by using the shiitake mushrooms and tomato paste, but you can also add a small piece of kombu (dried seaweed) if you want an even silkier, more savory texture.
| Problem | Root Cause | Solution |
|---|---|---|
| Bitter taste | Too many brassicas or over simmered herbs | Avoid broccoli/cabbage; add herbs in the last 20 mins |
| Cloudy liquid | Rolling boil or stirring too much | Keep at a low simmer; never stir once water is added |
| Lack of depth | Not enough browning or no umami | Sauté veg longer; add more mushrooms or tomato paste |
Common Mistakes Checklist
- ✓ Never add salt until the end of the cooking process. As the broth reduces, the salt concentration increases, which can lead to an oversalted final product.
- ✓ Avoid using old, soft vegetables that have started to mold. If you wouldn't eat it in a salad, don't put it in your broth.
- ✓ Keep the heat low. A rolling boil is the enemy of a clear, bright broth.
- ✓ Use cold water. Hot water from the tap can contain dissolved minerals and lead to a flat flavor.
- ✓ Don't simmer for longer than 60 minutes. After an hour, the vegetables begin to lose their structural integrity and the flavor starts to "gray" out.
Creative Variations and Budget Swaps
The beauty of this recipe is its flexibility. If you want a "Golden Immune Booster" version, add a thumb sized piece of fresh turmeric and a few extra slices of ginger during the sauté phase. This creates a vibrant, anti inflammatory broth that is perfect for sipping during cold season.
For a "Parmesan Umami Bomb," save your old Parmesan rinds in the freezer. Toss one or two rinds into the pot along with the water. The cheese rinds are packed with natural glutamates and will give the broth a salty, cheesy depth that makes it an incredible base for a broccoli casserole recipe.
Adjusting Batch Sizes and Ratios
If you are cooking for a smaller household, you can easily halve this recipe. Simply use a 4 quart pot and reduce the cook time by about 10 minutes, as the smaller volume will reach the extraction point faster. When scaling down, beat one egg and use half of it? No, that's for baking!
For broth, just use half the weight of the vegetables and half the water.
When scaling up (4x or more), be careful with the spices. Salt and peppercorns do not scale linearly. Use only 1.5x the spices for a double batch and taste as you go. Liquids should be reduced by about 10% in large batches because large pots have less surface area relative to their volume, leading to slower evaporation.
Smart Storage and Freezing Strategies
Storing your broth correctly is just as important as cooking it. Freshly made broth will stay safe and flavorful in the refrigerator for up to 5 days. I recommend storing it in glass mason jars. If you notice any sour smell or if the liquid becomes excessively cloudy after a few days, it’s time to toss it.
Freezing is the best way to manage a large batch. I like to freeze mine in silicone ice cube trays. Once frozen, pop the "broth cubes" into a freezer bag. This allows you to pull out exactly the amount you need whether it’s a single cube to deglaze a pan or a dozen cubes for a quick soup.
The broth will maintain its peak quality for about 6 months in the freezer.
To minimize waste, don't just throw away the strained vegetables. While they have given most of their flavor to the broth, they still contain fiber. I sometimes blend the soft carrots and onions into a "veggie mash" that can be hidden in meatloaf or used to thicken a rustic stew.
The onion skins and peppercorns, however, should definitely go into the compost pile.
Serving Ideas and Meal Pairings
This broth is the ultimate "silent partner" in your kitchen. It's designed to be versatile enough for everything from a delicate risotto to a hearty bean stew. If you're looking for a quick, healthy lunch, simply heat a cup of the broth with some frozen peas, a handful of spinach, and a squeeze of lemon juice.
It also works beautifully as a poaching liquid. Instead of boiling your chicken in plain water, use this broth to infuse the meat with extra flavor. This is particularly effective for recipes like a spinach chicken recipe, where the savory notes of the broth complement the earthy greens.
The Perfect Risotto Base
When making risotto, the broth is the most important ingredient. Since the rice absorbs almost all the liquid, any flaws in the broth will be magnified. Using this homemade version ensures that your risotto has a complex, layered flavor that store-bought cartons simply can't provide.
Keep the broth at a low simmer on the burner next to your risotto pan so you aren't shocking the rice with cold liquid each time you add a ladleful.
Healing Garlic Soup
For those days when you're feeling under the weather, this broth is a lifesaver. Sauté five extra cloves of minced garlic in a little olive oil, add two cups of this broth, and a handful of small pasta stars. It’s light, hydrating, and the high concentration of garlic provides a natural boost.
It’s a simple, efficient way to nourish yourself without needing to spend hours over the stove when you aren't feeling your best.

Recipe FAQs
How do you make simple vegetable broth?
Heat olive oil in an 8-quart stockpot over medium high heat. Sauté the onions, carrots, and celery for 6 8 minutes, stir in the tomato paste for one minute, then add the remaining ingredients and cold filtered water, simmering uncovered for 45 60 minutes before straining.
What makes a good vegetable broth?
Clarity and depth of flavor depend on gentle simmering. Avoid a rolling boil to prevent the liquid from becoming cloudy, and always use cold filtered water to ensure the cleanest taste profile.
What not to put in Homemade Vegetable Broth?
Avoid any vegetables that are soft, moldy, or past their prime. If you would not eat the produce raw in a salad, it will negatively affect the quality and flavor of your finished stock.
Is vegetable stock okay for gout?
Yes, this is generally considered a safe option. Since this recipe relies on aromatic vegetables, herbs, and mushrooms rather than purine heavy proteins, it is a suitable choice for those monitoring their intake.
Is it true I should boil the vegetables for as long as possible?
No, this is a common misconception. You should never simmer the broth for longer than 60 minutes, as the vegetables begin to lose their flavor and texture, resulting in a flat, unappealing liquid.
How to ensure the broth isn't too salty?
Wait until the very end of the cooking process to add any salt. Because the liquid reduces while simmering, the salt concentration increases significantly, which can easily lead to an oversalted final product if added too early.
How to use the tomato paste effectively?
Stir the paste into the sautéed vegetables and cook for one minute before adding water. This caramelization step deepens the color and flavor intensity, a Recipe with Fresh Tomatoes that you can also apply to other tomato based sauces.
Homemade Vegetable Broth
Ingredients:
Instructions:
Nutrition Facts:
| Calories | 32 kcal |
|---|---|
| Protein | 0.9 g |
| Fat | 1.8 g |
| Carbs | 3.6 g |
| Fiber | 0.4 g |
| Sugar | 1.9 g |
| Sodium | 38 mg |
