Korean Ground Beef Bowl
- Time: Active 10 minutes, Passive 15 minutes, Total 25 minutes
- Flavor/Texture Hook: Mahogany colored glaze with a velvety, sticky finish
- Perfect for: High protein meal prep or busy family Tuesday nights
- Create a Hearty Korean Ground Beef Bowl Tonight
- The Science of Creating a Perfect Sticky Glaze
- Critical Numbers for Your Weeknight Cooking Success
- Selecting the Best Components for Bold Beef Bowls
- Necessary Tools for Achieving a Professional Sear
- Mastering the Stages of Flavor Layering Technique
- Professional Fixes for Your Common Kitchen Mistakes
- Delicious Ways to Customize Your Beef Bowls
- Adjusting the Recipe for Different Group Sizes
- Debunking Common Korean Cooking Myths
- Storage and Reheating Tips for Better Leftovers
- Perfect Side Dishes to Balance Your Meal
- Recipe FAQs
- 📝 Recipe Card
Create a Hearty Korean Ground Beef Bowl Tonight
Listen, we have all been there. It is 6:00 PM, the kids are asking what is for dinner for the tenth time, and the thought of chopping a mountain of vegetables makes me want to hide. That was me last Tuesday. I had a pound of ground beef in the fridge and zero patience for a complex recipe.
Then, the sharp aroma of fresh ginger hitting hot oil changed the entire mood of my kitchen.
The sound of that beef hitting a hot skillet is honestly therapeutic. It is that aggressive, snapping sizzle that tells you real flavor is actually happening. Within fifteen minutes, my house smelled better than the Korean BBQ spot down the street.
It is a bold, satisfying meal that feels like a warm hug in a bowl, and the best part is that I did not even have to change out of my comfortable sweatpants to make it happen.
You are going to love how the light brown sugar and gochujang melt together to create this velvety, mahogany colored sauce that clings to every single crumble of meat. We are not just making a quick dinner here, we are building layers of comfort that satisfy that deep craving for something salty, sweet, and just a little bit spicy. This recipe is a great alternative to a classic Beef Noodle Casserole recipe when you want something with a bit more zing and less dairy.
The Science of Creating a Perfect Sticky Glaze
The Maillard Reaction: High heat triggers a chemical reaction between amino acids and reducing sugars, which creates that deep brown crust and complex savory flavor on the beef.
Sugar Polymerization: As the brown sugar heats up with the soy sauce, it creates a thick, glossy syrup that coats the protein fibers rather than just soaking into them.
Aromatic Volatility: Grating fresh ginger and garlic right before they hit the pan ensures the essential oils are at their peak, providing a much brighter flavor than pre minced versions.
| Beef Fat Percentage | Final Meat Texture | Best Usage Scenario | Chef's Secret |
|---|---|---|---|
| 90/10 Lean Beef | Firm and snappy | Best for meal prep bowls | Holds onto the sticky sauce without feeling greasy |
| 85/15 Blend | Tender and juicy | Great for family dinners | Needs a quick drain after browning to prevent a soggy bowl |
| 80/20 Chuck | Rich and very soft | Maximum flavor indulgence | Significant shrinkage, but offers the most satisfying mouthfeel |
The texture of your beef depends heavily on how much moisture is in the pan. If you overcrowd the skillet, the meat will steam in its own juices instead of searing, which leads to a grey, rubbery texture rather than those beautiful crispy bits we all want.
Critical Numbers for Your Weeknight Cooking Success
When I first started making this, I used to just eyeball the heat and the timing, but I realized that a few specific checkpoints make the difference between a "good" meal and one that people ask for every single week.
Using a heavy bottomed skillet is non negotiable because it maintains the heat needed to really caramelize that 1/4 cup of light brown sugar.
| Ingredient Component | Culinary Science Role | Pro Kitchen Secret |
|---|---|---|
| 90/10 Ground Beef | Structural Protein | Pat the meat dry with a paper towel before it hits the pan to ensure a deep mahogany sear. |
| Fresh Ginger | Protease Tenderizer | Contains enzymes that slightly soften beef fibers while providing a sharp, aromatic counterpoint to the sugar. |
| Gochujang Paste | Emulsifying Agent | This fermented paste adds "body" to the sauce, helping the liquid components cling to the meat. |
| Toasted Sesame Oil | Finishing Fat | Added at the end to preserve its delicate flavor, which can turn bitter if exposed to high heat for too long. |
The balance of flavors here relies on the interplay between the 1/4 cup of low sodium soy sauce and the sweetness of the sugar. This dish is much more flavorful than many other Ground Lamb Dishes recipe variations because the beef fat carries the heat of the gochujang so effectively.
Selecting the Best Components for Bold Beef Bowls
- 1 lb 90/10 lean ground beef: Provides a sturdy texture that stands up to the heavy sauce. Why this? Leaner meat prevents the bowl from becoming an oily mess once the rice is added. (Substitute: Ground turkey for a lighter feel)
- 3 cloves garlic, minced: The foundation of the aromatic profile. Why this? Fresh garlic provides a pungent bite that cuts through the sweet sugar. (Substitute: 1 tsp garlic powder in a pinch)
- 1 tbsp fresh ginger, grated: Adds a zesty heat you cannot get from a jar. Why this? Ginger brightens the heavy umami of the beef and soy. (Substitute: 1/2 tsp ground ginger)
- 1/4 cup low sodium soy sauce: The primary salt source and color builder. Why this? Low sodium allows you to control the saltiness while getting deep color. (Substitute: Tamari for a gluten-free version)
- 1/4 cup light brown sugar: Creates the sticky, glossy finish. Why this? The molasses in brown sugar adds a hint of caramel depth. (Substitute: Honey or maple syrup)
- 1 tbsp gochujang: Adds fermented funk and a gentle hum of heat. Why this? It provides a unique Korean flavor profile that sets this apart from basic stir fry. (Substitute: Sriracha mixed with a little miso)
- 1 tsp toasted sesame oil: The signature nutty aroma. Why this? It rounds out the sharp edges of the vinegar and soy. (Substitute: Toasted sesame seeds)
- 2 cups cooked jasmine rice: The perfect fluffy vehicle for the sauce. Why this? Jasmine rice has a floral scent that complements the ginger. (Substitute: Cauliflower rice for low carb)
Chef's Tip: Freeze your ginger root and grate it while frozen. It makes the fibers much easier to break down, and you do not even need to peel it first.
Necessary Tools for Achieving a Professional Sear
To get those crispy, shatter like edges on your ground beef, you need a pan that can hold onto its heat. A cast iron skillet is my absolute favorite tool for this job. If you throw cold meat into a thin non stick pan, the temperature drops instantly, and you end up boiling the meat in its own liquid.
You will also want a sturdy wooden spoon or a heat resistant spatula to break up the meat. I like to leave some chunks a bit larger, about the size of a marble, because it provides a more satisfying bite than meat that has been pulverized into tiny grains.
A microplane is another essential here for getting that ginger and garlic into a fine paste that melts right into the sauce.
Mastering the Stages of Flavor Layering Technique

- Prep the aromatics. Mince your 3 cloves of garlic and grate the 1 tbsp of fresh ginger. Note: Doing this first prevents the garlic from burning while you scramble for the ginger.
- Sear the beef. Heat 1 tsp of neutral oil in a large skillet over medium high heat until it wisps with smoke.
- Brown the meat. Add the 1 lb of ground beef, breaking it into large chunks. Let it sit undisturbed for 3 minutes until a dark brown crust forms on the bottom.
- Drain the excess. Move the meat to one side and spoon out any pooled liquid. Note: This ensures the sauce sticks to the meat rather than sliding off a layer of grease.
- Infuse the aromatics. Stir in the minced garlic and grated ginger. Cook for 1 minute until the air smells intensely fragrant and sharp.
- Build the sauce. Pour in the 1/4 cup of soy sauce, 1/4 cup of brown sugar, and 1 tbsp of gochujang.
- Reduce and glaze. Simmer the mixture for 3 to 5 minutes until the liquid thickens into a sticky, bubbling syrup that coats every piece of beef.
- The final touch. Remove from the heat and stir in 1 tsp of toasted sesame oil.
- Assemble the bowls. Divide 2 cups of jasmine rice and 2 cups of steamed broccoli into four bowls.
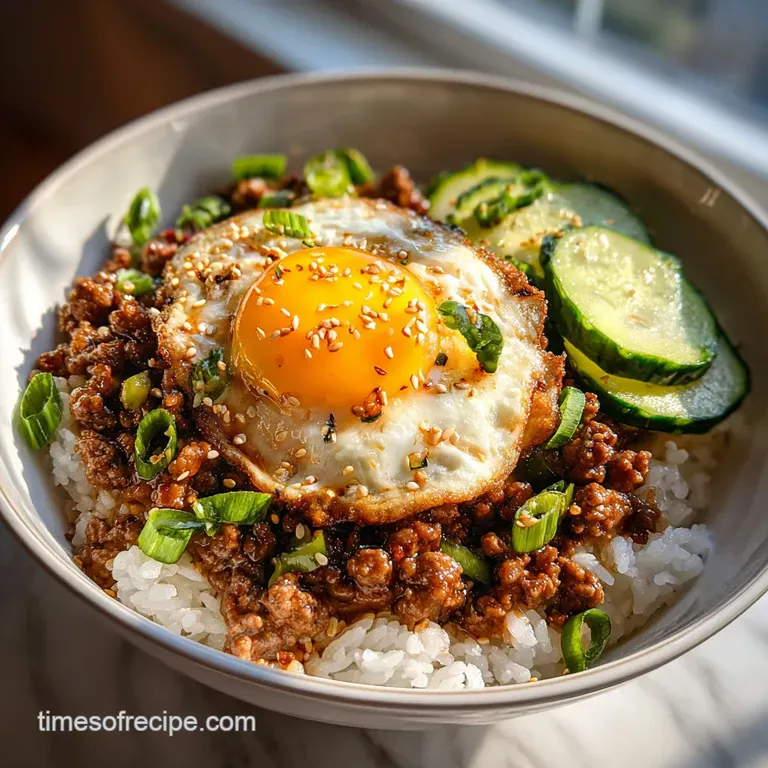
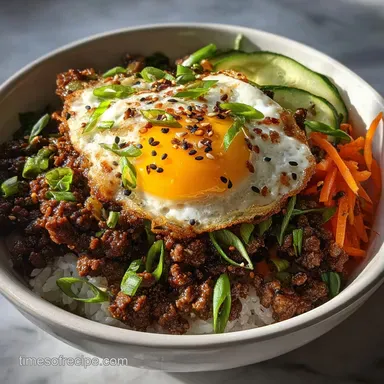
- Garnish and serve. Top with the glazed beef, sliced green onions, and toasted sesame seeds.
Professional Fixes for Your Common Kitchen Mistakes
Why Your Ground Beef Is Grey and Soggy
If your meat looks grey instead of brown, it is likely because the pan was not hot enough or you moved the meat around too much. Patience is a virtue when it comes to searing. Let that meat sit and fight the urge to stir it until you see those crispy edges peeking out.
Dealing with an Overly Salty Sauce
Sometimes different brands of soy sauce have wildly different salt levels. If you find the finished dish is a bit too salty for your palate, do not panic. You can balance it out after the fact with a small splash of rice vinegar or a squeeze of fresh lime juice.
The acidity cuts through the salt and brightens the whole dish.
| Problem | Root Cause | Solution |
|---|---|---|
| Meat is tough/dry | Cooked for too long at high heat | Add a splash of beef broth or water to rehydrate the sauce. |
| Sauce is too thin | Not enough sugar or not reduced enough | Simmer for 2 extra minutes or add a tiny cornstarch slurry. |
| Flavor is flat | Ginger was old or garlic was burnt | Finish with a heavy squeeze of lime and fresh green onions. |
Common Mistakes Checklist
- ✓ Pat the raw beef dry with a paper towel before adding it to the skillet.
- ✓ Do not crowd the pan; use at least a 12 inch skillet for 1 lb of beef.
- ✓ Wait for the oil to shimmer and smoke slightly before adding the meat.
- ✓ Use low sodium soy sauce to prevent a salt bomb.
- ✓ Grate the ginger and garlic fresh rather than using the pre minced jars.
Delicious Ways to Customize Your Beef Bowls
If you are looking to change things up, this recipe is incredibly flexible. For a Korean ground beef bowl with egg, try adding a sunny side-up egg on top. The runny yolk mixes with the sticky beef sauce to create a rich, velvety texture that is honestly out of this world.
For those watching their carbs, you can easily turn this into a healthy Korean ground beef bowl by swapping the jasmine rice for cauliflower rice or serving the beef inside large butter lettuce leaves. The crunch of the lettuce provides a wonderful contrast to the soft, savory meat.
If you want more vegetables, a Korean ground beef and broccoli mix is the classic choice. I like to toss the steamed broccoli florets directly into the pan with the beef for the last minute of cooking so they get coated in that beautiful mahogany glaze.
Adjusting the Recipe for Different Group Sizes
To Make a Smaller Batch
If you are cooking for just one or two people, you can easily halve this recipe. Use a smaller 8 inch skillet so the sauce does not evaporate too quickly. You will want to reduce the simmering time by about 2 minutes since there is less liquid to thicken.
To Feed a Large Crowd
When doubling or tripling this recipe, do not just throw all the meat in one giant pot. Work in batches to brown the beef. If you put 3 lbs of beef in one skillet, it will just boil. Brown the meat in 1 lb increments, set it aside, and then combine everything at the very end when you add the soy sauce and sugar.
| Number of People | Meat Amount | Rice Amount | Pan Size Recommendation |
|---|---|---|---|
| 2 Servings | 0.5 lb Beef | 1 cup Rice | 8 inch Cast Iron |
| 4 Servings | 1 lb Beef | 2 cups Rice | 12 inch Skillet |
| 8 Servings | 2 lbs Beef | 4 cups Rice | Two 12 inch Skillets |
Debunking Common Korean Cooking Myths
Myth: You must marinate ground beef for it to be flavorful. Actually, because ground beef has so much surface area, the sauce clings to it instantly. Marinating ground meat can often lead to a mushy texture. It is much better to sear the meat first and then glaze it.
Myth: Gochujang is too spicy for kids. While gochujang does have a kick, when it is diluted with 1/4 cup of brown sugar and soy sauce, the heat becomes very mild. It provides more of a deep, savory warmth than a burning spice.
Storage and Reheating Tips for Better Leftovers
This Korean ground beef bowl meal prep is a dream because the flavors actually get better as they sit. Store the beef in an airtight container in the fridge for up to 4 days. When you are ready to reheat, add a tiny splash of water to the meat before microwaving it. This helps loosen up the sugar based sauce so it becomes glossy and velvety again.
For freezing, this beef holds up surprisingly well. You can freeze the cooked beef mixture in a freezer safe bag for up to 3 months. To use it, just thaw it in the fridge overnight and hit it in a hot pan for a few minutes.
I do not recommend freezing the rice, as it can get grainy; it is better to make a fresh batch of jasmine rice while you reheat the meat.
Perfect Side Dishes to Balance Your Meal
While the beef is the star, the sides really make the bowl feel complete. A side of quick pickled cucumbers adds a bright, vinegary snap that cuts through the richness of the beef. Just thinly slice some Persian cucumbers and toss them with rice vinegar, a pinch of salt, and a dash of sugar while the beef is browning.
If you want to go all out, serve this with a side of kimchi or even some crispy seaweed snacks. The fermented tang of kimchi is the traditional partner for these flavors and adds a healthy dose of probiotics to your meal. If you have any extra beef, you might even consider trying your hand at a Biltong Recipe later in the week for a different take on preserved beef snacks.

Recipe FAQs
What is the best fat percentage for the ground beef to use?
90/10 lean beef is best for meal prep bowls. This higher lean ratio allows the meat to hold onto the sticky sauce without becoming overly greasy when reheated later.
How do I prevent the ground beef from boiling instead of searing?
Heat the pan until the oil lightly wisps with smoke before adding the meat. Overcrowding the skillet causes the temperature to drop instantly, forcing the meat to steam in its own juices rather than achieve a proper sear.
How to make the sauce sticky and glossy rather than watery?
Simmer the sauce components for 3 to 5 minutes after mixing with the beef. The combination of brown sugar and soy sauce needs time to polymerize over heat, which thickens the liquid into a glaze that clings well to the meat.
Is it true that I can use honey instead of brown sugar in the glaze?
Yes, you can substitute honey, but expect a slight change in texture. Honey has a different molecular structure than brown sugar, so the resulting glaze might be slightly runnier; you may need to simmer it a minute or two longer.
Can I use pre-minced garlic and ginger from a jar for faster prep?
No, using fresh aromatics is highly recommended for maximum flavor. Jarred versions often contain preservatives or are packed in oil that dulls the sharp, pungent qualities essential for balancing the sweetness of this dish.
What is the best way to cool down the heat if the gochujang makes it too spicy?
Add a splash of rice vinegar or a squeeze of fresh lime juice after the sauce has thickened. The acidity effectively cuts through the perceived heat of the gochujang, brightening the entire flavor profile, similar to how acid balances the fat in our BBQ Chicken Pasta recipe.
How should I adjust this recipe if I want to add broccoli florets?
Steam the broccoli separately until tender crisp, then toss it into the skillet during the final minute of cooking. This ensures the florets are coated in the sticky glaze without overcooking, maintaining that necessary textural contrast to the soft beef.
Korean Ground Beef Bowl
Ingredients:
Instructions:
Nutrition Facts:
| Calories | 382 kcal |
|---|---|
| Protein | 25.1 g |
| Fat | 11.9 g |
| Carbs | 43.5 g |
| Fiber | 1.8 g |
| Sugar | 13.2 g |
| Sodium | 648 mg |
