Cookie Recipe with Chocolate Chips
- Time: Active 20 mins, Passive 2 hours 10 mins, Total 2 hours 30 mins
- Flavor/Texture Hook: Shatter crisp edges with a velvety, fudgy center
- Perfect for: Elegant gifting or an elevated weekend treat
- The Best Cookie Recipe with Chocolate Chips
- The Secret to Every Bite
- Choosing Fast or Classic Methods
- The Elegant Building Blocks
- Essential Tools for Perfection
- The Magic Baking Process
- Fixing Common Baking Mistakes
- Simple Flavor Variations
- Scaling This Recipe
- Smart Storage Guidelines
- Perfect Pairings for Dessert
- Recipe FAQs
- 📝 Recipe Card
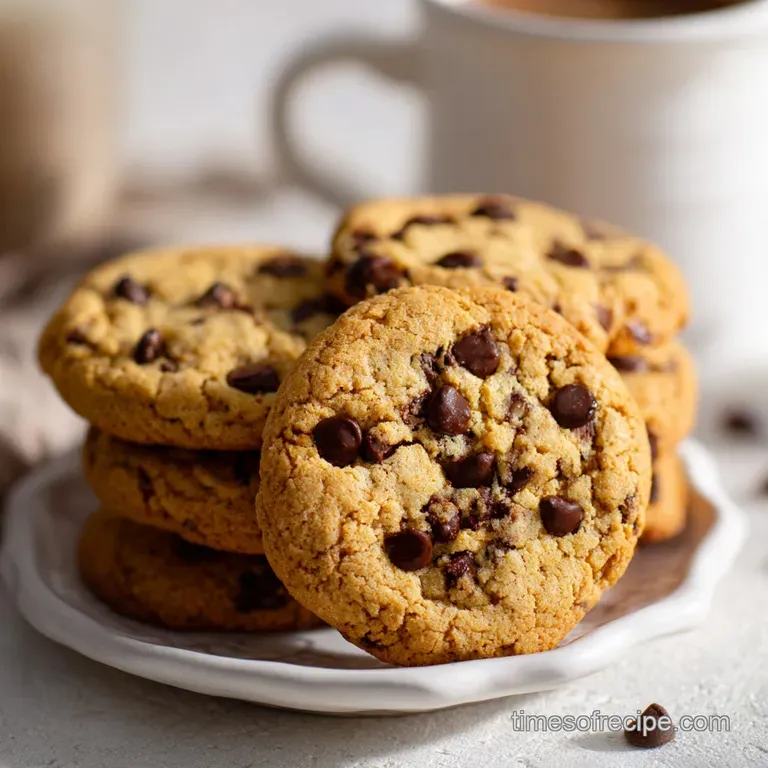
The Best Cookie Recipe with Chocolate Chips
Right then, imagine the smell of butter sizzling in a pan until it turns the color of a tarnished penny. That nutty, toasted aroma is the first hint that this isn't your average bake.
When you pull these out of the oven, the edges don't just crunch they shatter like fine glass, while the centers remain almost impossibly soft. It’s that contrast between the golden, caramelized rim and the molten bittersweet chocolate that makes this specific method so addictive.
I remember the first time I tried browning the butter for my cookies. I was impatient and didn't let the butter cool, which ended up melting the sugars into a greasy puddle. It was a disaster, honestly.
But after a few more tries, I realized that adding a tiny splash of cold water back into the browned butter creates the perfect emulsion. It brings back the moisture lost during the "sizzle" phase and ensures the dough stays supple. We're aiming for magic here, and that tiny detail is what makes the result so stunning.
The Secret to Every Bite
The real magic happens when we stop treating ingredients like a list and start treating them like a process. This recipe relies on the Maillard reaction not just in the oven, but in the pan before the dough is even mixed.
By browning our grass fed butter, we create complex flavor compounds that simple creaming can't touch. But the flavor isn't the only win; the texture is a direct result of how we handle the flour and sugars.
The Science of the Chill: Chilling the dough for 2 hours allows the flour to fully hydrate and the fats to solidify, which prevents excessive spreading.
This rest period also concentrates the sugars, leading to that coveted "toffee" flavor profile that characterizes a professional grade bake.
| Feature | Fast Method (No Chill) | Classic Method (2 Hour Chill) |
|---|---|---|
| Texture | Thinner, cakey, and soft | Thick, chewy, with crispy edges |
| Flavor | Sweet and simple | Deep, nutty, and caramelized |
| Visuals | Pale and uniform | Rugged, dark golden, and textured |
Trust me on this: if you skip the rest period, you’re missing out on 50% of the flavor. It’s like letting a stew sit overnight; the molecules just need time to get to know each other. While you wait, you can think about how this base compares to other classics, like the slightly softer texture found in a Pumpkin Chocolate Chip Cookies recipe. Both have their place, but today we are chasing that elegant, chewy crispy balance.
Choosing Fast or Classic Methods
When we talk about a Cookie Recipe with Chocolate Chips, precision matters more than speed. If you’re in a massive rush, you can bake these immediately, but they will be much flatter. I always recommend the classic route for that stunning, bakery style ripple.
Chef Tip: Freeze your butter for 10 minutes before dicing it to brown. This ensures it melts and browns evenly without the milk solids burning before the fat is ready.
Another unconventional trick I've learned is to use an extra egg yolk. The white adds structure, but the yolk adds that velvety, fudge like richness that makes a cookie feel expensive. It changes the protein to fat ratio just enough to make the center feel like a truffle.
| Component | Science Role | Pro Secret |
|---|---|---|
| Brown Butter | Fat & Flavor | Replace lost water (1 tbsp) to keep the dough from becoming too crumbly. |
| Egg Yolk | Emulsifier | Provides extra lecithin for a silkier, more decadent mouthfeel. |
| Dark Brown Sugar | Humectant | The high molasses content ensures the center stays soft for days. |
The Elegant Building Blocks
Every ingredient here serves a purpose in building those flavor layers. We aren't just tossing things in a bowl; we're layering textures. I use unsalted grass fed butter because the higher fat content leads to a better "shatter" on the edges.
For the chocolate, go for bittersweet chips 60% cacao is the sweet spot. Anything sweeter and the sugar becomes overwhelming; anything darker and it loses that velvety melt.
- 1 cup (225g) unsalted grass fed butter: The soul of the recipe.
- 1 tbsp (15ml) cold water: Why this? Replaces moisture evaporated during the browning process.
- 2 ¼ cups (280g) all purpose flour: Provides the necessary structure.
- 1 tsp (6g) baking soda: Reacts with brown sugar for lift.
- ¾ tsp (4g) fine sea salt: Balances the intense sweetness.
- ¾ cup (150g) dark brown sugar: Why this? Creates a deep, molasses driven chewiness.
- 1/4 cup (50g) granulated cane sugar: Helps achieve those crispy, crackly edges.
- 1 large egg + 1 large egg yolk: For ultimate richness.
- 2 tsp (10ml) pure vanilla extract: Highlights the chocolate notes.
- 1 ½ cups (255g) bittersweet chocolate chips: Use high-quality 60% cacao.
- 1 tsp flaky sea salt: For that final, elegant sparkle.
| Original Ingredient | Substitute | Why It Works |
|---|---|---|
| Dark Brown Sugar | Light Brown Sugar | Less molasses, so the cookie will be slightly crispier and less "fudgy." |
| Bittersweet Chips | Semi sweet Chips | Increases sweetness; works well for those who prefer a traditional milk chocolate vibe. |
| Grass fed Butter | Standard Unsalted Butter | Lower fat content. Note: Edges might be slightly less crispy, but still delicious. |
If you find yourself loving this flavor profile but want something a bit different for a holiday party, you might enjoy the texture of a Chocolate Chip Cookies recipe that focuses more on a classic creaming method. But for today, we are sticking with the liquid gold of brown butter.
Essential Tools for Perfection
You don't need a professional kitchen, but a few specific tools make this simple recipe even easier. A light colored skillet (like stainless steel) is crucial for browning the butter because it allows you to see the color change clearly.
If you use a dark cast iron, you might miss the moment it turns amber and accidentally burn it.
A stand mixer is great, but honestly, a sturdy whisk and a spatula work just as well since we aren't creaming cold butter. You’ll also want heavy duty baking sheets that won't warp in the heat. Thin sheets often lead to burnt bottoms before the centers are set.
Finally,, a cookie scoop ensures every piece is the same size, which means they all finish baking at the exact same moment. No one wants one burnt cookie and one raw one in the same batch!
The Magic Baking Process
ACHIEVING THE AMBER GLOW
Place your butter in a small saucepan over medium heat. Let it melt, then sizzle and pop. Swirl the pan constantly. Once the foam subsides and you see little brown specks at the bottom, remove it from the heat immediately. Pour it into a large, heat proof bowl and whisk in the 1 tbsp of cold water.
Note: The water will hiss this is normal. It’s re hydrating the fat.
AERATING THE SUGARS AND FATS
Add both the dark brown sugar and granulated sugar to the warm butter. Whisk vigorously for about 2 minutes. You want the sugar to start dissolving into the fat. Add the whole egg, the yolk, and the vanilla. Continue whisking until the mixture looks pale and slightly thickened.
This aeration is what creates that beautiful crackly top.
FOLDING THE FOUNDATION
In a separate bowl, whisk the flour, baking soda, and fine sea salt. Gradually fold the dry ingredients into the wet mixture using a spatula. Stop the moment you see no more white streaks of flour. Note: Over mixing at this stage develops too much gluten, making the cookies tough instead of tender.
THE CHOCOLATE INCLUSION
Fold in the bittersweet chocolate chips. Ensure they are evenly distributed so every bite has a molten pocket of cacao. The dough will look very soft and glossy at this point this is exactly what we want.
PRACTICING PATIENCE (THE CHILL)
Cover the bowl and refrigerate for at least 2 hours. This is the hardest part, I know! But as the dough rests, the flour absorbs the moisture from the eggs and butter, which leads to a more uniform bake and a much deeper flavor.
BAKING TO PERFECTION
Preheat your oven to 350°F. Line two baking sheets with parchment paper. Scoop 2 tablespoon sized balls of dough and space them 3 inches apart. Bake for 9 to 11 minutes until the edges are dark golden and the centers still look slightly underdone.
They will firm up as they cool on the hot pan.
THE FINISHING TOUCH
The moment they come out of the oven, sprinkle a tiny pinch of flaky sea salt over each one. Let them sit on the pan for 5 minutes before moving them to a wire rack to cool completely.
Fixing Common Baking Mistakes
Even the best of us have a batch go sideways sometimes. Usually, it comes down to temperature either the oven or the butter. If your cookies came out like thin pancakes, your butter was likely still too hot when you added the eggs, or your kitchen was too warm.
Why Your Cookies Spread Too Much
This often happens if the dough wasn't chilled long enough or if the butter wasn't properly emulsified with the sugars. If the fat is too liquid when it hits the oven, it escapes the flour structure before the edges can set.
Why the Texture is Sandy
A sandy or gritty texture usually means the sugars didn't dissolve enough into the butter and eggs. Make sure you whisk the warm butter and sugars together until the mixture looks smooth and cohesive before adding the dry ingredients.
| Problem | Root Cause | Solution |
|---|---|---|
| Burnt Bottoms | Oven rack too low or dark pans | Move rack to the middle; use parchment paper or silicone mats. |
| Hard/Tough Cookies | Over mixing the flour | Fold in dry ingredients only until the white streaks disappear. |
| Puffy/Cakey Results | Too much egg white or flour | Measure flour by weight (280g) and ensure you only use one whole egg plus one yolk. |
Common Mistakes Checklist
- ✓ Always use a kitchen scale for the flour; volume measurements with cups can vary by 20%.
- ✓ Don't skip the cold water addition to the brown butter; it’s vital for moisture balance.
- ✓ Ensure your baking soda is fresh (less than 6 months old) for the proper lift.
- ✓ Never place raw dough onto a hot baking sheet from a previous batch; let the pan cool first.
- ✓ Wait the full 5 minutes before moving cookies to a rack to prevent them from breaking.
Simple Flavor Variations
Once you’ve mastered this base, you can start playing with the profile. I love adding a teaspoon of espresso powder to the dry ingredients it doesn't make them taste like coffee, but it makes the chocolate taste ten times more intense. It’s like turning up the volume on the cacao.
If you want a bit of crunch, toasted walnuts or pecans are a stunning addition. Just make sure to toast them in a dry pan for 3 minutes first to release their oils. For those with dietary needs, you can swap the flour for a 1:1 gluten-free blend, though the texture will be slightly more fragile. If you’re looking for a completely different vibe, like a no bake option, you could always check out a Haystacks recipe for those busy days.
Scaling This Recipe
HALVING THE BATCH
To make 12 cookies, use 1/2 cup of butter and 1 1/8 cups of flour. For the egg, whisk one large egg in a small bowl and use exactly 2 tablespoons of it, then add the single yolk. Reduce the baking time by about 1 minute as smaller batches can sometimes bake faster in a hot oven.
DOUBLING THE BATCH
When making 48 cookies, double everything except the salt and spices use 1.5x the salt and vanilla to avoid overpowering the dough. Work in batches for the baking; never crowd more than two sheets in the oven at once, or the airflow will be restricted, leading to uneven browning.
Smart Storage Guidelines
To keep that "shatter" on the edges, store these in an airtight container at room temperature for up to 4 days. If they start to soften too much, you can pop them in a 300°F oven for 2 minutes to crisp them back up. For longer storage, these cookies freeze beautifully.
I actually prefer eating them cold straight from the freezer!
Zero Waste Tip: Don't toss that extra egg white! Store it in a small jar in the fridge for up to 2 days. It’s perfect for making a quick meringue, adding to your morning omelet, or even shaking into a classic whiskey sour cocktail for a velvety foam.
Perfect Pairings for Dessert
These cookies are quite rich, so they pair beautifully with something that has a bit of acidity or bitterness. A cold glass of whole milk is the classic choice, but a double shot of espresso or a dark roast coffee is even better for an adult treat.
If you're serving these at a dinner party, try plating a warm cookie with a scoop of high-quality vanilla bean ice cream and a drizzle of extra virgin olive oil. The fruitiness of the oil against the sea salt and chocolate is absolutely stunning. It’s a simple way to turn a "cookie" into a "dessert." If you're looking for more classic inspiration, you can always look back at a Peanut Butter Blossom Cookies recipe to see how different fats and textures play together on a dessert platter. Enjoy the magic!

Recipe FAQs
What is the secret to making good chocolate chip cookies?
Brown your butter and chill the dough. Browning the butter develops deep, nutty flavors, while chilling allows the flour to hydrate and fats to solidify, preventing excessive spreading and concentrating sugars for a richer taste. If you enjoyed mastering texture control here, the same principle of fat manipulation applies to achieving perfect flaky layers in our Ted Lasso Biscuit: Perfect Homemade Shortbread Recipe.
What is in cowboy cookies?
Cowboy cookies typically contain oats, pecans, and shredded coconut. They often include classic chocolate chips and can also feature cinnamon for a warm spice note, creating a hearty, textured cookie.
What are the 10 most popular homemade cookies?
Chocolate chip cookies are consistently the most popular. Other top contenders usually include peanut butter cookies, sugar cookies, oatmeal raisin, shortbread, gingerbread, and brownies, often celebrated for their comforting flavors and textures.
What are the 5 ingredient magic cookies?
These cookies typically rely on sweetened condensed milk, chocolate chips, vanilla, butter, and flour. The condensed milk acts as both a binder and sweetener, simplifying the recipe for a quick, sweet treat reminiscent of some bar cookie recipes.
Can I use regular butter instead of grass fed butter?
Yes, you can substitute standard unsalted butter. Grass fed butter has a slightly higher fat content which can contribute to crispier edges, but regular unsalted butter will still yield delicious results.
My cookies spread too much. What did I do wrong?
This usually means the dough wasn't chilled long enough or the butter was too warm. When the fat is too liquid upon hitting the oven, it escapes the flour structure before the edges can set, leading to excessive spreading. Proper dough chilling is key for texture control.
Can I make these cookies ahead of time?
Yes, the dough can be scooped and frozen for up to 3 months. This makes them perfect for spontaneous baking and ensures you always have a batch of delicious cookies ready for any occasion, much like how Christmas Sweets: make-ahead For Holiday Gifting offers convenience.
Chocolate Chip Cookie Recipe

Ingredients:
Instructions:
Nutrition Facts:
| Calories | 206 kcal |
|---|---|
| Protein | 2.2 g |
| Fat | 11.8 g |
| Carbs | 23.2 g |
| Fiber | 1.2 g |
| Sugar | 12.8 g |
| Sodium | 134 mg |
