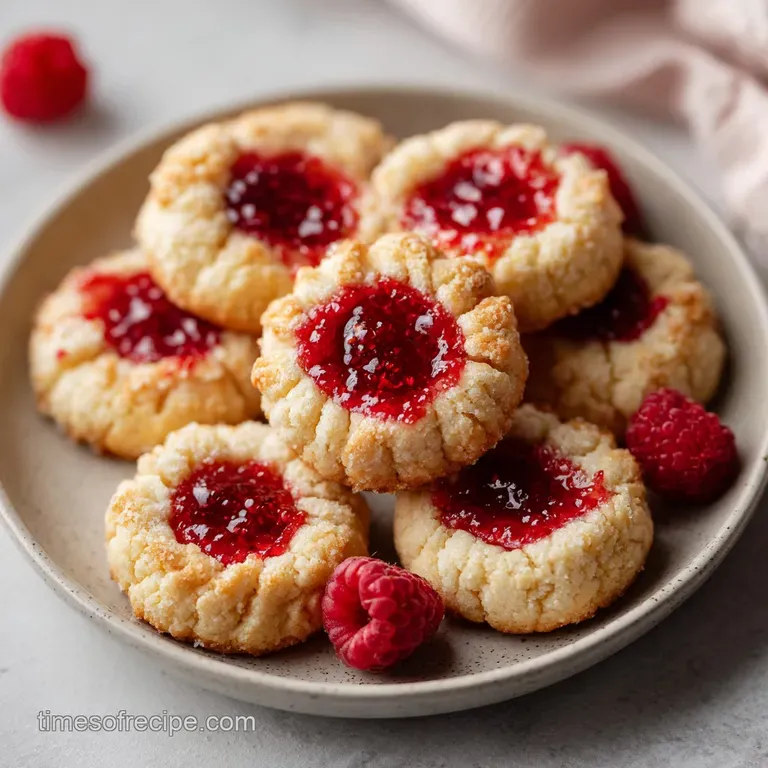
Thumbprint Cookies Easy Raspberry Recipe with Jam
- Time: Active 15 minutes, Passive 12 minutes, Total 27 minutes
- Flavor/Texture Hook: Buttery, shatter crisp edges with a velvety raspberry finish
- Perfect for: Holiday cookie swaps, elegant afternoon tea, or beginner bakers
- Master the Thumbprint Cookies Easy Raspberry Recipe
- Why This Recipe Works
- The Physics of the Shatter
- Ingredients for Baking Magic
- Tools for Elegant Cookies
- Crafting the Stunning Result
- Fixes for Baking Issues
- Simple Dietary Adaptations
- Storing Your Sweet Gems
- Elegant Serving Ideas
- Myths About Thumbprints
- Recipe FAQs
- 📝 Recipe Card
Master the Thumbprint Cookies Easy Raspberry Recipe
The moment you crack open the bottle of pure almond extract, the kitchen transforms. That sweet, cherry adjacent perfume hits the air, mingling with the scent of softened butter, and you just know something special is happening.
I remember the first time I tried making these for a neighborhood swap; I was so rushed I skipped the cornstarch, thinking it wouldn't matter. I ended up with "thumbprint pancakes" that tasted fine but looked like a sad kitchen accident.
That mistake taught me that baking is less about following a list and more about understanding the little whispers from your ingredients. When you get the dough just right, it feels like play dough supple, soft, and completely obedient.
Pressing your thumb into the center should feel satisfying, creating a little crater ready to hold a pool of ruby red jam. It’s a small, quiet magic that happens right on your baking sheet.
We’re going for a result that looks like it belongs in a glass display case at a boutique patisserie but feels as cozy as a childhood memory. No complicated chill times that last for hours, and no fussy decorations. Just a few pantry staples turned into something stunning.
Let's walk through exactly how to get that perfect "shatter" texture every single time.
Why This Recipe Works
- The Starch Secret: Adding cornstarch interrupts gluten formation, ensuring the cookie has a delicate "shatter" rather than a chewy or tough bite.
- Almond Synergy: Almond extract acts as a flavor bridge, making the raspberry jam taste more like fresh fruit and less like store-bought sugar.
- Moisture Balance: Using powdered sugar instead of granulated sugar keeps the dough tight, which prevents the cookies from spreading too far in the oven.
- Thermal Stability: Adding the jam before baking allows the fruit pectins to set firmly, creating a jammy "gem" that won't stick to your fingers.
| Preparation Method | Time Required | Final Texture | Best For |
|---|---|---|---|
| Room Temp Dough | 27 minutes | Soft & crumbly | Quick cravings |
| Chilled Dough | 57 minutes | Sharper edges | Professional look |
| Frozen Dough | 1.5 hours | Very crisp | make-ahead prep |
Chilling the dough isn't strictly necessary for this specific ratio, but if your kitchen is particularly warm, a quick 15 minute rest in the fridge can make the balls easier to roll. It keeps the butter from melting too quickly when your warm palms touch the dough.
The Physics of the Shatter
The secret to this "shatter" texture is the ratio of fat to flour. Unlike a chewy chocolate chip cookie that relies on moisture and sugar caramelization, this thumbprint cookies easy raspberry recipe is essentially a high fat shortbread.
By using 227g of butter against 250g of flour, we create a structure held together by fat. When the heat hits, the tiny bit of water in the butter turns to steam, creating microscopic layers that snap beautifully when you take a bite.
Component Analysis
| Ingredient | Science Role | Pro Secret |
|---|---|---|
| Unsalted Butter | Provides "short" crumb | Use European style butter for higher fat and less water. |
| Cornstarch | Softens protein | Sift it with the flour to avoid tiny white clumps in the dough. |
| Powdered Sugar | Controls spread | The cornstarch already in powdered sugar helps the cookies hold their shape. |
Using high-quality butter is the most important choice you'll make here. Since there are so few ingredients, the flavor of the butter is front and center. I usually reach for a block with at least 82% fat content to ensure that velvety mouthfeel we're after.
Ingredients for Baking Magic
- 1 cup (227g) unsalted butter, softened: Why this? Provides the foundational flavor and the necessary fat for a melt in-your mouth texture. (Substitute: Salted butter, but omit the extra salt).
- 1/2 cup (60g) powdered sugar: Why this? Creates a finer, tighter crumb than granulated sugar. (Substitute: Granulated sugar pulsed in a blender).
- 1 tsp (5ml) pure vanilla extract: Why this? Rounds out the sweetness with a classic floral note. (Substitute: Vanilla bean paste).
- 1/2 tsp (2.5ml) pure almond extract: Why this? Adds an elegant, professional depth that defines this specific cookie. (Substitute: Extra vanilla).
- 2 cups (250g) all purpose flour: Why this? The structural base that holds the jam pocket. (Substitute: 1 to-1 gluten-free flour blend).
- 1/4 cup (32g) cornstarch: Why this? Acts as a tenderizer by preventing too much gluten from developing. (Substitute: Arrowroot powder).
- 1/2 tsp (3g) fine sea salt: Why this? Sharpens the other flavors so they aren't flat. (Substitute: Table salt, but use slightly less).
- 1/3 cup (80ml) high-quality raspberry jam: Why this? The jewel like center that provides a tart contrast. (Substitute: Apricot or strawberry preserves).
- 1 tsp fresh lemon zest (optional): Why this? Brightens the jam and adds a tiny hint of citrus aroma. (Substitute: Orange zest).
Tools for Elegant Cookies
You don't need a pantry full of gadgets, but a few specific items make this much easier. A stand mixer (like a KitchenAid) or a hand mixer is essential for creaming the butter and sugar until they are pale and fluffy. This step incorporates air, which helps the cookies feel light rather than leaden.
I also highly recommend using a small cookie scoop (about 1 tablespoon size). This ensures every cookie is the exact same size, which means they will all finish baking at the same time. If you have a silicone baking mat (like a Silpat), use it!
It prevents the bottoms from browning too quickly and makes cleanup a breeze. If not, high-quality parchment paper works just as well. Finally, a half teaspoon measuring spoon is the secret weapon for making perfectly round "thumbprints" without using your actual thumb, which can sometimes leave messy nail marks or uneven edges.
Crafting the Stunning Result

1. The Creaming Phase
Beat 227g of softened butter and 60g of powdered sugar in a large bowl. Cream for 3 full minutes until the mixture looks pale and cloud like.Note: This aerates the fat, which is the only "lift" these cookies get since there's no baking powder.
2. The Fragrant Infusion
Add 5ml of vanilla and 2.5ml of almond extract to the butter mixture. Mix until the sweet, nutty aroma fills the air. This is when the dough starts to smell like a professional bakery.
3. Sifting the Solids
In a separate bowl, whisk together 250g of flour, 32g of cornstarch, and 3g of salt. Slowly add the dry ingredients to the wet while the mixer is on low.Note: Mixing slowly prevents a flour cloud and keeps the dough tender.
4. The Sculpting Moment
Scoop the dough into 24 even balls, roughly 2.5 cm in diameter. Roll each between your palms until perfectly smooth with no visible cracks. If the dough feels too soft, pop the balls in the fridge for 10 minutes.
5. Creating the Crater
Place the balls on a lined baking sheet. Use the back of a rounded half teaspoon to gently press a well into the center of each ball.Note: If the edges crack significantly, your dough might be a bit dry; just pinch them back together with your fingers.
6. The Ruby Filling
Whisk your 80ml of raspberry jam in a small bowl to loosen it up. Carefully spoon about 1/2 teaspoon of jam into each well.Note: Don't overfill, or the jam will bubble over the sides and hide the beautiful buttery ring.
7. The Bake
Slide the tray into an oven preheated to 180°C. Bake for 12 minutes until the edges are set and just barely starting to turn golden. The kitchen should smell like toasted butter and warm fruit.
8. The Cooling Finish
Let the cookies rest on the hot baking sheet for 5 minutes before moving them to a wire rack. Wait until they are completely cool before eating.Note: The jam needs this time to set into its signature chewy, jewel like texture.
Fixes for Baking Issues
Why Your Cookies Spread
If your cookies come out looking like flat puddles, the most common culprit is butter that was too soft or even melted. Butter should be "cool room temperature" soft enough to dent with a finger, but still holding its shape. If the dough feels greasy as you roll it, that's a sign the fat is melting.
The Cracked Earth Effect
Deep cracks around the edges happen when the dough is too cold or has too much flour. If you notice this while pressing the wells, try warming a ball of dough in your hands for a few seconds before pressing. You can also lightly dampen your finger to smooth out any small fissures before they go into the oven.
| Problem | Root Cause | Solution |
|---|---|---|
| Crumbly Dough | Too much flour | Add 1 tsp of milk or cream to bind it. |
| Leaking Jam | Overfilling the well | Use a smaller spoon and leave a 2mm rim. |
| Tough Texture | Overmixing the flour | Stop mixing as soon as no white streaks remain. |
Common Mistakes Checklist
- ✓ Always fluff your flour with a spoon before measuring into a cup to avoid packing it down.
- ✓ Ensure your oven is fully preheated; a cool oven causes the butter to leak out before the structure sets.
- ✓ Don't skip the salt; it's essential to balance the sweetness of the jam and powdered sugar.
- ✓ Use "jam" rather than "jelly" jelly has a lower melting point and will run everywhere.
- ✓ If using lemon zest, rub it into the powdered sugar first to release the fragrant oils.
Similar to the technique used in my Peanut Butter Cookies recipe, the texture depends entirely on the fat to dry ratio, so precision is your friend here!
Simple Dietary Adaptations
1. The gluten-free Swap
This recipe translates beautifully to gluten-free. Use a high-quality 1 to-1 baking flour that contains xanthan gum. Because this is a shortbread style cookie, the lack of gluten actually helps maintain that desired crumbly texture.
You might find you need an extra tablespoon of jam, as GF flours can sometimes be a bit thirstier.
2. The Vegan Alternative
To make these vegan, swap the butter for a high fat vegan butter stick (avoid the tubs, which have too much water). Ensure the butter is chilled slightly more than usual, as plant based fats tend to melt at lower temperatures. The flavor will be slightly different, but the raspberry jam remains the star.
3. The Low Sugar Twist
While the powdered sugar provides structure, you can swap the raspberry jam for a refined sugar-free fruit spread. Look for one sweetened with white grape juice or dates. Just be aware that these spreads often have a higher water content, so they might bubble more in the oven.
Storing Your Sweet Gems
These cookies are surprisingly hardy! Keep them in an airtight container at room temperature for up to 5 days. If you live in a very humid climate, you might notice the jam gets a little sticky; in that case, place a piece of parchment paper between layers to keep them from bonding together.
For long term storage, these freeze like a dream. You can freeze the baked and cooled cookies for up to 3 months. To serve, just let them sit at room temperature for about 30 minutes.
If you want that "fresh from the oven" smell, pop them in a 150°C oven for 3 minutes just to wake up the buttery fats.
Zero Waste Tip: If you have leftover jam, whisk it with a little balsamic vinegar and olive oil for a stunning fruity salad dressing. Any leftover dough scraps can be rolled into tiny "buttons," baked off, and used as a crunchy topping for vanilla ice cream.
Elegant Serving Ideas
1. The Afternoon Tea Pairing
These cookies are the natural best friend of a steaming cup of Earl Grey or Darjeeling. The bergamot in the tea highlights the lemon zest in the jam, creating a sophisticated flavor profile. Arrange them on a tiered stand with small finger sandwiches for a classic look.
2. The Savory Contrast
If you're serving these as part of a larger dessert board, try placing them near a wedge of sharp white cheddar or a creamy brie. The buttery, sweet tart nature of the cookie acts as a brilliant palate cleanser against the richness of the cheese.
3. The Gift Box Finish
If you're making this thumbprint cookies easy raspberry recipe for a gift, wait for the jam to be completely set (about 2 hours), then lightly dust the edges with a tiny bit of extra powdered sugar. It makes the raspberry center pop like a glowing ruby. If you like the look of a different fruit, you could even mix and match with my Strawberry Kiss Cookies recipe for a beautiful red toned cookie tray.
Myths About Thumbprints
A common misconception is that you have to use your thumb to make the indentation. While the name suggests it, using a small measuring spoon actually creates a more uniform well that holds the jam better without the risk of the cookie "mushrooming" or cracking unevenly.
The spoon creates a flat bottom in the well, ensuring the jam stays put rather than sliding toward one side.
Another myth is that the jam will get hard if you bake it. In reality, the heat of the oven slightly reduces the water content in the jam, concentrating the flavor and helping the natural pectins set.
This creates a chewy, candy like texture that is far superior to adding cold jam to a pre baked cookie, which often ends up soggy.
Finally, some think you need baking powder for these to be light. This is a "short" dough, meaning it relies on the creaming of butter and sugar for its lift. Adding leavening agents like baking powder would actually cause the cookies to puff up too much, losing the definition of the thumbprint and making the jam spill out.
Trust the butter!

Recipe FAQs
Can I substitute the raspberry jam with a different preserve?
Yes, substitution works well, but manage moisture. Use firm jams like apricot or strawberry; very soft jellies can cause leakage during the bake. For a different fruit profile, try incorporating the technique used for balancing tartness in our Mini Pavlova with Berries recipe.
How do I prevent the cookies from spreading too much during baking?
Chill the dough for at least 15 minutes before scooping. This solidifies the butter, slowing its melting rate in the oven, which is crucial for maintaining the defined thumbprint shape.
Is it true that skipping the cornstarch will result in a chewier cookie?
Yes, omitting cornstarch results in a tougher, less delicate texture. Cornstarch interrupts gluten formation, providing the signature "shatter" associated with high-quality shortbread bases.
How to achieve a perfectly smooth, uncracked dough ball before baking?
Roll the dough between the palms of your hands until completely smooth, applying even pressure. If the dough resists and shows fissures, your butter might be too cold, so warm the dough slightly in your hands first.
Must I use almond extract, or can I use only vanilla?
No, you don't have to use almond, but it adds complexity. Almond extract enhances the fruit flavor of the raspberry, making it taste fresher; using only vanilla results in a simpler, sweeter butter cookie profile.
How long can the unbaked cookie dough be stored in the refrigerator?
The dough stores safely for up to 48 hours refrigerated. Keep the dough tightly wrapped in plastic wrap to prevent drying out, ensuring it returns to a workable temperature before rolling.
Why are my cookies sticking to the baking sheet after cooling?
This usually indicates insufficient parchment paper or mat use. Always use parchment paper or a silicone baking mat; if using bare metal, lightly dust the pan with flour to prevent sticking, especially with high sugar doughs.
Easy Raspberry Thumbprint Cookies

Ingredients:
Instructions:
Nutrition Facts:
| Calories | 133 kcal |
|---|---|
| Protein | 1.2 g |
| Fat | 7.8 g |
| Carbs | 14.6 g |
| Fiber | 0.4 g |
| Sugar | 5.4 g |
| Sodium | 49 mg |
