Sugar Cookie Icing: the Hard-Setting Royal Method
- Chef’s Choice: Flawless, Fast-Setting Sugar Cookie Icing (The Royal Treatment)
- Achieving the Professional Finish: Why Meringue Powder is Essential
- The Science of Smooth: Why This Flawless, Fast-Setting Icing Sets Rock-Hard
- Essential Components for the Perfect Cookie Canvas
- Whipping Up the Flawless Royal Icing Base: Step-by-Step Method Guide
- Troubleshooting and Advanced Techniques for Cookie Decorating
- Preparation and Shelf Life: Storing Your Decorative Mixture
- Beyond the Plate: Creative Uses for Hard-Setting Icing
- Recipe FAQs
- 📝 Recipe Card
Chef’s Choice: Flawless, Fast Setting Sugar Cookie Icing (The Royal Treatment)
Achieving the Professional Finish: Why Meringue Powder is Essential
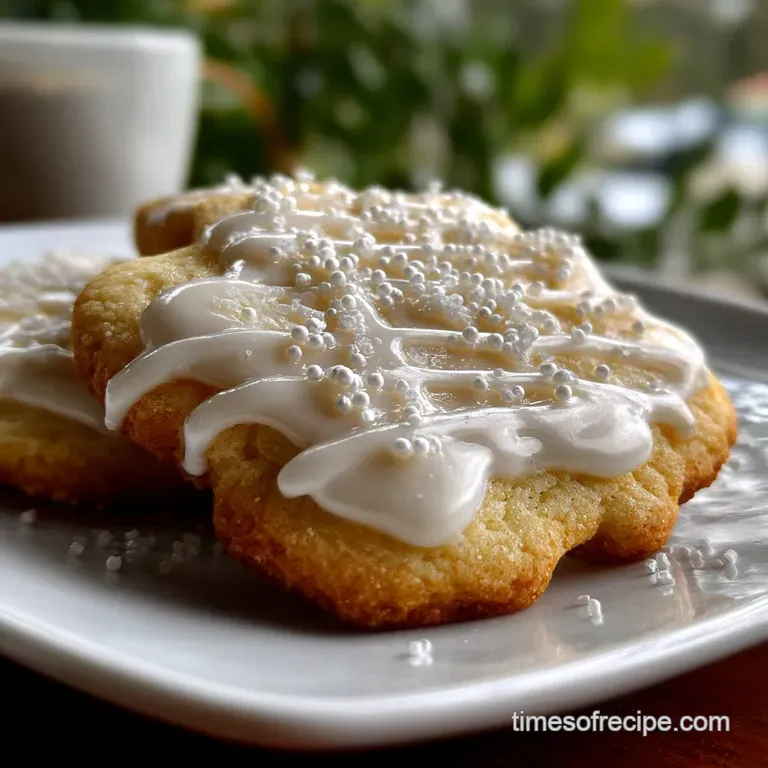
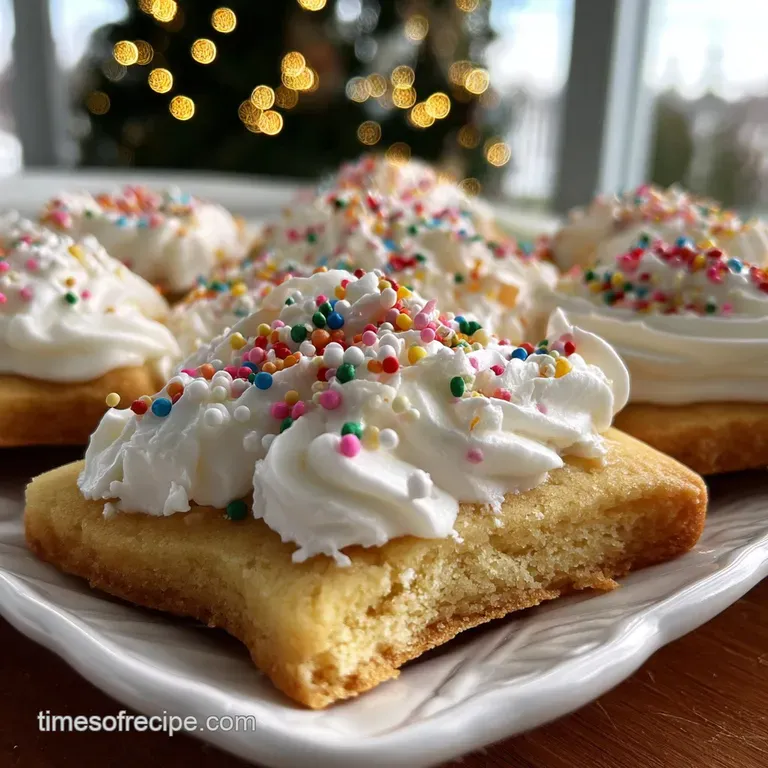
If you’re serious about decorating, you need serious Sugar Cookie Icing . We aren't making a sticky, runny drizzle here; we are creating a flawless, structural shell that transforms a humble cookie into a miniature work of art.
The smell of this icing, rich with vanilla and that subtle hint of almond, is the official scent of holiday baking at my house.
Forget that frustrating glaze that stays tacky for three days and smears all over your perfect packaging. This specific Sugar Cookie Icing recipe sets up rock hard in hours, giving you that incredible high shine finish professional bakers get. It’s cheap, uses five simple ingredients, and is frankly a game changer for anyone who loves decorating Sugar Cookie Recipe: Best Cutout for Perfect Decorating .
We're going to dive deep into exactly how to master this technique, ensuring you always achieve the two vital consistencies: the thick line and the smooth flood. Seriously, making this ultimate Sugar Cookie Icing is easier than you think. Let's crack on!
The Science of Smooth: Why This Flawless, Fast Setting Icing Sets Rock Hard
The magic ingredient here is meringue powder. It’s the secret to reliable, stable, and quick drying Sugar Cookie Icing . If you want icing that hardens completely, you cannot skip this step. I tried relying on tricky glazes for years, resulting in heartbreak and smudged Christmas cookies.
Never again!
Defining Royal Icing vs. Simple Powdered Sugar Glaze
A simple glaze is just powdered sugar and milk or juice; it stays semi soft and translucent. Royal icing, however, uses meringue powder or egg whites to introduce protein. When whipped, that protein creates a stable structure that air-dries into a smooth, opaque, waterproof shell. This difference is critical.
If you are decorating cookies you plan to stack, gift, or ship, you need this hard setting Sugar Cookie Icing .
The Stability and Safety of Meringue Powder Over Egg Whites
Look, I love tradition, but raw egg whites are risky, especially when baking for big groups or kids. Meringue powder is pasteurized dried egg whites, making this Sugar Cookie Icing completely shelf stable and safe.
It whips up consistently every single time, giving you better control over volume and texture than fresh egg whites ever will.
What to Expect: Texture, High Shine, and Setting Time
When finished, this Sugar Cookie Icing will be unbelievably smooth, almost like liquid plastic when wet. When dried overnight, it develops a mirror like shine and a crisp, clean texture when you bite into it.
Depending on your humidity (mine is brutal in the summer!), plan for at least six to eight hours of undisturbed drying time for a proper, hard set finish.
Controlling Viscosity for Piped Definition and Flood Coats
The single most important skill when mastering this Sugar Cookie Icing recipe is controlling the water. We use the thick base (Stiff Peak) for outlining the cookie edge. Then, we thin it down with tiny additions of water to create the flooding consistency. This runny consistency needs to be thin enough to spread smoothly but thick enough to stop at the border we just piped. This is how you achieve a perfect flat surface, ideal for Sugar Cookie Frosting: Royal Icing That Dries Hard details later.
Preventing Bleeding and Color Run on Cookies
Ever had your vibrant red bleed into your pure white? It’s heartbreaking. The key to preventing color run is ensuring your base coat of Sugar Cookie Icing is absolutely bone dry before piping the next layer. Patience is your best friend here.
Also, always use high-quality gel food colorings, as they introduce less moisture into the beautiful texture of the Sugar Cookie Icing .
The Role of Sugar Particle Size in Icing Texture
We use confectioners’ sugar, which is powdered cane sugar mixed with a tiny bit of cornstarch to prevent clumping. The finely ground nature of this sugar is why the resulting Sugar Cookie Icing is so silky smooth.
Granulated sugar won’t dissolve properly and will result in a gritty mess. So make sure you’re grabbing the right bag!
Essential Components for the Perfect Cookie Canvas
Making the best Sugar Cookie Icing starts with respecting the ingredients and how they interact. Don't eyeball these measurements; precision matters here.
Powdered Sugar: Sifting for Lump Free Results
You simply must sift your confectioners’ sugar, and I mean must . Those little lumps hiding inside will clog your piping tip at the worst possible moment, guaranteeing a temper tantrum (ask me how I know).
Sifting the sugar ensures your finished Sugar Cookie Icing flows perfectly and prevents those ugly, visible sugar granules in the final product.
Meringue Powder: Choosing the Right Brand for Consistency
Different brands of meringue powder behave differently, which is annoying but true. Once you find a brand you like I prefer Wilton or CK Products stick with it religiously. This ensures your batches of Sugar Cookie Icing always have the same reliable water-to-powder ratio.
Water and Flavorings: Balancing Liquid for Consistency
Warm water helps the sugar dissolve quicker and activates the meringue powder faster. Start with the minimum amount listed in the recipe. It is incredibly easy to make this Sugar Cookie Icing too runny, but fixing it takes time and extra sugar. For flavor, I love using clear vanilla extract combined with almond extract; it provides a delicious, classic bakery flavour that complements, say, our amazing Peanut Butter Blossom Cookies: Soft, Chewy, Classic Recipe if you're multitasking.
Corn Syrup and Alternatives: Achieving Added Flex and Shine
Some recipes call for corn syrup, which adds extra shine and a slight elasticity, preventing the dry Sugar Cookie Icing from cracking when the cookie expands or shrinks slightly.
I usually omit it for simplicity, but if you want that ultra professional, hyper glossy look, adding 1 teaspoon of light corn syrup along with the water can certainly elevate this cookie icing recipe.
Whipping Up the Flawless Royal Icing Base: step-by-step Method Guide
This is where the magic happens. We’re aiming for volume and stiffness before we adjust the consistency for decorating. This process is key to achieving that smooth, hard setting Sugar Cookie Icing .
Mixing Order: Combining Dry Ingredients First
Always sift your dry ingredients together into a large bowl first. This ensures even distribution of the meringue powder throughout the sugar before any water is introduced. Adding the liquid while the mixer is on is a recipe for a powdered sugar explosion, which is not fun to clean up.
Achieving Stiff Peaks (The Base Consistency)
Once your ingredients are in the bowl, start your mixer slow! Mix until just combined, about 30 seconds. Then crank that puppy up to medium high. You are whipping air into the mixture, causing it to double in volume and lighten in color.
Beat for the full 5 to 7 minutes until the Sugar Cookie Icing stands straight up on its own, like soft serve ice cream that hasn't melted. This is your essential base.
Coloring the Icing: Tips for Deep, Rich Hues
Once the base is whipped, divide the thick icing into separate bowls before coloring. Always use gel colors. To achieve deep colors like black or red, it’s best to let the colored icing sit for an hour, covered.
The color deepens over time, preventing you from over coloring and adding too much gel to your careful consistency.
Thinning the Base: Creating Piping vs. Flooding Consistencies
The stiff base is your piping icing. It holds intricate details and forms the dam for the flood coat. For the flooding consistency the smooth, runny layer you need to add water, literally drop by drop.
Chef’s Note: The goal is the "10 Second Rule." Draw a line through your thinned Sugar Cookie Icing with a spoon. If the line smooths out and disappears completely in exactly 8 to 12 seconds, you’ve nailed the flood cookie icing.
If it takes longer, add two more drops of water. If it disappears faster, add a tablespoon of stiff base icing.
Troubleshooting and Advanced Techniques for Cookie Decorating
Even seasoned bakers mess this up sometimes, so don't feel bad! Achieving perfect Sugar Cookie Icing that hardens takes practice and a few clever fixes.
Fixing Runny Icing: The Quick Powdered Sugar Rescue
If you added too much water when creating your flooding consistency (it disappears in 3 seconds instead of 10), panic, then immediately grab more powdered sugar. Add a tablespoon of sifted sugar at a time to the offending bowl and stir well until you hit that sweet 10 second spot again.
That is often why I keep a little extra powdered sugar pre-sifted on the counter!
Preventing Air Bubbles and Pinholes During Application
Air bubbles are annoying little culprits that pop while drying, leaving pinholes in your perfect finish. After flooding your cookie, gently tap the cookie on the counter a few times. This forces the trapped air bubbles to rise. Use a toothpick to gently pop any remaining bubbles you see right away.
When and How to Layer Icing Colors for 3D Effects
To get that beautiful dimension, you must let the underlying layer of Sugar Cookie Icing dry completely first. This usually takes about 2 hours, sometimes more. Layering wet-on-wet creates a blended, flat look (useful for marbling!), but layering dry-on-dry creates a distinct 3D outline, perfect for adding borders or holiday details onto your Christmas Cookies: Best Brown Butter Cut-Outs Recipe .
Short Term Storage: Keeping Icing from Crusting in Bowls
Royal icing loves to crust when exposed to air. To keep your colored bowls of icing usable for a few hours, place a piece of plastic wrap directly onto the surface of the icing, pressing out any air pockets. You can also cover the tips of your piping bags with a damp paper towel.
Preparation and Shelf Life: Storing Your Decorative Mixture
You can absolutely make this Sugar Cookie Icing ahead of time! It saves so much stress during decorating day.
Freezing Iced Cookies vs. Freezing the Icing Base
Do NOT freeze finished, iced cookies. The freezing process introduces moisture that can cause the colors to bleed when thawing. However, you can freeze the stiff base of your Sugar Cookie Icing (before thinning or coloring) for up to three months in an airtight container.
Reactivating Royal Icing After Refrigeration
If you store the stiff base in the fridge (it lasts about two weeks), it will seem stiff and unusable when you pull it out. Bring it to room temperature first. Then, put it back in the stand mixer and whip it on medium speed for 3- 5 minutes, adding a drop or two of water if necessary.
It will return to its original glory, ready to become the best sugar cookie flooding icing recipe you've ever used.
Beyond the Plate: Creative Uses for Hard Setting Icing
This durable, fast setting Sugar Cookie Icing is incredibly versatile. Use it to "glue" gingerbread houses together it’s stronger than cement! You can also use the stiff consistency as piping for delicate borders on cakes or cupcakes when you want a texture that won’t melt.
This is seriously the ultimate method for how to make icing for sugar cookies. Enjoy the decorating!

Recipe FAQs
My icing seems too stiff or too thin. How do I adjust the consistency?
Consistency is key to royal icing success. If it is too stiff (for piping), add water one teaspoon at a time until the desired flow is achieved. Conversely, if it is too thin (for flooding), gradually beat in more sifted powdered sugar until you reach a stable consistency, often measured by the “10-second rule” for flow.
Why must I use Meringue Powder? Can I substitute it with fresh egg whites?
Meringue powder provides the essential structure and stabilizing protein required for the icing to set rock hard and smooth. While fresh egg whites can technically be used, the meringue powder is highly recommended by professionals as it eliminates the risk of salmonella and ensures consistent, stable results every time.
How long does the royal icing take to fully set and dry hard?
Drying time is heavily dependent on the ambient humidity and the thickness of the application. Generally, the icing will skin over in about 30 minutes, but it requires a minimum of 6 to 8 hours to set fully hard.
For best results, allow the decorated cookies to cure uncovered overnight (12 24 hours) before stacking or packaging them.
I see holes or “cratering” in my flooded areas. How do I prevent this common issue?
Cratering typically occurs when the surface of the icing dries too quickly while the bottom remains moist, causing the surface to collapse. Ensure your flooding icing is adequately thinned, and try working in a slightly lower humidity environment or using a small, gentle fan to create a stabilizing crust immediately after flooding.
Can I store unused, prepared royal icing, and if so, for how long?
Yes, prepared royal icing can be stored in an airtight container in the refrigerator for up to two weeks. You must press plastic wrap directly onto the surface of the icing before sealing the container to prevent a dry crust from forming.
Before using the refrigerated icing, allow it to come to room temperature and beat it thoroughly to restore its original consistency.
Is it possible to make this recipe vegan or use an alternative to meringue powder?
To make a similar hard setting icing vegan, you would need to use a commercial aquafaba based powder stabilizer specifically designed for royal icing, as standard meringue powder contains egg whites.
Simply omitting the meringue powder will result in a soft glaze that will not achieve the desired professional, hard setting structure.
What is the best way to store the finished, decorated sugar cookies?
Once the icing has completely dried (ideally 24 hours), store the decorated cookies at room temperature in an airtight container away from direct sunlight or heat. Avoid refrigerating or freezing decorated cookies, as the rapid temperature change and resulting condensation can cause the colors to bleed or the icing to become sticky.
Fast Setting Sugar Cookie Icing
Ingredients:
Instructions:
Nutrition Facts:
| Calories | 505 kcal |
|---|---|
| Protein | 0.1 g |
| Fat | 0.3 g |
| Carbs | 127.4 g |
