Instant Pot Roast Beef and Gravy: Fork Tender
- Time: Active 15 minutes, Passive 80 minutes, Total 95 minutes
- Flavor/Texture Hook: Hearty, melt in-your mouth beef with a rich, velvety mahogany gravy
- Perfect for: Stress free Sunday family dinners or high comfort meal prep
- Perfect Instant Pot Roast Beef and Gravy
- Vital Recipe Timing and Specifications
- Why These Specific Flavor Layers Succeed
- Selecting the Best Roast Components
- Gathering Your Essentials
- Essential Kitchen Tools for Success
- Cooking Your Pot Roast Stepwise
- Solving Common Roast Cooking Errors
- Creative Customizations for Your Meal
- Storing and Repurposing Your Leftovers
- Serving Suggestions for Hearty Results
- Very High in Sodium
- Recipe FAQs
- 📝 Recipe Card
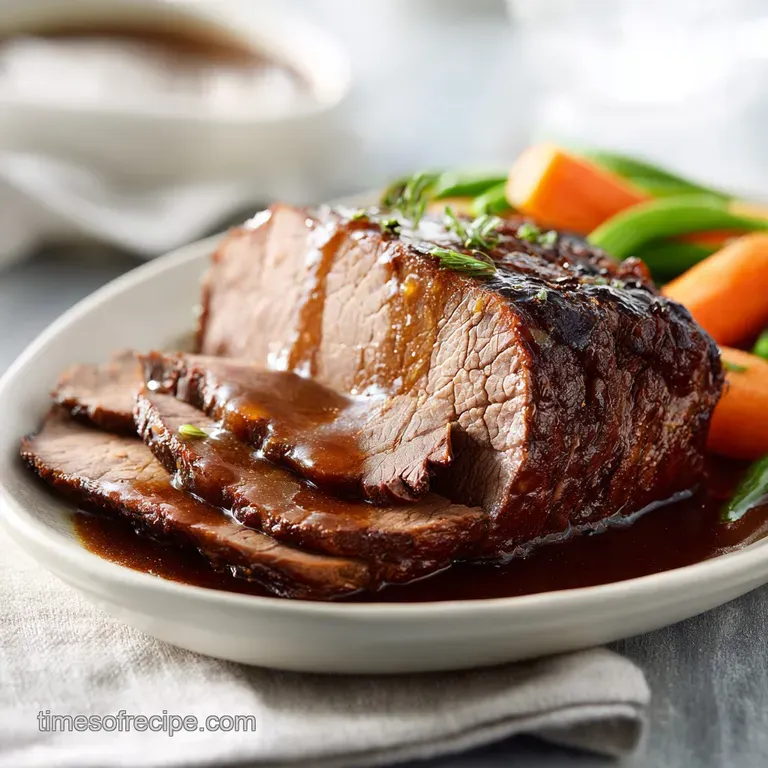
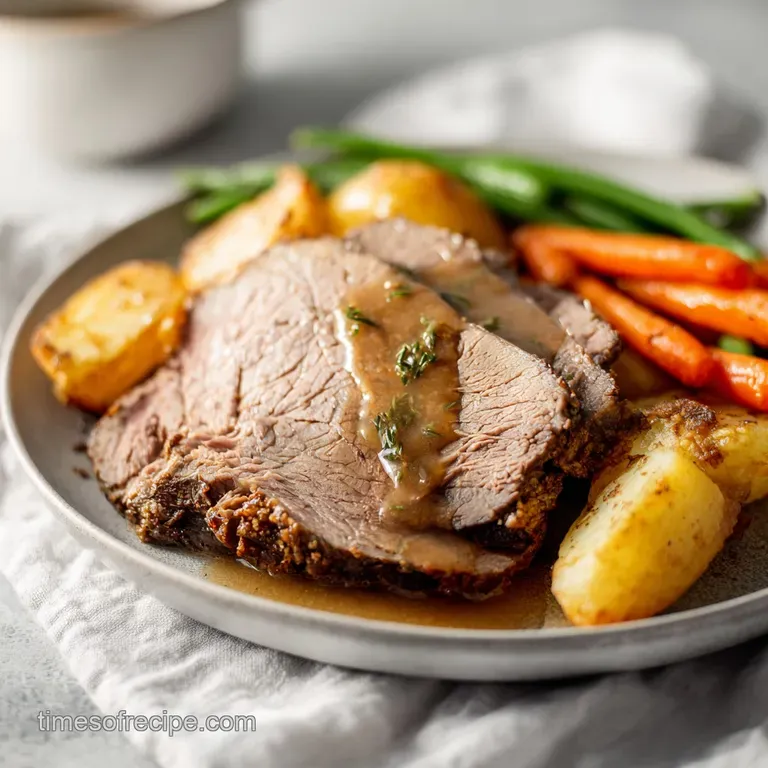
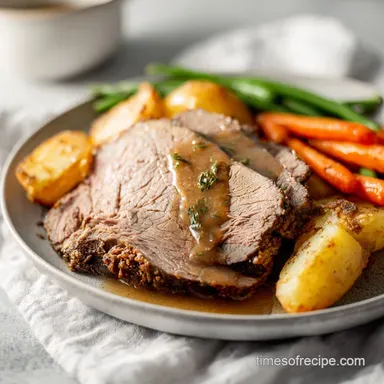
Perfect Instant Pot Roast Beef and Gravy
The moment the seal on the Instant Pot releases and that first puff of steam hits your face, you know exactly what’s waiting inside. It is a scent that carries me straight back to my grandmother’s kitchen on a rainy Sunday afternoon that heavy, bold aroma of slow cooked onions, earthy rosemary, and beef that has surrendered all its toughness to the pot.
I remember watching her sear the meat in a heavy cast iron Dutch oven, a process that took all day. But today, we are capturing that exact same nostalgic comfort in a fraction of the time, without losing a single drop of that satisfying, home cooked soul.
We’ve all been there: staring at a rock hard 3 lbs beef chuck roast, wondering if it will ever actually become tender. The beauty of this specific method is the "quick win" it provides for busy cooks.
You get the deep, caramelized crust and the falling apart fibers of a six hour braise, but you’re sitting down to eat in under two hours. It’s about more than just speed, though; it’s about the layers. We aren't just tossing everything into a bowl and pressing a button.
We are building a foundation of flavor, from the aggressive sear to the charred onion wedges, ensuring every bite feels like a warm hug from the past.
This isn't just another pot roast; it’s the definitive way to handle a chuck roast if you want results that are consistently bold and hearty. We are going to walk through the "how" and the "why" together, ensuring you avoid the common pitfalls like the dreaded "Burn" notice or mushy carrots.
By the time we’re done, you’ll have a platter of glistening beef and root vegetables that looks like it stepped off a magazine cover but tastes like home.
Vital Recipe Timing and Specifications
Before we get our hands messy, let’s look at the hard numbers. Precision is what separates a good roast from a legendary one. In the world of pressure cooking, five minutes can be the difference between a potato that is a perfect vessel for gravy and one that has disintegrated into the abyss.
We are looking at a 15 minutes prep phase followed by a structured 80 minutes cooking cycle.
| Metric | Specification | Visual Cue |
|---|---|---|
| Beef Weight | 3 lbs (1.36 kg) | Room temp for 20 mins before searing |
| Searing Time | 6–8 minutes per side | Deep mahogany, not just grey |
| Pressure Level | High Pressure (Manual) | Steam pin fully engaged |
| Rest/Release | 15 minutes Natural Release | Meat fibers relax and reabsorb juices |
The Power of the Fond
When you sear that beef on the 'Sauté' High setting, you are creating what we call "fond" those beautiful, crusty brown bits stuck to the bottom of the pot. Think of this as concentrated gold. Most people see a dirty pot; a flavor obsessed cook sees the soul of the gravy.
If you don't scrape that up during the deglazing phase with the beef broth, you aren't just losing flavor you’re risking a "Burn" notice. That heat sensitive sensor at the bottom of the Instant Pot hates those stuck bits, so we use a wooden spoon to lift them back into the liquid.
Timing the Vegetable Integrity
One mistake I made early on was putting the carrots and potatoes in at the same time as the beef. Unless you want vegetable purée, don't do this. A 3 lbs chuck roast needs 60 minutes to break down its connective tissue. A carrot needs five.
By adding the vegetables after the initial meat cook, we ensure they are tender but still have a distinct "snap" when you bite into them. This two stage cooking process is the secret to a professional looking platter.
Why These Specific Flavor Layers Succeed
Pressure cooking is essentially a way to force moisture and heat into the center of dense proteins at an accelerated rate. But to get that "grandmother style" depth, we have to manipulate the chemistry of the pot.
- Collagen Transformation: High pressure accelerates the breakdown of tough collagen into gelatin. This is what gives the beef that silky, melt in-your mouth feel and adds a natural body to the gravy.
- Pressure Infused Aromatics: Unlike a slow cooker where aromatics can sometimes become muted, the sealed environment of the Instant Pot forces the volatile oils of the rosemary, thyme, and onion soup mix directly into the meat fibers.
- The Maillard Foundation: By searing the beef first, we create complex sugars and savory compounds that wouldn't exist if we simply boiled the meat. This "mahogany crust" is the primary source of the gravy's dark color and bold taste.
- Starch Suspension: Using baby Yukon Golds is a deliberate choice. Their higher wax content compared to Russets means they hold their shape under pressure, while still releasing just enough starch to help the gravy emulsify later.
Comparisons of Fast vs Classic
| Feature | Instant Pot (Fast) | Dutch Oven (Classic) | Result |
|---|---|---|---|
| Total Cook Time | 95 minutes | 4–6 hours | IP is 75% faster |
| Moisture Loss | Minimal (Sealed) | Moderate (Evaporation) | IP meat is often juicier |
| Veggie Texture | Controlled (2 stage) | Often overcooked | IP allows for "snap" |
Selecting the Best Roast Components
To get that bold, satisfying finish, every ingredient needs to play its part. We aren't just looking for "beef"; we are looking for a specific architecture of fat and fiber.
Component Analysis
| Ingredient | Science Role | Pro Secret |
|---|---|---|
| Chuck Roast | Primary protein with high connective tissue. | Look for "Choice" or "Prime" with white flecks of fat (marbling) throughout. |
| Beef Bone Broth | Provides the liquid for pressure and the base for the gravy. | Use bone broth over standard stock for a higher gelatin content and richer mouthfeel. |
| Onion Soup Mix | A concentrated blast of umami and salt. | It contains toasted onion bits that dissolve into the sauce, acting as a built in seasoning base. |
| Tomato Paste | Adds acidity to balance the fat and deepens the color. | Sauté the paste for 60 seconds until it turns brick red to remove the "tinny" raw taste. |
Gathering Your Essentials
When you’re standing in the grocery aisle, don't just grab the first package you see. Take a second to look at the marbling. You want those thin white veins of fat; they are what will keep the meat moist during the 60 minutes of high pressure cooking.
If you choose a lean cut like Round Roast, it will come out dry and stringy. Chuck is king here.
- 3 lbs beef chuck roast: Well marbled and trimmed of any excessively thick fat caps. Why this? High collagen content melts into gelatin, creating incredible tenderness.
- Substitute: Beef Brisket (point cut). It’s equally fatty but may need 10 extra minutes.
- 2 tbsp avocado oil: A high smoke point oil for that aggressive sear.
- Substitute: Grapeseed oil or vegetable oil.
- 1 large yellow onion: Cut into thick, sturdy wedges.
- Substitute: White onion or 3 large shallots.
- 4 cloves garlic: Smashed to release oils.
- 2 tbsp tomato paste: For depth and color.
- 2 cups beef bone broth: The braising liquid.
- 1 tbsp Worcestershire sauce: Adds a fermented, salty tang.
- 1 pkt onion soup mix: The "secret" flavor bomb.
- Fresh Herbs: 1 sprig rosemary, 3 sprigs thyme.
- 1 lb baby Yukon Gold potatoes: Keep them whole so they don't disintegrate.
- 4 large carrots: Cut into thick 2 inch chunks.
- The Slurry: 3 tbsp cornstarch mixed with 3 tbsp cold water.
For a different take on beef and starch, you might enjoy this Cheesy beef and potatoes recipe, which uses a skillet for a quicker, more crust focused result.
Essential Kitchen Tools for Success
You don't need a professional kitchen, but a few specific items make this 15 minutes of prep feel like a breeze.
- 6 Quart or 8 Quart Instant Pot: A standard size works perfectly for a 3 lbs roast.
- Long handled Tongs: You’ll need these to flip the heavy roast without getting splashed by hot oil.
- Wooden Spoon: Essential for "deglazing" the flat edge is perfect for scraping the bottom of the pot.
- Heavy duty Paper Towels: Don't skip this. If the beef is wet, it will steam rather than sear. We want a "shatter" of flavor on that crust.
- Meat Thermometer: While we cook by time, checking that the internal temp has reached roughly 95°C (203°F) ensures the collagen has fully liquefied.
Cooking Your Pot Roast Stepwise
Let's get into the rhythm of the kitchen. This is where the magic happens.
- Prepare the meat. Pat the 3 lbs beef roast completely dry with paper towels. Season aggressively with salt and pepper on all sides. Note: Moisture is the enemy of a good sear.
- Ignite the sear. Set your Instant Pot to 'Sauté' on High. Add the avocado oil. Once it's shimmering and whispering, add the beef.
- Develop the crust. Sear for 6–8 minutes per side. Resist the urge to move it! We want a deep mahogany color. Remove the meat and set it on a plate.
- Aromatize the base. Toss in the onion wedges. Let them char for 2-3 minutes. Add the smashed garlic and tomato paste, stirring for 1 minute until the kitchen smells like a dream.
- The critical deglaze. Pour in ½ cup of the beef bone broth. Use your wooden spoon to scrape every single brown bit off the bottom.
- Load the chamber. Return the beef to the pot. Add the remaining broth, Worcestershire, onion soup mix, rosemary, and thyme.
- High pressure braise. Lock the lid. Set to High Pressure for 60 minutes.
- The patient rest. When the timer beeps, let it sit for a 15 minutes natural pressure release. This prevents the juices from "geysering" out of the meat fibers.
- The vegetable finish. Release any remaining steam. Open the lid and nestle the potatoes and carrots around the beef. Lock and cook on High Pressure for 3-5 minutes.
- The gravy transformation. Remove the meat and veggies to a platter. Whisk the cornstarch and water. Set the pot to 'Sauté' and stir the slurry into the bubbling liquid until it becomes velvety and thick.
Chef's Tip: If you find your gravy is too thin even after the slurry, let it simmer on the Sauté function for an extra 5 minutes. The evaporation will concentrate the flavors even further.
Solving Common Roast Cooking Errors
Even the best of us hit a snag sometimes. The Instant Pot is a machine, and sometimes machines need a little human intuition.
Why Your Beef Is Tough
If you open the pot and the beef feels "bouncy" or hard to pierce with a fork, it simply hasn't cooked long enough. This usually happens if the roast was particularly thick or still cold in the center when it went in. Pressure cooking is a function of time and heat; if the collagen hasn't melted, it will stay tough.
| Problem | Root Cause | Solution |
|---|---|---|
| "Burn" Notice | Stuck bits of tomato paste or beef fond on the bottom. | Cancel, vent steam, and scrape the bottom thoroughly with liquid. |
| Thin Gravy | Too much liquid or the slurry wasn't boiled long enough. | Sauté for 5 more minutes or add a second, smaller slurry. |
| Mushy Veggies | Cooked for the full 60 minutes with the meat. | Always add vegetables after the initial meat braise. |
Common Mistakes Checklist
- ✓ Did you pat the meat dry? Wet meat won't sear; it just turns grey and sad.
- ✓ Did you deglaze thoroughly? Even a tiny stuck bit can trigger the "Burn" sensor.
- ✓ Was it a natural release? Quick releasing meat immediately after 60 mins can make it tough and dry.
- ✓ Are the potatoes whole? Cutting baby Yukons in half leads to them dissolving into the gravy.
Creative Customizations for Your Meal
While the classic onion soup mix version is my go to for pure nostalgia, there are ways to "elevate" this if you're feeling fancy.
- The Red Wine Reduction: Swap 1 cup of beef broth for a bold Cabernet Sauvignon. The acidity of the wine cuts through the richness of the chuck roast perfectly.
- The Low Carb Swap: Replace the potatoes with large chunks of cauliflower or radishes. If using radishes, add them in the last 3 minutes; they lose their "bite" and taste remarkably like potatoes when braised.
- The Spicy Kick: Add a tablespoon of horseradish to the gravy at the very end for a zesty, sinus clearing finish that pairs beautifully with beef.
If you are looking for a more "special occasion" beef dish, you might want to explore this Beef tenderloin masterclass, which focuses on a more delicate, medium rare finish for premium cuts.
Storing and Repurposing Your Leftovers
Pot roast is one of those rare dishes that might actually be better on day two. As the beef sits in that velvety gravy, it continues to absorb all those aromatics.
- Fridge: Store in an airtight container for up to 3 days. Always store the beef in the gravy to prevent it from drying out.
- Freezer: You can freeze the beef and gravy for up to 3 months. I recommend freezing the vegetables separately or accepting they will be softer upon reheating.
- Zero Waste: Don't you dare throw away those onion remnants or leftover gravy!
- Leftover Tacos: Shred the beef and fry it in a pan until the edges are crispy (like carnitas).
- Pot Roast Pasta: Toss the shredded beef and leftover gravy with some pappardelle noodles for an instant ragu.
- Shepherd's Pie: Mash the leftover potatoes and carrots, layer them over the shredded beef and gravy, and bake until bubbly.
Serving Suggestions for Hearty Results
When it comes to serving, I like to keep it simple and bold. Place the roast in the center of a large, warmed platter. Surround it with the glistening carrots and potatoes, then pour about half of that velvety gravy directly over the meat.
If you want X, do Y:If you want a more refined look, strain the gravy through a fine mesh sieve before serving to remove the onion bits and herb stems. If you want more crunch, serve with a side of quick pickled red onions to cut through the heavy fats.
If you want the ultimate comfort, serve over a bed of extra buttery mashed potatoes (yes, even with the baby Yukons on the side!).
Debunking Kitchen Myths
"Searing the meat seals in the juices." Honestly, this is one of the oldest myths in the book. Searing does absolutely nothing to "seal" anything. What it does do is create a massive amount of flavor through the "mahogany transformation" of proteins.
The juice stays in because of the 15 minutes natural release, which allows the muscle fibers to relax and hold onto that moisture.
"You must use a rack for the roast." In a pressure cooker, sitting the meat directly in the liquid is actually better for a pot roast. We aren't roasting it; we are braising it. The direct contact with the broth ensures the bottom of the meat becomes just as tender as the top.
Let's crack on and get that Instant Pot hissed up. You’re about 95 minutes away from the most satisfying dinner you’ve had in a long time. Trust me on this the gravy alone is worth the effort!

Very High in Sodium
985 mg 985 mg (43% 43%)
The American Heart Association recommends limiting sodium intake to less than 2,300mg per day, with an ideal limit of less than 1,500mg for most adults.
Tips to Reduce Sodium
-
Choose Low-Sodium Broth-30%
Replace the 2 cups of regular beef bone broth with low-sodium or no-salt added beef bone broth. This is a significant sodium contributor.
-
Omit Onion Soup Mix-25%
The 1 packet of onion soup mix is a major source of hidden sodium. Omit it entirely and rely on fresh onion and garlic for flavor.
-
Reduce Added Salt-15%
Cut the 0.5 tsp of added salt in half or omit it completely. You can always add a pinch at the table if needed.
-
Modify Worcestershire Sauce-10%
Worcestershire sauce can be high in sodium. Look for a low-sodium version or use a smaller amount (e.g., 0.5 tbsp) and supplement with a touch of balsamic vinegar for acidity.
-
Boost Flavor with Herbs and Spices
Incorporate a variety of fresh or dried herbs and spices like garlic powder (without salt), onion powder (without salt), paprika, or smoked paprika to enhance the flavor profile without adding sodium.
Recipe FAQs
How long do you cook a beef roast in the Instant Pot?
Cook for 80 minutes on High Pressure. This is followed by a mandatory 15-minute natural pressure release to ensure the meat fibers tenderize properly before adding your vegetables for the final 3-5 minute cycle.
What is the best liquid for Instant Pot roast?
Use beef bone broth for the most depth of flavor. It provides the necessary volume to bring the pot to pressure while creating a robust foundation for your gravy.
Is beef roast better in Instant Pot or crock pot?
The Instant Pot is superior for time efficiency without sacrificing texture. You achieve the same fall apart results in under two hours compared to the all-day commitment of a slow cooker.
Why is my roast tough in Instant Pot?
You likely skipped the natural pressure release or failed to sear the meat. The 15-minute natural release allows the collagen to finish breaking down; if you vent the steam immediately, the muscle fibers tighten up and become chewy.
How to avoid a burn notice when making gravy?
Scrape every bit of browned fond from the bottom of the pot with a wooden spoon after deglazing with beef broth. Ensuring the cooking surface is completely clean before pressure cooking prevents the stuck-on sugars from triggering the sensor.
How to store leftovers so the beef stays moist?
Keep the beef submerged in the gravy within an airtight container. This prevents the meat from drying out in the refrigerator and allows the flavors to deepen, a principle of balancing aromatics similar to our classic beef stew.
Is it necessary to sear the chuck roast before pressure cooking?
Yes, this is non-negotiable for flavor. Searing the beef for 6 8 minutes per side in avocado oil creates a mahogany crust that provides the savory base required for a rich, restaurant quality gravy.
Instant Pot Roast Beef And Gravy
Ingredients:
Instructions:
Nutrition Facts:
| Calories | 742 kcal |
|---|---|
| Protein | 46 g |
| Fat | 48 g |
| Carbs | 31 g |
| Fiber | 4.2 g |
| Sugar | 5.8 g |
| Sodium | 985 mg |
