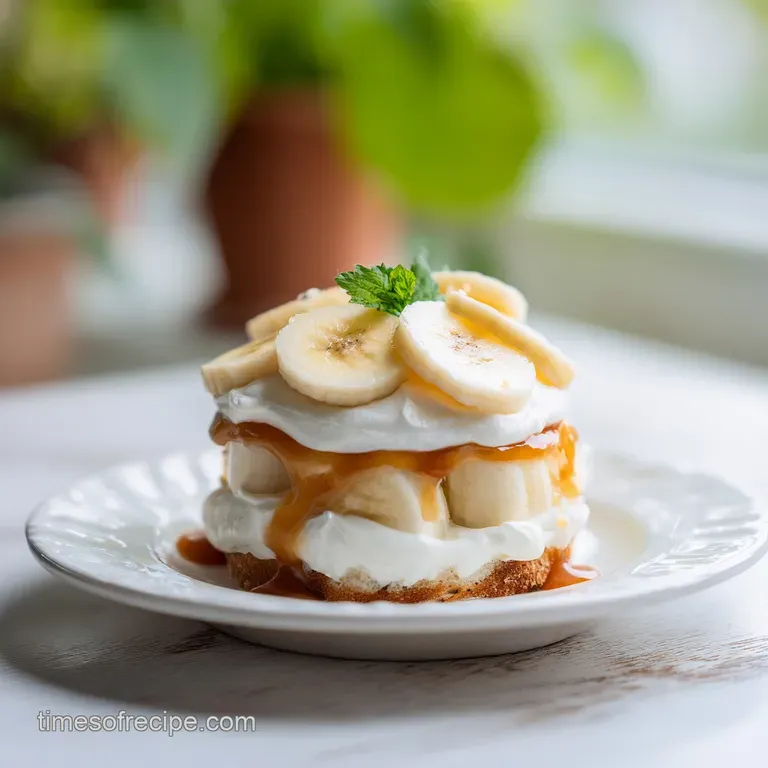
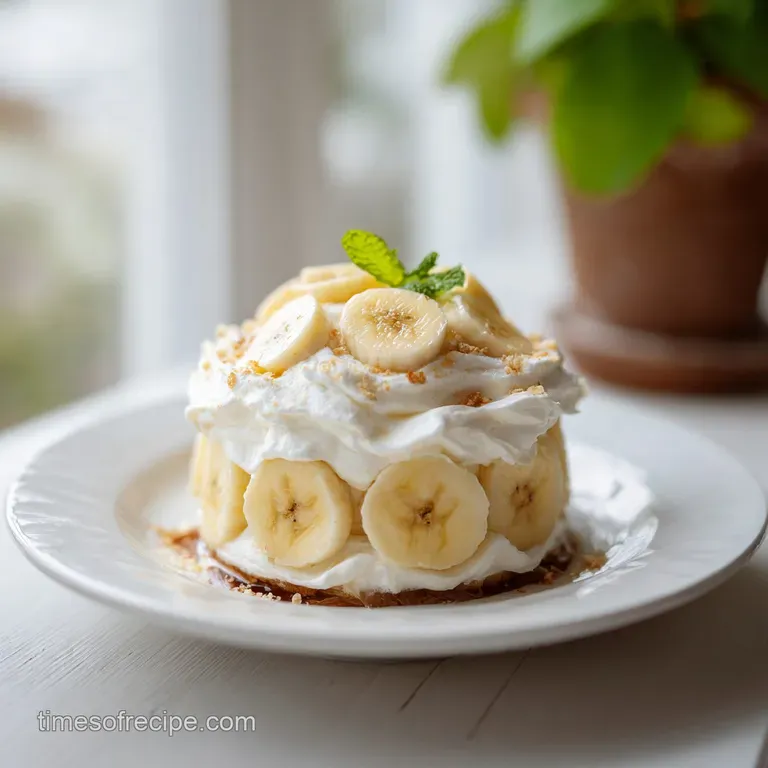
No-Bake Banana Pudding
- Time: Active 20 minutes, Passive 240 minutes, Total 260 minutes
- Flavor/Texture Hook: Silky custard meets softened wafers and creamy bananas.
- Perfect for: Family gatherings, summer picnics, or high end dinner parties.
- Creating My Signature Creamy Banana Pudding
- Why These Luscious Layers Work
- Deep Dive Into Key Components
- The Essential Shopping List
- Tools For Success
- Assembling The Perfect Sweet Layers
- Fixing Common Pudding Layer Problems
- Swap Ideas For Every Kitchen
- Scaling For Small Or Large Groups
- Debunking Banana Ripening Myths
- Keeping Your Pudding Fresh Longer
- Serving Your Masterpiece With Flair
- Recipe FAQs
- 📝 Recipe Card
Creating My Signature Creamy Banana Pudding
The sound of a heavy metal spoon clinking against a vintage glass trifle bowl is the official starting whistle for any family gathering where I grew up. There is a specific sort of magic that happens when you peel back a layer of whipped topping to reveal the pale gold custard beneath.
Banana pudding isn't just a dessert in the Southern United States; it’s a cultural heirloom that has traveled from 19th-century custard techniques to the mid century convenience of the iconic vanilla wafer box.
We often think of it as a humble picnic staple, but when done with precision, it transforms into a stunning, elegant dessert that rivals the finest patisserie.
I remember my first real encounter with the "perfect" version at a small church social in Georgia. While most people brought runny puddings or ones with grey, unappealing fruit, one woman’s dish stood tall. The wafers hadn't just gotten soggy; they had become structural, like layers of sponge cake.
The secret wasn't just in the ingredients, but in the patience of the chill. This dish carries the weight of history it represents the arrival of bananas as a global commodity and the ingenuity of home cooks who wanted something luxurious without spending all day over a hot stove.
We are going to build this recipe in stages to ensure every bite is a consistent mix of textures. It is about understanding how fat, sugar, and starch interact in a cold environment. Most people rush the process, but we are going to respect the "cure" time.
Trust me, the result is a velvety masterpiece that looks as beautiful as it tastes. We aren't just tossing things in a bowl; we are layering a symphony of flavors that will have your friends texting you for the recipe before they’ve even finished their first bowl.
Why These Luscious Layers Work
- Fat Induced Stability: The cream cheese acts as a structural anchor. By beating it with the condensed milk first, we create a high fat emulsion that prevents the instant pudding from becoming too "jiggly" or weeping water as it sits in the fridge.
- Starch Gelatinization: The instant pudding mix contains pre gelatinized starch that thickens instantly upon contact with cold milk. When combined with the heavy fats in the cream cheese, it creates a thick, mousse like consistency that supports the heavy banana slices.
- Moisture Migration Control: Vanilla wafers are essentially dry sponges. Over the 240 minutes of chilling, they pull just enough moisture from the pudding to soften into a cake texture without losing their shape entirely.
- Enzymatic Delay: By completely submerging the sliced bananas within the dense pudding and whipped topping, we limit their exposure to oxygen. This prevents the polyphenol oxidase from turning the fruit brown, keeping the internal layers looking fresh and vibrant for days.
| Servings | Ingredient Adjustments | Pan Size | Total Chill Time |
|---|---|---|---|
| 8 People | 1/2 of all ingredients | 20 cm Square Pan | 240 minutes |
| 15 People | Full recipe (as listed) | 23x33 cm Glass Dish | 240 minutes |
| 30 People | Double all ingredients | Two 23x33 cm Dishes | 300 minutes |
This table helps you plan for everything from a quiet dinner to a massive neighborhood block party. Using a glass dish for the 15 serving size is particularly effective because it allows your guests to see the beautiful stratification of the wafers and fruit.
If you decide to double the recipe, I recommend using two separate dishes rather than one deep one, as the middle of a very deep pudding can take much longer to set and cool.
Deep Dive Into Key Components
Understanding the role of each element helps you troubleshoot before you even start mixing. While we often think of these as "convenience" items, they each play a specific chemical role in the final architecture of the dessert.
This isn't just about mixing things together; it's about creating a stable, luscious environment where the bananas can shine. For instance, the choice of whole milk isn't just for flavor the fat content is vital for the pudding to set with a creamy, rather than watery, mouthfeel.
| Component | Scientific Role | Pro Secret |
|---|---|---|
| Cream Cheese | Emulsifier and Stabilizer | Must be completely soft to avoid "cheesy" lumps in the custard. |
| Condensed Milk | Concentrated Sugar and Protein | Provides the "velvety" mouthfeel and binds the water in the milk. |
| Vanilla Wafers | Starch Structure | Place them flat to maximize surface area for moisture absorption. |
| Instant Pudding Mix | Rapid Thickening Agent | Whisk for exactly 2 minutes to fully hydrate the starches. |
The interaction between the sweetened condensed milk and the cream cheese is where the "magic" starts. If you’ve ever enjoyed a Banana Pudding Cheesecake, you know how well these flavors marry. In this no bake version, we are essentially creating a cold set cheesecake base and lightening it with pudding and whipped topping. This ensures the dessert doesn't collapse when you scoop into it, maintaining those distinct, beautiful layers.
The Essential Shopping List
- French Vanilla Instant Pudding (140g): Provides the base flavor and thickener. Why this? French vanilla has a deeper, eggier flavor than standard vanilla.
- Sub: Standard Vanilla Pudding (add 1/2 tsp extra vanilla extract).
- Cold Whole Milk (475ml): Hydrates the pudding and adds richness. Why this? Lower fat milks will result in a thinner, less stable pudding.
- Sub: 2% Milk (expect a slightly softer set).
- Sweetened Condensed Milk (400g): Adds sweetness and a dense, silky texture. Why this? It provides a concentrated milk flavor without extra water.
- Sub: Dulce de Leche (for a caramel banana twist).
- Cream Cheese (225g): Adds tang and structural integrity. Why this? It prevents the pudding from being overly sweet or "fake" tasting.
- Sub: Mascarpone (for an even richer, milder flavor).
- Pure Vanilla Extract (5ml): Enhances the natural aroma of the fruit and wafers. Why this? Real vanilla adds complex floral notes that imitation lacks.
- Sub: Vanilla Bean Paste (for beautiful black specks).
- Vanilla Wafers (312g box): The structural "cake" of the dish. Why this? These specific cookies are designed to soften perfectly in dairy.
- Sub: Butter Cookies or Graham Crackers (texture will be crunchier).
- Ripe Bananas (6 large): The star of the show. Why this? Yellow with small brown spots gives the best sweetness and aroma.
- Sub: Plantains are NOT a substitute here as they are too starchy.
- Whipped Topping (340g): Adds air and lightness to the top. Why this? It stays stable and "perky" much longer than fresh whipped cream.
- Sub: Stabilized Whipped Cream (use gelatin to keep it from melting).
Tools For Success
- Large Mixing Bowl: You need ample space to beat the cream cheese without it splashing over the sides. A glass or metal bowl is best as they stay cooler.
- Hand Mixer: Essential for achieving a truly "velvety" texture with the cream cheese. Doing this by hand is possible but usually results in small lumps.
- 23x33 cm Glass Baking Dish: This is the standard "9x13" vessel. Glass is preferred so you can see the layers, which is half the fun of this dessert.
- Offset Spatula: Great for spreading the pudding and whipped topping evenly to the very edges of the dish.
- Whisk: Use this for the second stage of mixing to ensure the milk and pudding mix are perfectly incorporated.
Assembling The Perfect Sweet Layers
- Beat the softened cream cheese and sweetened condensed milk in your large bowl. Use a hand mixer on medium speed for about 3 minutes until the mixture is glossy and completely smooth. Note: This is the only chance to remove lumps from the cream cheese.
- Whisk in the cold whole milk, instant pudding mix, and vanilla extract. Turn the mixer to low or use a hand whisk for 2 minutes until the liquid thickens into a pale gold cream.
- Rest the pudding mixture for about 5 minutes on the counter. This allows the starches to begin their initial set before you start the heavy layering process.
- Line the bottom of your 23x33 cm glass dish with a single, solid layer of vanilla wafers. Try to minimize gaps to create a "crust" that will absorb the pudding from the bottom.
- Layer half of your sliced bananas directly on top of the wafers. Spread them evenly so every guest gets plenty of fruit in their scoop.
- Pour exactly half of the pudding mixture over the banana layer. Use your spatula to shatter any large air bubbles and push the cream into the corners of the dish.
- Repeat the entire process: another layer of wafers, the remaining bananas, and the rest of the pudding mixture. This double stacking is what gives the dish its height.
- Spread the thawed whipped topping over the final pudding layer. Make sure you seal the topping against the edges of the dish to protect the bananas underneath from the air.
- Garnish the top with a few whole wafers or a handful of crushed crumbs for a bit of visual flair and texture contrast.
- Chill the dish in the refrigerator for at least 240 minutes. This wait is non negotiable, as it's when the wafers transform into a soft, cake like texture.
Fixing Common Pudding Layer Problems
The Issue Of Watery Custard
Sometimes the pudding doesn't set firmly, leading to a "soupy" mess when you try to serve it. This usually happens if the milk wasn't cold enough or if the ratio of liquid to starch was off.
If you notice it’s too thin after the 2 minute whisking period, you can whisk in an extra tablespoon of pudding mix if you have it. However, the best fix is prevention: always use full fat dairy and ensure your cream cheese is properly emulsified with the condensed milk before adding liquid.
Managing Discolored Banana Slices
Bananas turn brown when exposed to oxygen. If your layers are looking grey, it’s likely because the bananas were exposed to the air for too long during assembly. To prevent this, slice your bananas right before you need them for each layer, rather than all at once.
Also, ensure the pudding layer completely "hugs" the bananas, leaving no air pockets. A tiny squeeze of lemon juice on the slices can also help, though it can slightly alter the flavor profile.
| Problem | Root Cause | Solution |
|---|---|---|
| Lumpy Texture | Cream cheese was too cold | Microwave cream cheese for 10 seconds or beat it alone first. |
| Soggy Wafers | Chilled for more than 48 hours | Serve within 24 hours for the best "cake to crunch" ratio. |
| Topping Melting | Pudding was too warm | Ensure all dairy is cold and the mixture has rested before topping. |
Common Mistakes Checklist
- ✓ Always use Cold milk; warm milk prevents the instant starch from "grabbing" properly.
- ✓ Do not over ripen the bananas; if they are mushy before they go in, they will dissolve into the pudding.
- ✓ Pat your banana slices dry if they seem particularly moist to prevent watering down the custard.
- ✓ Leave the dish uncovered for the first hour of chilling to prevent condensation from dripping onto the topping.
- ✓ Resist the urge to use "low-fat" cream cheese, as the lack of fat will cause the structure to collapse.
Swap Ideas For Every Kitchen
This recipe is incredibly versatile. If you are looking for a lighter start to your day or a different texture profile entirely, you might consider how a Chia Pudding Recipe uses different thickening mechanics. In our banana pudding, we are relying on dairy fats and starches, but you can certainly play with the flavors.
| Original Ingredient | Substitute | Why It Works |
|---|---|---|
| Vanilla Wafers | Biscoff Cookies | Adds a deep cinnamon, caramelized flavor. Note: Very sweet! |
| Whole Milk | Coconut Milk (Full Fat) | Similar fat content but adds a tropical note. |
| Whipped Topping | Mascarpone Whipped Cream | Much richer and more "elegant" but less stable over time. |
The "oven vs. stovetop" debate often comes up with this dish. Traditional Southern pudding is often made on the stovetop with an egg yolk custard and topped with a baked meringue. This no bake version, however, offers a much more consistent, velvety texture that many modern palates prefer.
It’s also significantly more stable for transport to a picnic.
| Feature | No Bake (This Recipe) | Baked Meringue Version |
|---|---|---|
| Texture | Mousse like and silky | Dense and custard like |
| Preparation | 20 minutes active | 45 minutes active |
| Stability | Highly stable for 2 days | Meringue "weeps" after 4 hours |
Scaling For Small Or Large Groups
Cutting the Recipe in Half If you only need to serve 6-8 people, you can easily halve this recipe. Use a 20 cm square glass dish. When halving the pudding mix, use a digital scale to get exactly 70g.
The cook time remains the same the chill time of 240 minutes is still required to allow the wafers to soften, as that is a function of moisture migration, not volume.
Doubling for a Crowd When making this for 30 people, I strongly suggest using two separate 23x33 cm dishes. If you try to stack this dessert too high in one giant container, the weight of the top layers will crush the bottom layers, and the center won't chill evenly.
Increase your spices (like vanilla) by 1.5x rather than a full 2x to keep the flavor balanced.
Chef's Tip: If you want an extra "gourmet" touch, toss your sliced bananas in a little bit of melted butter and brown sugar before layering. It adds a caramel depth that is absolutely stunning.
Debunking Banana Ripening Myths
There is a common misconception that "the blacker the banana, the better the pudding." This is actually false for this specific layered dessert. While overripe bananas are great for banana bread, they are too soft for pudding. They will turn into a mushy liquid, ruining the structural integrity of your layers.
You want bananas that are bright yellow with just a few "sugar spots." These are firm enough to slice cleanly but sweet enough to perfume the entire dish.
Another myth is that you must use a specific brand of wafer. While the yellow box is classic, any high-quality butter cookie or shortbread will work. The "science" is simply about the moisture absorption rate.
Harder cookies like biscotti won't work because they won't soften in the 240 minute window, but any "soft snap" cookie is fair game.
Keeping Your Pudding Fresh Longer
Storage Guidelines Keep your banana pudding in the refrigerator at all times. It is best enjoyed within 24 to 48 hours. After 48 hours, the bananas will begin to release their juices, which can make the pudding watery, and the wafers will eventually move past the "cake" stage into a "mush" stage.
Always cover the surface tightly with plastic wrap, pressing it directly onto the whipped topping to prevent a skin from forming and to keep out fridge odors.
Zero Waste Tips If you find yourself with leftover wafers, don't throw them away! Crush them into a fine crumb and store them in a jar; they make an excellent topping for yogurt or oatmeal. If you have bananas that are getting too ripe before you can make the pudding, peel them and freeze them for smoothies or a future batch of Moist Tropical Banana Bread. Even the leftover liquid from the condensed milk can be stirred into your morning coffee for a luxurious treat.
Serving Your Masterpiece With Flair
When it’s time to serve, don't just "glop" it into a bowl. Use a large spoon to cut straight down through all the layers, ensuring every serving has the wafer base, the fruit center, and the fluffy topping. For a dinner party, you can actually assemble these in individual wide mouthed mason jars.
This looks incredibly elegant and ensures the layers stay perfectly intact for each guest.
If you want to add a final sensory trigger right before serving, grate a little bit of fresh nutmeg or lemon zest over the top. The brightness of the citrus or the warmth of the nutmeg cuts through the richness of the cream cheese, making the whole dish feel lighter and more sophisticated.
Whether you're serving this at a sun drenched picnic or an elegant holiday dinner, the combination of textures and the nostalgic flavor profile will always make it the star of the table. Enjoy the magic of the "cure" that moment when simple cookies and cream become a unified, stunning dessert.

Recipe FAQs
How to ensure the pudding mixture is perfectly smooth?
Beat the cream cheese and sweetened condensed milk first until completely velvet like. This initial step is vital to ensure no lumps from the cream cheese carry over into the pudding mix.
Can I serve this dessert immediately after assembling?
No, you must chill it for at least 4 hours. This mandatory rest period allows the vanilla wafers to absorb moisture and transform into a tender, cake like consistency that is essential for the classic texture.
How to keep the banana slices from turning brown?
Cover the bananas completely with the pudding mixture. By ensuring the fruit is fully encased within the pudding layers, you minimize exposure to air and prevent oxidation.
Is it necessary to use a hand mixer for the pudding base?
Yes, a hand mixer is highly recommended. Using a mixer for the 2-minute duration ensures the instant pudding thickens properly and creates the necessary pale yellow, consistent aeration.
Can I use a different type of cookie for the layers?
No, stick to the original recipe requirements. Vanilla wafers are specifically designed to soften into a cake like texture; if you enjoyed the structural integrity of these cookies, see how we achieve perfect height and texture in other classic dishes.
How to store leftovers properly?
Keep the dish covered tightly with plastic wrap or a lid in the refrigerator. It will stay fresh for up to two days, though the wafers will continue to soften the longer it sits.
Is it true I should add the whipped topping right before serving?
No, this is a common misconception. You should spread the whipped topping over the final pudding layer before the initial 4-hour chill to allow the entire dessert to set into a cohesive structure.
No Bake Banana Pudding
Ingredients:
Instructions:
Nutrition Facts:
| Calories | 383 kcal |
|---|---|
| Protein | 5.8 g |
| Fat | 16.3 g |
| Carbs | 56.8 g |
| Fiber | 1.8 g |
| Sugar | 39.4 g |
| Sodium | 194 mg |
