Oldfashioned Pancakes: Proper Homemade Buttermilk Fluffy Stack Recipe
- The Ultimate Guide to Proper Old-Fashioned Pancakes
- The Science of the Stack: Achieving Maximum Fluffiness
- Essential Ingredients for Authentic Old-Fashioned Pancakes
- How to Make and Cook the Perfect Old-Fashioned Pancakes
- Expert Tips for Flawless Pancake Success
- Storing, Reheating, and Freezing Leftover Pancakes
- Mastering the Toppings: Serving Suggestions
- Recipe FAQs
- 📝 Recipe Card
The Ultimate Guide to Proper Old-Fashioned Pancakes
Remember that perfect Sunday morning smell? It’s the scent of proper, Old-Fashioned Pancakes hitting a buttery hot griddle, absolutely heavenly. These are not those thin, pale discs; these babies are thick, boast slightly crisp, buttery edges, and have a wonderfully airy, cloud like interior that just begs for syrup.
You need this recipe in your life.
Forget those dry, disappointing boxed mixes forever. Seriously, ditch them now. This classic recipe is genuinely faster, cheaper, and uses staple pantry ingredients you already own for maximum comfort food payoff.
It is absolute breakfast gold, giving you the best return on your 10 minutes of effort.
We aren't just dumping ingredients into a bowl today, though. We’re going to look at the tiny, crucial tweaks the secrets my Grandma swore by that transform a decent flapjack into the ultimate, fluffy stack. Let's get nerdy about the technique and achieve true pancake perfection.
The Science of the Stack: Achieving Maximum Fluffiness
Defining 'Old-Fashioned': Buttermilk and Crumb
When we talk about "Old-Fashioned pancakes," we are generally referring to the proper use of leavening agents activated by an acid, traditionally buttermilk. This acid base reaction creates small, beautiful pockets of gas right away.
This results in an incredibly tender, open, and slightly porous crumb structure, which is what gives the pancakes their legendary fluffiness.
What Sets This Fluffy Stack Apart?
The difference lies entirely in the gentle handling of the batter and the quality of the fat. We use melted butter, not oil, which gives a richer flavour and better mouthfeel without making the stack greasy.
This is crucial: the addition of melted butter right into the wet mix helps coat the flour slightly, discouraging over development of gluten.
Equipment Checklist for Perfect Cooking
You truly don't need fancy tools to nail this, which is great news. A standard balloon whisk is essential for evenly distributing the dry ingredients before any liquid is introduced. For cooking, a heavy bottomed frying pan or a cast iron griddle maintains heat far better than thin pans.
Consistent, steady heat is your best friend here.
The Buttermilk Reaction: Why Acidity is Key
Buttermilk is slightly acidic, which is exactly why we use both baking soda and baking powder in this recipe. Baking soda reacts instantly with the buttermilk to give that initial, powerful lift.
The baking powder is added insurance; it’s double acting, meaning it keeps working as the pancakes heat up on the griddle, ensuring maximum height.
The Non-Negotiable Rule: Why You Mustn't Overmix
This is where everyone messes up, trust me, I've made flat hockey pucks too many times. When you stir flour and water (or buttermilk) too much, you develop gluten, leading to a tough, rubbery texture. Lumpy batter is happy batter.
Stop stirring the second the flour streaks mostly disappear, leaving plenty of lumps behind.
Resting the Batter for Superior Texture
You must let the batter rest for 10 minutes before cooking. This isn't just a suggestion; it’s critical for two reasons. First, the leavening agents have time to fully activate and start producing bubbles, resulting in those perfect air pockets.
Second, this rest allows the flour to fully hydrate, smoothing out the texture without requiring aggressive mixing.
Essential Ingredients for Authentic Old-Fashioned Pancakes
Every ingredient here plays a specific role, but thankfully, most have simple backups if you’re in a pinch.
| Ingredient | Role | Substitute Option |
|---|---|---|
| All-Purpose Flour | Structure | 1:1 gluten-free Blend (must contain xanthan gum) |
| Buttermilk | Acid and Moisture | Milk + Vinegar/Lemon Juice (see note below) |
| Melted Butter | Flavour and Tenderness | Neutral oil (canola, grapeseed) for a slightly less rich flavour |
| Baking Soda & Powder | Leavening | N/A (Must use both for the buttermilk reaction) |
Buttermilk Notes: Cultured vs. Homemade Substitute
True cultured buttermilk provides the best flavour, lending a slight tang that balances the richness of the butter and syrup beautifully. If you don't have buttermilk, don't panic! Simply combine 1 ¾ cups of whole milk with 1 ½ tablespoons of white vinegar or lemon juice.
Let that sit for 5– 10 minutes until it looks curdled and thickened. That’s your DIY buttermilk, ready to go.
Choosing the Right Fats: Butter vs. Neutral Oil
I am a purist, so I always use melted unsalted butter in the batter for unmatched richness. However, you should use a neutral oil (like rapeseed or vegetable) for greasing the griddle between batches.
Butter burns too quickly at high temperatures and leaves tiny black speckles, ruining the look and taste of your old fashioned pancakes fluffy stack.
Why Baking Soda and Powder Work Together
Because we are using an acid (buttermilk), we need baking soda, which neutralizes the acid and lifts the batter rapidly. Baking powder, which is necessary for recipes without acid, ensures the lift continues throughout the cooking process.
You absolutely must use both here to achieve that gorgeous rise and airy texture.
Scaling the Recipe: Ingredient Ratios
This recipe yields a perfect stack for four people, roughly 8 to 10 pancakes. If you need to double or triple it, maintain the ratio of 2 parts flour to 1 ¾ parts buttermilk and keep the leavening agents exact (2 tsp baking powder, 1 tsp soda) for every 2 cups of flour.
Don't eyeball these measurements; they are the heart of your success.
How to Make and Cook the Perfect Old-Fashioned Pancakes

Phase 1: Separating the Wet and Dry Ingredients
In your large mixing bowl, whisk the flour, sugar, leaveners, and salt together for a good 30 seconds. This step is just as important as the rest; it stops you from having to overmix later to break up clumps of baking powder. In a separate, smaller bowl, gently whisk the eggs, then add the room temperature buttermilk.
Pour in the slightly cooled melted butter and whisk quickly until it blends seamlessly.
Phase 2: Gentle Folding and Batter Consistency
Now for the fun part: creating the 'shaggy mix.' Pour the entire wet mixture into the centre of the dry ingredients. Using a rubber spatula, fold the ingredients from the bottom up, cutting through the center gently. Stop when you still see large streaks of flour! It will look chunky and lumpy.
That rough, shaggy look means you’ve developed minimal gluten, and your pancakes will be tender.
Phase 3: Heating and Prepping Your Cooking Surface
Heat your pan or griddle over consistent medium heat. Too high, and the outside burns before the inside cooks; too low, and they spread out and won't develop those lovely, crunchy edges. Test the heat: a drop of water should sizzle and evaporate within 2 seconds.
Lightly brush the surface with oil before the first batch.
Phase 4: Recognizing the Perfect Flip Time
The perfect flip time is non-negotiable and requires patience. Cook the first side until two things happen: first, numerous bubbles rise to the surface and burst , forming small craters. Second, the edges look set and dull, pulling slightly away from the pan.
This usually takes 2– 3 minutes. Flip quickly and cook the second side for only 1– 2 minutes until golden brown.
Chef's Note: Flipping too early is a disaster. If you try to flip while the batter is still too wet, it will splat everywhere and the pancake won't get that gorgeous, sky-high lift.
Expert Tips for Flawless Pancake Success
Troubleshooting: Why Are My Pancakes Flat?
If your Proper Old Fashioned Buttermilk Pancakes are coming out flat, there are only two likely culprits. One: You overmixed the batter, activating the gluten and making it dense. Two: Your leavening agents (baking soda/powder) are old.
They usually have a shelf life of about 6 months, so check the dates.
The Warm Holding Trick (How to Keep the Stack Hot)
Nobody wants cold pancakes! Preheat your oven to its lowest setting, around 175°F (80°C). Place a wire rack over a baking sheet. As each batch finishes, transfer them to the rack in the warm oven. The rack prevents the pancakes from sitting in their own steam, keeping them warm and crispy, not soggy.
Managing Griddle Temperature Consistency
The first pancake is almost always a sacrifice, I accept that as kitchen fact. Use that first one to gauge your temperature. If it burns quickly, turn the heat down slightly and wait 30 seconds before pouring the next batch.
Your griddle temperature will drop slightly when you add new cold batter, so maintain consistency by letting the pan reheat for 20 seconds between batches.
Storing, Reheating, and Freezing Leftover Pancakes
Safely Stacking Pancakes for Freezer Storage
Made too many? Fantastic! Let the homemade buttermilk pancakes cool completely on the wire rack. To prevent freezer burn and sticking, layer them in a zip-top freezer bag with small squares of parchment paper between each one. Squeeze out as much air as possible before sealing.
They’ll keep beautifully for up to three months.
Best Methods for Reheating Without Drying Out
Do not, under any circumstance, microwave them unless you enjoy chewy, rubbery food. The absolute best way to reheat frozen pancakes is in a toaster oven or even a regular toaster on a medium setting. They come out perfectly crisp on the edges and warm all the way through, just like they were fresh off the griddle.
You can also bake them straight from frozen on a sheet tray at 350°F (175°C) for about 8 minutes.
Shelf Life of Buttermilk Pancake Batter
This is a tricky one because the leavening agents start working immediately. You can store leftover batter in an airtight container in the fridge for up to 2 days, but be warned: the pancakes won't be quite as fluffy. The acid base reaction diminishes over time.
For best results, mix the smallest batch you can manage, or cook all the batter and freeze the finished pancakes instead.
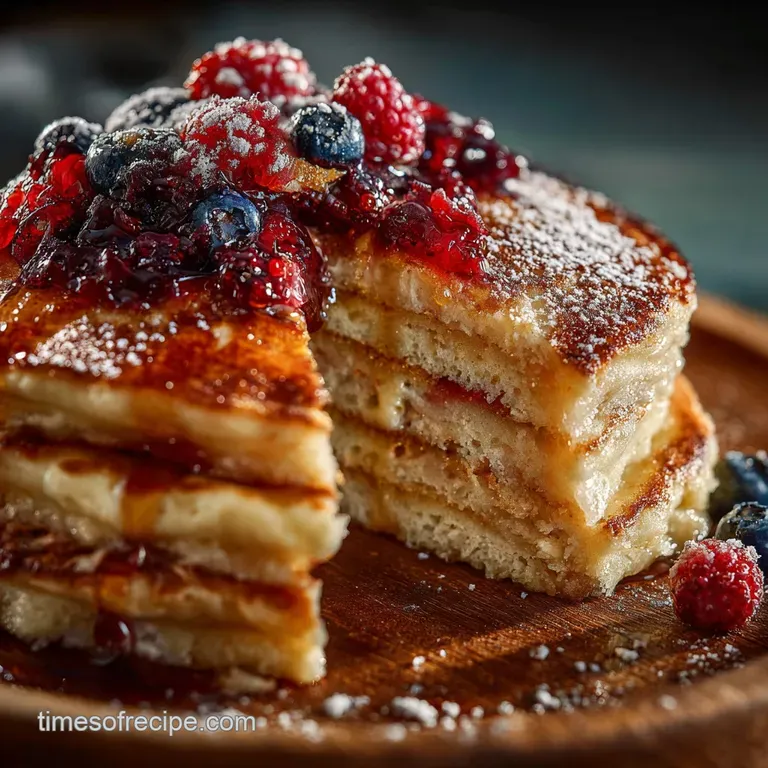
Mastering the Toppings: Serving Suggestions
These old fashioned pancakes from scratch deserve better than corn syrup and plastic fruit. Stick to Grade A Dark Robust Taste Maple Syrup; it has the deepest flavour. A dollop of proper, melting butter is mandatory.
I also love adding fresh seasonal berries, maybe a dust of powdered sugar, and a side of strong coffee. Simple perfection.

Recipe FAQs
Why are my pancakes coming out flat or dense?
Overmixing is the primary culprit; gently fold the wet and dry ingredients only until streaks of flour disappear, allowing lumps to remain. Also, ensure your baking powder and baking soda are fresh, as old leavening agents won't provide the necessary lift for a fluffy stack.
Can I substitute regular milk for buttermilk?
You can use regular milk, but you must add an acid to replicate buttermilk's necessary reaction with the baking soda. Mix 1 tablespoon of white vinegar or lemon juice per cup of regular milk, let it sit for five minutes until it curdles slightly, and then use this mixture as a buttermilk replacement.
My pancakes are burned on the outside but raw in the center. What am I doing wrong?
The griddle temperature is likely too high; high heat causes the outside to caramelize quickly before the interior can cook through. Cook pancakes over a consistent medium heat (or medium low, depending on your stovetop) and wait until small bubbles form across the surface before flipping.
How should I store leftover pancakes, and can I freeze them?
Store cooled, cooked pancakes in an airtight container in the refrigerator for up to 3 days, separating layers with parchment paper to prevent sticking. For freezing, flash freeze them individually on a baking sheet, then transfer them to a heavy duty freezer bag for up to 2 months; reheat gently in a toaster or microwave.
Can I make this recipe gluten-free?
Yes, this classic recipe adapts very well to gluten-free alternatives without sacrificing much texture. Substitute the all-purpose flour cup-for-cup with a high-quality gluten-free blend that already includes xanthan gum for structure. Make sure your baking powder is also certified gluten-free, if necessary.
How long should the batter rest before cooking?
It is best to let the buttermilk batter rest, covered, for about 5 to 10 minutes after mixing. This brief rest period allows the flour to fully hydrate and gives the baking soda and buttermilk time to activate the leavening process. Do not rest the batter longer than 15 minutes, or the leavening power may dissipate.
When should I add mix-ins like blueberries or chocolate chips?
Do not mix them into the main batter, as the weight of the additions can cause the light batter to deflate and prevents proper rising. Instead, pour the batter onto the hot griddle first, and then immediately sprinkle your desired toppings onto the wet surface of each individual pancake before it sets.
Oldfashioned Buttermilk Pancakes Stack

Ingredients:
Instructions:
Nutrition Facts:
| Calories | 485 kcal |
|---|---|
| Protein | 13.5 g |
| Fat | 16.2 g |
| Carbs | 64.1 g |
