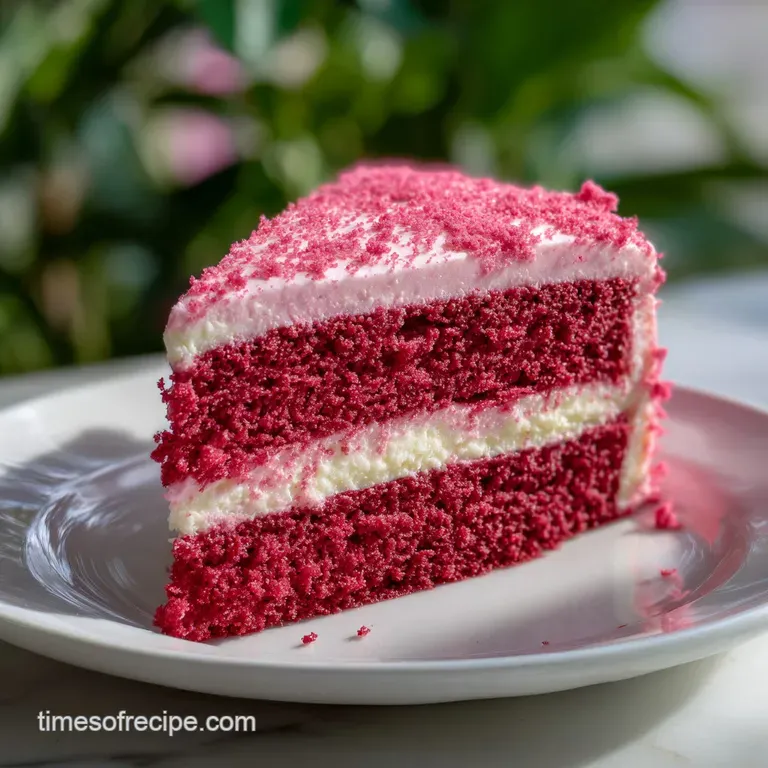
Pink Velvet Cake Recipe: Tender Crumb
- Time: Active 20 minutes, Passive 30 minutes, Total 50 minutes
- Flavor/Texture Hook: Velvety crumb with a tangy cream cheese finish
- Perfect for: Elegant birthday parties, bridal showers, or Valentine’s Day
- Crafting the Perfect Crumb for Your Pink Velvet Cake
- Essential Numbers and Timing for Your Velvet Bake
- Selecting Premium Components for a Stunning Pink Finish
- Gathering Your Culinary Tools for a Flawless Result
- Mastering the Technique with Our Precise Baking Steps
- Avoiding Common Baking Errors for a Velvety Texture
- Tailoring Your Creation with Flavorful Swaps and Twists
- Why the Traditional Method Beats the Stovetop
- Dispelling Common Myths About Velvet Cakes
- Planning Ahead with Storage and Freshness Protection
- Final Flourishes for a Visually Enchanting Dessert Presentation
- Recipe FAQs
- 📝 Recipe Card
Crafting the Perfect Crumb for Your Pink Velvet Cake
I still remember the first time I pulled a Pink Velvet Cake out of the oven and realized I’d accidentally made a "Peach ish Beige" cake instead. It was devastating. I’d used too much cocoa powder, thinking more flavor was better, but the chemistry of a velvet cake is a delicate dance.
When you get it right, though, the kitchen smells like a dream sweet vanilla swirling with a hint of chocolate and that distinct, tangy aroma of buttermilk.
The magic of this specific bake is in the texture. It isn’t just a colored vanilla cake; it has that signature "tight" crumb that feels like literal velvet on your tongue. We aren't going for a bouncy sponge here.
We want something substantial yet delicate, a cake that holds up to a thick swirl of cream cheese frosting without feeling heavy or cloying.
It’s the kind of dessert that makes people stop talking the moment they take a bite. You’ll see them poking at the crumb with their fork, trying to figure out why it’s so much softer than a standard box mix. It’s elegant, it’s stunning, and honestly, it’s a bit of a showstopper.
Let’s get into how we make that happens every single time.
The Chemistry of the Blush
The secret to the Pink Velvet Cake color lies in the minimal use of cocoa powder which provides a subtle flavor base without darkening the batter enough to overpower the pink gel. Because we use buttermilk, the acidity reacts with the leavening agents to keep the crumb tender while preventing the "browning" Maillard reaction from turning our pink into a muddy orange.
Essential Numbers and Timing for Your Velvet Bake
The Acid Base Balance: Buttermilk provides the acidity needed to tenderize the gluten, while the tiny amount of cocoa powder adds just enough "earthiness" to mimic the traditional red velvet profile.
Fat Emulsification: By using both butter for flavor and oil for moisture, we create a cake that stays soft even when refrigerated, which is necessary for cream cheese frosting stability.
Leavening Synergy: The combination of baking powder and baking soda ensures a consistent rise, while the soda specifically reacts with the buttermilk to create tiny air pockets for that velvety feel.
Pigment Stability: Using gel coloring instead of liquid ensures the hue stays vibrant through the over high heat baking process without thinning out our batter.
| Pan Configuration | Bake Time | Doneness Cue | Internal Temp |
|---|---|---|---|
| Two 8 inch Rounds | 28-32 minutes | Springy to the touch | 98°C |
| Three 6 inch Rounds | 22-26 minutes | Toothpick comes out clean | 98°C |
| Standard Cupcakes | 18-22 minutes | No "sizzle" sound when heard | 97°C |
When choosing your baking method, consider your kitchen environment. While the oven is the gold standard for that classic crumb, some people swear by unconventional methods for smaller batches.
| Method | Texture | Heat Distribution | Best For |
|---|---|---|---|
| Standard Oven | Fluffy with slight crust | Surround heat | Multi layer cakes |
| Fan Assisted (Convection) | Drier exterior, fast rise | Rapid air circulation | Even browning across racks |
Selecting Premium Components for a Stunning Pink Finish
The foundation of a great Pink Velvet Cake starts with the flour. We are using 345g of cake flour because it has a lower protein content than all purpose flour. This means less gluten formation, resulting in a cake that is soft and tender rather than chewy or bread like.
If you only have all purpose, you can substitute, but the crumb will lose its delicate "velvet" nature.
For the fat, we use a hybrid of 115g softened unsalted butter and 120ml vegetable oil. Butter brings the flavor, but oil keeps the cake moist even the next day. This is a trick I learned after years of dry "butter only" cakes. We also need 4 large eggs at room temperature.
Cold eggs will seize your butter, and you'll end up with a curdled looking batter that doesn't rise evenly.
Component Analysis
| Ingredient | Science Role | Pro Secret |
|---|---|---|
| Cake Flour (345g) | Provides structure with low gluten | Sift twice to aerate the starch particles |
| Full fat Buttermilk (240ml) | Tenderizes gluten and activates soda | Shake the carton well to distribute the solids |
| Unsweetened Cocoa (1 tsp) | Adds depth of flavor without color | Use natural cocoa, not Dutch processed, for better pH reaction |
| Pink Gel Coloring (2-3 drops) | Provides concentrated, heat stable hue | Add to the liquid ingredients first for even distribution |
For the frosting, we need 450g of full fat block cream cheese and 225g of slightly softened butter. Don't even think about using the spreadable cream cheese in a tub it has too much water and your frosting will literally slide off the cake.
To finish it off, 500g of sifted powdered sugar and a splash of heavy cream will give us that silky, pipeable consistency.
- 345g cake flour Why this? Essential for the low protein, delicate "velvet" crumb texture.
- 400g granulated sugar Why this? Adds sweetness and helps retain moisture during the bake.
- 115g unsalted butter, softened Why this? Provides the foundational "bakery" flavor we all love.
- 120ml vegetable oil Why this? Ensures the cake remains moist, even after refrigeration.
- 4 large eggs, room temperature
- 240ml full fat buttermilk
- 1 tsp unsweetened cocoa powder
- 1 tsp baking powder
- 1/2 tsp baking soda
- 2-3 drops pink gel food coloring
- 1 tbsp pure vanilla extract
- 450g full fat block cream cheese, cold
- 225g unsalted butter, slightly softened
- 500g powdered sugar, sifted
- 2 tbsp heavy cream
- 1 pinch salt
Gathering Your Culinary Tools for a Flawless Result
To get that professional finish, you’ll want a few specific tools. Two 20cm (8 inch) cake pans are perfect for this volume of batter. I always suggest using light colored aluminum pans.
Dark pans absorb too much heat and can cause the edges of your Pink Velvet Cake to brown too quickly, ruining that beautiful pink aesthetic.
A stand mixer is your best friend here. It allows you to cream the butter and sugar for a full 5 minutes without your arm falling off. If you don't have one, a sturdy hand mixer will work, but you'll need to be diligent about the timing.
You’ll also need a fine mesh sifter for the flour and cocoa powder clumps are the enemy of a smooth batter.
Finally, an offset spatula is a non negotiable for the frosting. It gives you the control to create those beautiful swoops and swirls. If you’re feeling extra fancy, a rotating cake turntable makes the frosting process feel like a professional art project rather than a messy chore.
Mastering the Technique with Our Precise Baking Steps
- Prep the environment. Preheat your oven to 180°C and grease two 8 inch pans. Note: Line the bottoms with parchment paper for a guaranteed clean release.
- Sift the drys. Combine 345g cake flour, 1 tsp cocoa powder, baking powder, baking soda, and salt. Sift until the mixture looks like fine dust.
- Cream the base. Beat 115g softened butter and 400g sugar for 5 minutes until pale and very fluffy.
- Emulsify the fats. Stream in 120ml vegetable oil while the mixer is running. Mix until the batter looks like shiny silk.
- Add the eggs. Incorporate 4 eggs one at a time. Note: Wait until each egg is fully absorbed before adding the next to maintain the emulsion.
- Hydrate and color. Mix the 2-3 drops of pink gel and 1 tbsp vanilla into the 240ml buttermilk. Stir until the liquid is a vibrant, uniform pink.
- Combine carefully. Alternate adding dry ingredients and buttermilk to the butter mixture, starting and ending with dry. Fold gently until no white streaks remain.
- Bake the layers. Divide the batter and bake for 30 minutes until a toothpick comes out clean and the edges pull away slightly.
- Cool completely. Let the cakes rest in the pans for 10 minutes, then move to a wire rack. Wait until they are cold to the touch before frosting.
- Whip the frosting. Beat the cold cream cheese and slightly softened butter, then slowly add 500g powdered sugar and heavy cream until thick and cloud like.
Avoiding Common Baking Errors for a Velvety Texture

The biggest pitfall I see with this recipe is over mixing the flour. Once the flour hits the wet ingredients, the clock starts on gluten development. If you keep beating it, you'll end up with a tough cake that has giant tunnels through it. Just fold it in until it's "just" combined.
Another common mistake is the temperature of the frosting ingredients. You want the cream cheese to be cold but the butter to be slightly softened. This prevents the frosting from becoming too runny.
If it does feel soft, pop the whole bowl in the fridge for 20 minutes before you try to assembly the cake.
Why Your Velvet Cake Fails
| Problem | Root Cause | Solution |
|---|---|---|
| Cake is dry/crumbly | Over baked or too much flour | Use a kitchen scale for flour and check doneness 5 mins early |
| Pink color turned brown | Over browning in the oven | Tent the pans with foil if edges brown too fast |
| Frosting is lumpy | Butter or cream cheese was too cold | Beat the fats alone for 3 mins before adding sugar |
Common Mistakes Checklist
- ✓ Use room temperature eggs to avoid "breaking" the batter emulsion.
- ✓ Sift the powdered sugar for the frosting to avoid tiny white grit.
- ✓ Tap the cake pans on the counter before baking to release large air bubbles.
- ✓ Never frost a warm cake; the cream cheese will melt into a sugary puddle.
- ✓ Use "Gel" food coloring, as liquid dye can change the batter consistency.
Tailoring Your Creation with Flavorful Swaps and Twists
If you want to take this Pink Velvet Cake in a different direction, it's very easy to adapt. You could try adding a teaspoon of strawberry extract for a fruity punch, or even fold in some freeze dried raspberry powder for a natural color boost. If you're looking for something more decadent, you might want to try my Valentine Ganache Cookies recipe for a side-by-side dessert spread.
For a smaller gathering, you can easily half this recipe. Just remember that when you're scaling down, you need to be even more precise. Use a small bowl for the mixing so the beaters can properly aerate the butter.
- Scaling DOWN (1/2 batch): Use 2 large eggs and reduce the bake time by about 25% if using smaller pans.
- Scaling UP (2x batch): Do not double the baking soda; use 1.5x the amount to avoid a metallic taste. Bake in batches to ensure even air circulation in the oven.
- High Altitude: Increase the buttermilk by 2 tablespoons and decrease the sugar by 50g to prevent the cake from collapsing.
| Original Ingredient | Substitute | Why It Works |
|---|---|---|
| Buttermilk | 240ml milk + 1 tbsp lemon juice | The acid mimics the tang and tenderizing power of real buttermilk. |
| Cake Flour | 300g AP flour + 45g cornstarch | Cornstarch lowers the protein content, imitating the soft crumb. |
| Vegetable Oil | Melted Coconut Oil | Provides a similar fat structure. Note: Adds a subtle coconut flavor. |
Why the Traditional Method Beats the Stovetop
Some people try to make "velvet" cakes in a steamer or on the stovetop to keep them moist, but for a true Pink Velvet, the oven is king. The dry heat of the oven allows the edges to set properly, giving the cake the structural integrity it needs to hold up those layers of frosting.
| Feature | Oven Baked | Stovetop Steamed |
|---|---|---|
| Crust | Beautifully golden and thin | No crust, very pale |
| Crumb Texture | Tight and velvety | Spongy and more porous |
| Reliability | Consistent heat | Hard to regulate temperature |
Chef's Note: If you find your cakes are "doming" too much in the middle, you can use wet cake strips around the pans. This keeps the edges cool and forces the cake to rise evenly, giving you flat tops that don't need much leveling.
Dispelling Common Myths About Velvet Cakes
A common myth is that Pink Velvet Cake is just a vanilla cake with pink dye. That’s simply not true! The inclusion of cocoa powder and buttermilk changes the entire protein structure and flavor profile.
Without that tiny hint of cocoa, you’re just eating a pink sponge cake, which lacks the depth and "velvet" mouthfeel.
Another myth is that you must use beet juice for "natural" coloring. While you can, the pH of the cake often turns the beet juice a muddy brown during baking. For that specific, whimsical pink, high-quality gel food coloring is actually the most reliable way to get a clean result without affecting the flavor.
Planning Ahead with Storage and Freshness Protection
This cake is a dream for make-ahead planning. You can bake the layers up to two days in advance. Once they are completely cool, wrap them tightly in plastic wrap and store them at room temperature. If you need more time, these layers freeze beautifully for up to three months.
Just thaw them in the fridge overnight before you plan to frost them.
The frosted cake should be kept in the fridge because of the cream cheese. However, always let it sit at room temperature for at least 30 minutes before serving. Cold butter and cream cheese are hard and lose their flavor; letting the cake "wake up" ensures the texture is perfectly soft when it hits the plate.
For zero waste, save any cake domes you level off! Crumble them up and mix them with a spoonful of leftover frosting to make Pink Velvet cake pops. You can also toast the crumbs in the oven and use them as a "velvet dust" garnish for the sides of the cake.
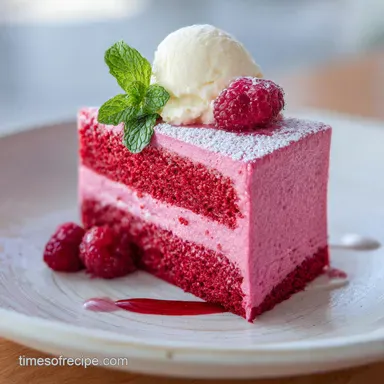
Final Flourishes for a Visually Enchanting Dessert Presentation
When it comes to the final look, I love a "semi naked" frost where you can just see a hint of the pink layers peeking through the white cream cheese. It looks sophisticated and modern. For a little extra sparkle, you might consider my How To Make recipe for strawberries. They make a stunning topper that echoes the pink tones of the cake perfectly.
To get clean slices, use a long, thin knife dipped in hot water and wiped dry between every single cut. This prevents the cream cheese from dragging through the pink crumb and keeps your presentation looking sharp and professional.
If you have leftover frosting, pipe small beads around the bottom edge of the cake to hide any imperfections where the cake meets the stand. It's the little things that turn a homemade bake into a masterpiece.

Recipe FAQs
What is the flavor of pink velvet cake?
It is a mild chocolate vanilla blend. Pink velvet offers a flavor profile similar to red velvet but with a softer cocoa note, balanced by the tanginess of buttermilk and rich vanilla.
What is the difference between red velvet and pink velvet cake?
The primary difference is the coloring agent and intensity. Red velvet uses significant cocoa and red dye for a pronounced look, whereas pink velvet uses minimal cocoa powder, allowing a light pink hue to dominate the flavor, making it taste closer to a vanilla cake.
Is pink velvet just vanilla?
No, it is subtly more complex than pure vanilla. While vanilla is dominant, the inclusion of a small amount of natural cocoa powder adds necessary depth and reacts with the buttermilk to create the signature tender crumb texture.
What is the best frosting for pink velvet cake?
Cream cheese frosting is the traditional and best pairing. The slight tang cuts through the sweetness of the cake beautifully, ensuring the final dessert doesn't feel heavy.
How do I ensure my pink velvet cake has that signature velvety texture?
Use cake flour and avoid overmixing the batter. Cake flour has lower protein, which limits gluten development, keeping the crumb soft; mastering this tenderizing technique is similar to controlling spread in our Sugar Cookie Recipe Cutout.
Can I use natural coloring instead of gel coloring for the pink hue?
No, use high-quality gel coloring for the best results. Natural colorings, like beet juice, often change the pH of the batter, causing the pink to turn muddy brown during the high heat of baking.
What temperature should the cream cheese and butter be for the frosting?
The cream cheese must be cold, but the butter should be slightly softened. This temperature difference helps the frosting whip up stable and voluminous without becoming runny, much like how temperature precision affects emulsification in our Pistachio Martini recipe.
Pink Velvet Cake Recipe
Ingredients:
Instructions:
Nutrition Facts:
| Calories | 785 kcal |
|---|---|
| Protein | 6.8 g |
| Fat | 44.6 g |
| Carbs | 92.0 g |
| Fiber | 0.8 g |
| Sugar | 69.2 g |
| Sodium | 115 mg |
