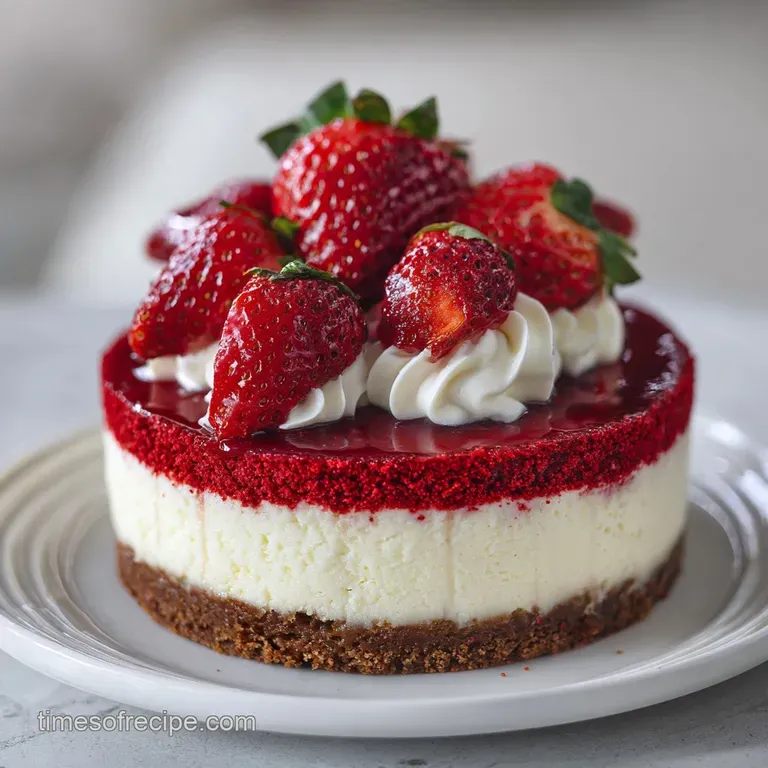
Red Velvet Strawberry Cheesecake Recipe
- Time: Active 40 minutes, Passive 1 hour 15 mins, Total 1 hour 55 mins
- Flavor/Texture Hook: A velvety, cream cheese crumb that meets the bright shatter of fresh strawberry glaze.
- Perfect for: Romantic anniversaries, vibrant spring brunches, or a show stopping birthday centerpiece.
- Creating the Ultimate Red Velvet Strawberry Cheesecake
- The Chemistry of Acid and Color Stability
- Component Analysis for Successful Baking
- Selecting Your High Quality Elements
- Essential Tools for Precision Baking
- Step-by-Step Instructions for Perfect Layers
- Resolving Common Baking Hurdles
- Adjusting for Different Batch Sizes
- Debunking Traditional Baking Myths
- Storage Guidelines and Zero Waste
- Elegant Presentation and Pairing
- Recipe FAQs
- 📝 Recipe Card
Creating the Ultimate Red Velvet Strawberry Cheesecake
The first time I pulled this beauty out of the oven, the kitchen was filled with that unmistakable scent of warm cocoa and tangy buttermilk. I remember the way the vibrant red batter swirled into the ivory cream, looking like a piece of edible marble art.
It was a cold Tuesday evening, and I was determined to make something that felt like a celebration, even if it was just for a quiet night in.
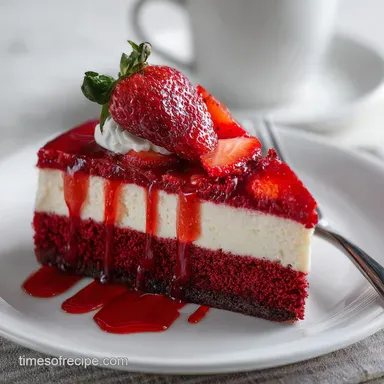
As I took that first bite, the velvety texture of the cheesecake melted against the slightly dense, chocolate hinted base. The strawberries added a necessary brightness that cut through the richness of the Philadelphia Cream Cheese. It wasn't just a dessert; it was a moment of pure magic.
I’ve refined this recipe over dozens of bakes to ensure your crust never gets soggy and your top never cracks, giving you a result that looks like it came from a high end boutique bakery.
We are going to focus on building layers of flavor here. Most people think red velvet is just chocolate with food coloring, but the real secret lies in the chemical reaction between the vinegar and the buttermilk.
When you pair that subtle tang with a concentrated strawberry purée, the result is an elegant dessert that balances sweetness with a sophisticated acidity. Let's get into the details of how to make this stunning treat.
The Chemistry of Acid and Color Stability
The Acid Cocoa Reaction: The white vinegar and buttermilk react with the cocoa powder to preserve the red anthocyanins, ensuring the cake base stays vibrant rather than turning a muddy brown.
This same acidity denatures the proteins in the cream cheese, resulting in a tighter, more velvety structure that holds its shape when sliced.
| Method | Time | Texture | Best For |
|---|---|---|---|
| Traditional Bake | 1 hour 15 mins | Ultra silky, dense | Formal dinner parties |
| Individual Cupcakes | 25 minutes | Airy, portable | Birthday parties |
| No Bake Version | 6 hours (chill) | Mousse like, light | Summer gatherings |
Choosing the right method depends on your schedule, but the traditional bake offers that classic, rich mouthfeel that defines a true Red Velvet Strawberry Cheesecake. If you are short on time, the individual cupcakes are a brilliant shortcut that skips the water bath entirely.
Component Analysis for Successful Baking
| Ingredient | Science Role | Pro Secret |
|---|---|---|
| Philadelphia Cream Cheese | Provides the structural fat and protein base for the filling. | Always use the full fat blocks; the tub versions contain extra air and stabilizers that ruin the density. |
| Buttermilk | Acts as the primary leavening activator for the red velvet base. | If you're out, "sour" regular milk with a splash of lemon, but the thickness of real buttermilk is unmatched. |
| Red Food Coloring Gel | Delivers the iconic, saturated hue without thinning the batter. | Use a high-quality gel like Americolor; liquid dyes can add too much moisture and dull the flavor. |
| Fresh Strawberry Purée | Adds natural acidity and moisture to the cheesecake layer. | Strain the seeds out carefully to maintain a perfectly smooth, velvety consistency. |
Selecting your elements with care is the difference between a good bake and a masterpiece. While the cake base relies on the chemistry of the buttermilk and vinegar, the cheesecake layer is all about temperature control and air management.
Selecting Your high-quality Elements
For this Red Velvet Strawberry Cheesecake, we need to be specific about our pantry choices. Every gram counts when you're aiming for that professional finish.
- 1.25 cups all purpose flour: The foundation of our red velvet base.
- 0.75 cup granulated sugar: Provides sweetness and helps with the tender crumb.
- 1 tbsp unsweetened cocoa powder: Why this? Just enough for flavor without making the cake dark brown.
- 0.5 tsp baking soda: Reacts with the buttermilk for a perfect rise.
- 0.5 tsp salt: Essential for balancing the high sugar content.
- 0.5 cup buttermilk, room temperature: Creates the signature tang and tender texture.
- 0.5 cup unsalted butter, melted and cooled: Adds richness and a buttery finish to the base.
- 1 large egg, room temperature: Binds the cake batter together.
- 1 tsp white vinegar: Why this? Enhances the red color and activates the baking soda.
- 1 tsp vanilla extract: Provides a warm, aromatic background note.
- 1 tbsp red food coloring gel: Ensures the color stays vibrant after baking.
- 32 oz Philadelphia Cream Cheese, softened: The gold standard for cheesecake stability.
- 1 cup granulated sugar (for filling): Sweetens the cream cheese layer.
- 1 cup full fat sour cream, room temperature: Why this? Adds creaminess and a subtle tang to the filling.
- 1 tbsp vanilla extract (for filling): Elevates the dairy flavors.
- 4 large eggs, room temperature: Provides structure and "lift" to the cheesecake.
- 0.5 cup fresh strawberry purée, strained: Natural flavor and beautiful pink marbling.
- 1 lb fresh strawberries, hulled and sliced: The fresh, vibrant topping.
- 2 tbsp granulated sugar (for topping): Macerates the berries for a glossy sauce.
- 1 tsp lemon juice: Keeps the berry topping bright and fresh.
If you are looking for a simpler berry experience, you might enjoy my Strawberry Cheesecake Dump Cake recipe which offers those same flavors with half the effort.
Essential Tools for Precision Baking
To achieve a crack free surface and a level base, you'll need a few specific pieces of equipment. I always recommend a 9 inch springform pan because the removable sides are non negotiable for a delicate cheesecake.
You will also need a stand mixer (like a KitchenAid) or a powerful hand mixer to ensure the cream cheese is completely smooth.
A large roasting pan is necessary for the water bath this creates the humid environment that prevents the top from drying out and shattering. I also keep a fine mesh strainer handy for the strawberry purée; leaving the seeds in can interrupt the velvety texture we're striving for.
Finally, a piece of heavy duty aluminum foil is vital for wrapping the bottom of your pan to prevent any water from seeping into your red velvet base.
step-by-step Instructions for Perfect Layers

Preparing the Red Velvet Foundation
Preheat your oven to 350°F and grease your 9 inch springform pan. In a medium bowl, whisk the 1.25 cups flour, 0.75 cup sugar, 1 tbsp cocoa, baking soda, and salt until no lumps remain. Note: Sifting the cocoa powder is highly recommended to avoid dark spots in the red batter.
Mixing the Wet Base
Combine the 0.5 cup buttermilk, melted butter, 1 egg, vinegar, vanilla, and red food coloring. Whisk until the color is uniform and vibrant. Fold the dry ingredients into the wet until just combined overmixing here will make the base tough instead of tender.
Baking the Cake Layer
Spread the red batter into the bottom of your prepared pan. Bake for 15 minutes until the center springs back when lightly touched. Remove from the oven and lower the temperature to 325°F while the base cools slightly.
Crafting the Creamy Filling
Beat the 32 oz Philadelphia Cream Cheese and 1 cup sugar in your mixer on medium speed. Work the mixture until it looks like smooth silk with zero lumps. Add the sour cream and vanilla, mixing just until incorporated to avoid beating in too much air.
Incorporating the Eggs
Add the 4 large eggs one at a time, mixing on the lowest speed. Note: Adding eggs slowly prevents the batter from breaking and keeps the texture dense.
Creating the Strawberry Marble
Pour two thirds of the cheesecake batter over the cooled red velvet base. Mix the remaining third with the 0.5 cup strawberry purée. Drop spoonfuls of the strawberry mixture onto the plain batter and use a knife to swirl gently until a beautiful marbled pattern emerges.
Preparing the Water Bath
Wrap the outside of your springform pan in two layers of heavy duty foil. Place it in a large roasting pan and fill the roasting pan with 1 inch of hot water. Bake at 325°F for 1 hour 15 mins until the edges are set but the center still wobbles slightly.
The Cooling Process
Turn off the oven and crack the door open about an inch. Let the cheesecake sit inside for 1 hour. This slow cooling is the secret to a crack free surface. Once cooled to room temperature, refrigerate for at least 6 hours, or ideally overnight.
Adding the Fresh Topping
Combine the sliced strawberries, 2 tbsp sugar, and lemon juice in a bowl. Let them sit for 15 minutes until a glossy syrup forms. Pile the berries onto the chilled cheesecake right before serving for maximum impact.
For another impressive centerpiece, you should check out the The Romantic Dessert recipe which uses a similar focus on temperature control for a perfect finish.
Resolving Common Baking Hurdles
Why Your Cheesecake Surface Cracked
Cracks are usually caused by a sudden change in temperature or overbeating the eggs. When you beat eggs at high speed, you incorporate air bubbles that expand in the oven and collapse as they cool, tearing the surface. Always use low speed for the eggs and never skip the oven cooling hour.
Why the Red Velvet Base Is Dry
A dry base often comes from overbaking the first layer or measuring the flour too heavily. Use the "spoon and level" method for your flour. Remember, the base will continue to cook slightly when the cheesecake layer is added, so 15 minutes for the initial bake is plenty.
| Problem | Root Cause | Solution |
|---|---|---|
| Lumpy Filling | Cold cream cheese. | Ensure cheese is at room temp (68°F) before mixing. |
| Soggy Crust | Leaky water bath. | Use heavy duty foil and a slow cooker liner for extra protection. |
| Runny Center | Underbaked or sliced too soon. | Bake until 150°F internal and chill for a full 6 hours. |
Common Mistakes Checklist:
- ✓ Ensure all dairy products are at true room temperature (this takes about 2 hours on the counter).
- ✓ Don't open the oven door during the first hour of baking; the loss of steam can cause a collapse.
- ✓ Use a silicone slow cooker liner over your foil to guarantee a 100% waterproof seal for the pan.
- ✓ Tap the filled pan firmly on the counter 5 times before baking to release trapped air bubbles.
Adjusting for Different Batch Sizes
When you need to scale this Red Velvet Strawberry Cheesecake, baking physics come into play. If you are cutting the recipe in half, use a 6 inch springform pan and reduce the baking time by about 20 minutes. For the base, beat one egg in a cup and use exactly half by weight.
Scaling up is a bit trickier because of the water bath. If you are doubling the recipe to make two cakes, do not bake them in the same roasting pan unless there is at least two inches of space between them for heat circulation.
Keep the spices and vanilla at 1.5x the original amount rather than doubling them completely to avoid overwhelming the delicate dairy flavors.
Chef's Tip: If you want a more intense strawberry flavor, reduce the purée on the stovetop by half before adding it to the batter. This concentrates the sugars and prevents the filling from becoming too thin.
Debunking Traditional Baking Myths
One common myth is that you must use liquid food coloring for red velvet. In reality, liquid coloring adds unnecessary water and often has a bitter aftertaste. Gels are far superior for maintaining the "velvet" texture.
Another misconception is that a cracked cheesecake is "ruined." While we aim for a smooth top, a crack doesn't affect the flavor that's exactly why we have a beautiful fresh strawberry topping to hide any minor imperfections!
Storage Guidelines and Zero Waste
Storage: This cheesecake keeps beautifully in the fridge for up to 5 days. Ensure it is tightly wrapped or in an airtight container so it doesn't absorb other "fridge smells."
Freezing: You can freeze the entire cake (without the fresh strawberry topping) for up to 2 months. Wrap it in plastic wrap, then foil. Thaw it overnight in the fridge before serving.
Zero Waste: If you have leftover red velvet batter, don't throw it away! Bake it in a muffin tin for 12 minutes to make "chef's snacks." Any leftover strawberry purée can be swirled into morning yogurt or used as a base for a refreshing vinaigrette. If you find yourself with extra vanilla, you might want to try this Vanilla Pound Cake recipe to use up those pantry staples.
Elegant Presentation and Pairing
When serving your Red Velvet Strawberry Cheesecake, use a warm knife dipped in hot water for those clean, professional slices. Wipe the knife after every single cut. This ensures the red base doesn't smear into the white cheesecake layer, keeping the contrast sharp.
For a drink pairing, a crisp Sparkling Rosé or a dessert wine like a Moscato d'Asti works beautifully. The bubbles and slight acidity in these drinks cleanse the palate between rich bites of cream cheese.
If you prefer non alcoholic options, a cold brew coffee with a splash of cream complements the cocoa notes in the base perfectly. For a truly magical experience, serve each slice with a small dollop of lightly sweetened whipped cream and a mint leaf for a pop of color.

Recipe FAQs
Can I use frozen strawberries instead of fresh for the topping and the swirl?
No, stick with fresh. Frozen berries release too much moisture and can thin out both the cheesecake swirl and the final topping into a watery mess.
How to prevent the cheesecake filling from cracking during cooling?
Turn off the oven and crack the door open slightly. Allow the cheesecake to cool gradually inside the turned off oven for one hour before removing it completely.
Is it true that overmixing the eggs will ruin the cheesecake texture?
Yes, this is crucial for texture. Overbeating incorporates excess air which causes the filling to puff up too much and then violently collapse, causing cracks and a less dense structure.
How to ensure the red velvet base stays vibrantly colored after baking?
Use high-quality gel food coloring and rely on the buttermilk/vinegar reaction. The acidity is key to preserving the red pigments against the cocoa powder; if you master this, see how the same acid principle affects flavor balance in our Cupid Crunch Valentine's recipe.
How to achieve a perfectly smooth, lump free cream cheese filling?
Ensure all dairy ingredients are truly room temperature before mixing. Beat the cream cheese and sugar together first on medium speed until completely silken before adding any eggs or sour cream.
What is the best way to wrap the springform pan for the water bath?
Wrap the bottom and sides tightly with two heavy duty layers of aluminum foil. This prevents the bath water from seeping into the red velvet base, keeping it perfectly dry.
Can I substitute the Philadelphia Cream Cheese with a lighter version?
No, for stability, use the full fat blocks. Lighter versions contain added stabilizers and air that will result in a significantly softer, sometimes runny, final texture.
Red Velvet Strawberry Cheesecake
Ingredients:
Instructions:
Nutrition Facts:
| Calories | 598 kcal |
|---|---|
| Protein | 10 g |
| Fat | 41 g |
| Carbs | 52 g |
| Fiber | 2 g |
| Sugar | 39 g |
| Sodium | 345 mg |
