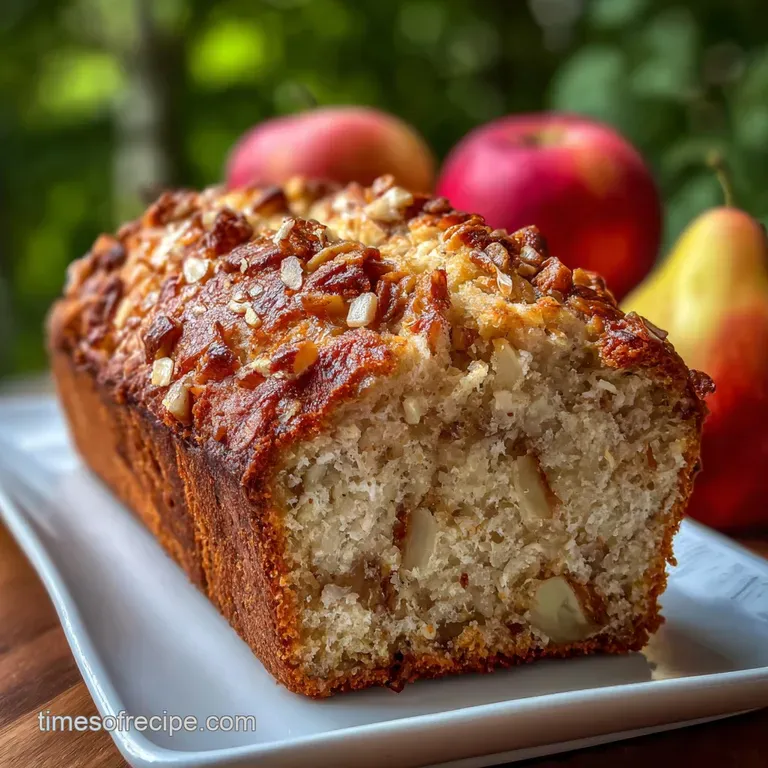
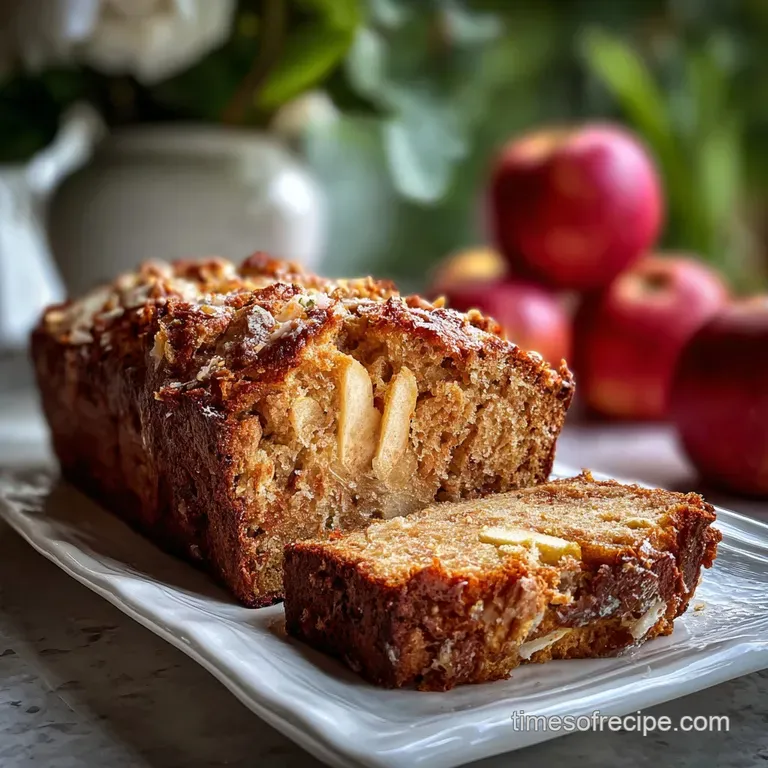
Homemade Apple Bread with Shredded Apple
- Time: Active 15 mins, Passive 60 mins, Total 1 hours 15 mins
- Flavor/Texture Hook: Velvety crumb with a crackling, sugar dusted crust.
- Perfect for: Cozy weekend brunches or an elegant afternoon tea pairing.
- Baking the Best Homemade Apple Bread with Shredded Apple
- The Alchemy of Moisture and Spice
- Technical Specs for the Perfect Loaf
- Building Layers of Autumnal Flavor
- Tools for an Elegant Bake
- Guided Steps for Golden Results
- Pro Fixes for Common Flaws
- Creative Variations and Smart Substitutes
- Guidelines for Long Term Storage
- Presentation and Serving Suggestions
- Scaling the Recipe
- Debunking Common Baking Myths
- Recipe FAQs
- 📝 Recipe Card
Baking the Best Homemade Apple Bread with Shredded Apple
There is a specific kind of magic that happens in a kitchen on a drizzly Tuesday afternoon when the scent of cinnamon starts to drift from the oven. I remember the first time I tried making a fruit based loaf; I had chopped the apples into thick chunks, and while it was okay, the pieces all sank to the bottom, leaving the top dry and the bottom a soggy mess.
It was a frustrating kitchen fail that taught me one of my favorite lessons: the power of the grate.
By shredding the fruit, you change the entire structural integrity of the loaf. The apples don't just sit there; they melt into the batter, distributing their nectar evenly so every single crumb feels like a velvety cloud.
When you pull this loaf out of the oven, the house smells like a warm hug, and that first slice, still steaming, is enough to make any stress of the day simply vanish. We’re going for something refined here a bread that looks like it belongs in a high end bakery but feels as comforting as a recipe passed down through generations.
The Alchemy of Moisture and Spice
Building flavors in a bake like this requires a bit of understanding about how ingredients interact under heat. We aren't just mixing things in a bowl; we are creating a delicate emulsion that will hold its shape while remaining incredibly tender.
- The Physics of the Shred: Grating the apples increases their surface area, allowing the natural pectin and juices to bond instantly with the flour for a more uniform crumb. This prevents the "sunken fruit syndrome" common in traditional chunky apple breads.
- Hygroscopic Balance: Using a mix of granulated and light brown sugar helps draw moisture into the bread while creating those lovely deep caramel notes during the bake.
- Starch Gelatinization: The vegetable oil coats the flour proteins, preventing excess gluten from forming so the texture remains soft and cake like rather than chewy.
- Thermal Stability: Baking at a steady 350°F ensures the edges set with a slight shatter while the dense, fruit heavy center has enough time to cook through without burning the exterior.
| Cooking Method | Time | Texture Outcome | Best For |
|---|---|---|---|
| Standard Oven | 60 mins | Even rise, golden crust | Traditional, elegant loaf |
| Stovetop (Dutch Oven) | 75 mins | Denser, more pudding like | Rustic, camp style baking |
| Air Fryer (Mini Loaves) | 25 mins | Very crispy exterior | Quick snacking portions |
The choice between an oven and a stovetop method usually comes down to the texture you desire. While a Dutch oven on the stovetop can mimic an oven, it often creates a more steamed, moist environment which is lovely but lacks the classic "shatter" of an oven baked crust.
I almost always opt for the oven to get that stunning golden finish.
Technical Specs for the Perfect Loaf
Before we get our hands messy, let's look at what makes these specific ingredients work so well together. It’s about more than just taste; it’s about the science of the bake.
| Component | Science Role | Pro Secret |
|---|---|---|
| All Purpose Flour | Provides the scaffolding | Sift it with the spices to ensure no clumps of nutmeg remain. |
| Vegetable Oil | Keeps the crumb tender | Use a neutral oil like grapeseed to let the apple perfume shine. |
| Fresh Shredded Apples | Natural hydration source | Don't squeeze the juice out; that liquid is your "secret sauce." |
| Baking Soda | Chemical leavening | Reacts with the acidic apple juice to create a light, airy rise. |
Precision is everything when you want a stunning result. If you find yourself wanting to experiment with the textures, you might notice similarities in how we handle moisture here compared to the gooey caramel layers in my Monkey Bread Recipe. Both rely on a careful balance of sugars and fats to keep the interior soft.
Building Layers of Autumnal Flavor
Gathering your elements is the first step toward a successful bake. I always recommend having everything at room temperature especially the eggs to ensure they emulsify properly with the oil and sugars.
Trust me on this; cold eggs can cause the oil to seize up, leading to a lumpy batter that won't rise quite as high.
- 2 cups fresh apples, shredded (approx. 360g): Why this? Shredding ensures the fruit's moisture is distributed perfectly throughout the entire loaf.
- 1 tsp lemon juice: Why this? Prevents browning and provides a tiny acidic kick to activate the baking soda.
- 250g all purpose flour: Why this? Provides enough structure to support the heavy fruit without being too dense.
- 1 tsp baking soda: Why this? The primary lift agent that reacts with the apples and lemon juice.
- 0.5 tsp fine sea salt: Why this? Salt is the ultimate flavor enhancer; it makes the spices pop.
- 1.5 tsp ground cinnamon: Why this? The classic aromatic partner for apples.
- 0.25 tsp ground nutmeg: Why this? Adds a sophisticated, earthy depth that cinnamon alone can't achieve.
- 150g granulated sugar: Why this? Creates a crisp exterior and provides essential sweetness.
- 50g light brown sugar, packed: Why this? Adds moisture and a hint of molasses flavor.
- 120ml vegetable oil: Why this? Oil keeps the bread moist for days longer than butter would.
- 2 large eggs, room temperature: Why this? Binds the structure and provides richness.
- 1 tsp pure vanilla extract: Why this? Rounds out the fruit and spice notes with floral sweetness.
For a truly elegant twist, you could even replace a teaspoon of the vanilla with a splash of almond flavor. It reminds me of the sophisticated profile found in an Orgeat Syrup Recipe, which pairs beautifully with stone fruits and apples alike.
Tools for an Elegant Bake
You don't need a kitchen full of gadgets, but a few specific tools will make the process much more enjoyable. I once tried to grate apples with a handheld zester because I couldn't find my box grater honestly, don't even bother. It took forever and the texture was all wrong.
- Box Grater: Use the large holes for the apples. You want distinct shreds, not a mushy purée.
- 9x5 inch Loaf Pan: This is the standard size for this volume of batter.
- Mixing Bowls: One large for wet ingredients, one medium for dry.
- Whisk and Silicone Spatula: For gentle folding.
- Parchment Paper: Essential for an easy, "no stick" release.
Chef's Tip: To unlock the full potential of your spices, toast the cinnamon and nutmeg in a small dry pan over low heat for just 30 seconds before whisking them into the flour. You'll smell the difference immediately it turns a simple bread into something truly brilliant.
Guided Steps for Golden Results
Ready to start? Let’s crack on. This process is all about the "dry into wet" method, which is the most reliable way to avoid overworking the gluten.
- Preheat and Prepare. Set your oven to 350°F (175°C). Grease your 9x5 loaf pan and line it with parchment paper, leaving an overhang on the sides like a little sling.
- Shred the Fruit. Grate your apples (keep the skins on for color if you like!) until you have 2 cups. Toss them immediately with 1 tsp lemon juice in a small bowl. Note: This prevents oxidation and adds a bright note.
- Whisk Dry Elements. In a medium bowl, combine 250g flour, 1 tsp baking soda, 0.5 tsp salt, 1.5 tsp cinnamon, and 0.25 tsp nutmeg. Whisk until the color is uniform and no streaks of spice remain.
- Emulsify Wet Ingredients. In a large bowl, whisk 120ml vegetable oil with 150g granulated sugar and 50g light brown sugar until the mixture looks like wet sand.
- Add Eggs and Vanilla. Beat in the 2 eggs one at a time, followed by 1 tsp vanilla. Whisk vigorously until the batter looks glossy and slightly pale.
- Fold in Apples. Stir the shredded apples (and any accumulated juices) into the wet mixture using your spatula.
- Combine Carefully. Gently fold the dry ingredients into the wet. Stop the moment you see the last streak of flour disappear. Do not overmix, or your bread will be tough.
- Bake the Loaf. Pour the batter into your prepared pan. Bake for 60 minutes until a skewer inserted into the center comes out clean or with just a few moist crumbs.
- Cool Properly. Let the bread rest in the pan for 10 minutes before using the parchment sling to lift it onto a wire rack. Cool completely before slicing to let the internal structure set.
Pro Fixes for Common Flaws
Even the most experienced bakers run into trouble sometimes. The most common issue with fruit based breads is moisture management. Because apples vary in water content, your batter might occasionally feel thinner or thicker than the last time you made it.
Managing Apple Moisture
If your apples are exceptionally juicy (like a McIntosh or Cortland), you might find the center of the loaf stays a bit gummy. If the batter looks more like a liquid than a thick paste, add one extra tablespoon of flour. This helps soak up that excess "apple water" without making the bread dry.
Preventing a Sunken Center
A sunken middle usually happens if the oven door is opened too early or if the baking soda is expired. Always check your leavening agents by dropping a pinch of soda into vinegar; if it doesn't sizzle violently, toss it and get a fresh box. Also, try to resist the urge to peek before the 45 minute mark!
| Problem | Root Cause | Solution |
|---|---|---|
| Gummy center | Too much fruit moisture | Bake for an extra 5-10 mins or lightly pat apples before measuring. |
| Dry, crumbly texture | Overmeasured flour | Use a kitchen scale for the 250g of flour. |
| Burnt edges, raw middle | Oven temperature too high | Check with an oven thermometer; reduce temp by 25°F if needed. |
Common Mistakes Checklist:
- ✓ Always use room temperature eggs for a smoother emulsion.
- ✓ Don't peel the apples unless you really hate the texture; the skins add beautiful flecks of color.
- ✓ Measure the shredded apple by gently spooning it into the cup, don't pack it down.
- ✓ Ensure your oven is fully preheated for at least 20 minutes before the pan goes in.
- ✓ Let the loaf cool! Slicing it hot will cause the steam to escape, leaving the rest of the loaf dry.
Creative Variations and Smart Substitutes
The beauty of this recipe is how adaptable it is. While the classic cinnamon apple profile is stunning on its own, you can easily dress it up for a more "elegant dessert" vibe.
| Original Ingredient | Substitute | Why It Works |
|---|---|---|
| Vegetable Oil (120ml) | Melted Butter (120ml) | Provides a richer, dairy flavor. Note: Loaf will be slightly firmer. |
| Light Brown Sugar | Dark Brown Sugar | Adds a deeper, more intense molasses flavor. |
| All Purpose Flour | 1:1 gluten-free Blend | Rice based blends mimic the crumb well. Note: May need 5 mins extra bake time. |
Adding a Textural Crunch
If you want to add some contrast to the velvety crumb, fold in 1/2 cup of toasted chopped pecans or walnuts right at the end. For a sweet "shatter" on top, sprinkle a tablespoon of coarse turbinado sugar over the batter before it goes into the oven. It creates a professional looking crust that is absolutely delightful.
Making it dairy-free/Vegan
This recipe is already naturally dairy-free since it uses oil! To make it fully vegan, you can swap the two eggs for two "flax eggs" (2 tbsp ground flaxseed mixed with 6 tbsp water, sat for 10 minutes).
The loaf will be slightly denser and have a nuttier flavor, but it remains incredibly moist and delicious.
Guidelines for Long Term Storage
Because this bread is so moisture rich, it stays fresh longer than many other baked goods. However, you need to store it correctly to prevent it from becoming soggy.
- Fridge Storage: Once completely cool, wrap the loaf tightly in plastic wrap or store in an airtight container. It will stay fresh for up to 5 days. I actually think the flavor improves on day two as the spices meld together.
- Freezing Instructions: This bread freezes beautifully. Wrap individual slices in parchment paper, then place them in a freezer safe bag for up to 3 months. This is perfect for quick morning treats.
- Zero Waste Tip: If you find yourself with a few dry slices at the end of the week, don't throw them away! Use them to make an "Apple Bread French Toast." Dip the slices in a standard egg custard and fry them in butter it's a revelation. You can also use the apple peels and cores to make a quick stovetop simmer pot with a cinnamon stick to keep your house smelling like a dream.
Presentation and Serving Suggestions
Serving this loaf is all about highlighting its simple, stunning nature. While a plain slice is lovely, there are ways to make it feel like a truly elegant dessert.
The Classic Warm Slice
The absolute best way to enjoy this is slightly warm with a generous smear of salted butter. The salt cuts through the sweetness of the apple and highlights the warmth of the nutmeg. If you're feeling fancy, a drizzle of honey or a sprinkle of flaky sea salt on top of the butter takes it to another level.
The Afternoon Tea Pairing
For a sophisticated gathering, serve thin slices of the apple bread alongside a sharp white cheddar cheese. The "apples and cheese" combination is a timeless pairing. If you want to lean into the sweetness, a dollop of lightly sweetened mascarpone or a quick glaze made of powdered sugar and a tiny splash of apple cider can be drizzled over the top for a beautiful finish.
- Serve it with: A hot cup of Earl Grey tea or a dark roast coffee.
- Temperature: Room temperature is best for tasting the nuances of the spices, but warm is best for comfort.
- Pro Tip: Use a serrated bread knife to get those clean, professional looking slices without squishing the tender crumb.
Scaling the Recipe
If you're baking for a crowd or want to fill your freezer, scaling is straightforward but requires a tiny bit of math to keep the ratios correct.
- To Double (2x): Use two 9x5 pans rather than one large one. Follow the ingredients exactly, but keep the spices to 1.5x (around 2 tsp cinnamon and a heavy pinch of nutmeg) to avoid them becoming overpowering.
- To Halve (1/2): Use a mini loaf pan. For the eggs, whisk one egg in a small bowl and use exactly half of it by weight or volume. Reduce the bake time to about 30-35 minutes.
- Baking in Batches: If you are making multiple loaves, ensure there is at least two inches of space between the pans in the oven to allow for proper heat circulation.
Debunking Common Baking Myths
There's a lot of "old wives' tale" advice out there about apple bread. Let's clear up a couple of things so you can bake with confidence.
- Myth: You must squeeze the water out of shredded apples. Truth: Absolutely not! That juice contains the pectin and flavor that makes this bread moist. If you squeeze it out, you'll end up with a dry, rubbery loaf. The flour in this recipe is specifically measured to account for that liquid.
- Myth: Peeling the apples is required for a good texture. Truth: The skin of the apple softened during the long bake and becomes almost imperceptible. Leaving the skin on actually provides more fiber and beautiful flecks of red or green in the finished crumb.
- Myth: More baking soda means a higher rise. Truth: Overloading on baking soda will give the bread a metallic, soapy taste and can actually cause it to rise too fast and then collapse. Stick to the 1 teaspoon it's the perfect amount for this density.

Recipe FAQs
Can I substitute frozen apples for fresh shredded apples in this recipe?
No, stick with fresh. Frozen apples have already released significant moisture, and thawing them will make your batter excessively wet, leading to a gummy, underbaked texture.
Why is my apple bread sinking in the middle after baking?
It is usually due to underbaking or expired leavening agents. Ensure your baking soda is fresh and avoid opening the oven door before the 45-minute mark, as sudden temperature changes destabilize the delicate crumb structure.
How to prevent the shredded apples from turning brown before mixing the batter?
Toss the shredded apples immediately with 1 teaspoon of lemon juice. This acid neutralizes the enzymes responsible for oxidation, keeping the fruit looking bright until it is incorporated into the wet ingredients.
Is it true that using oil instead of butter results in a less flavorful bread?
No, this is a common misconception when baking with strong flavors. Oil keeps the bread moist for longer and allows the apple and cinnamon notes to dominate the profile, whereas butter's distinct flavor might compete; for richness, think of the fat balance used when mastering a technique like in our Christmas Cookies recipe.
How to tell when the loaf is perfectly done without over drying it?
Insert a wooden skewer into the center; it should come out clean or with only a few moist crumbs attached. If it comes out wet, it needs more time, but if it is bone dry, the loaf is likely already slightly overbaked.
How to store leftover apple bread to maintain maximum moisture?
Wrap the completely cooled loaf tightly in plastic wrap, then foil. Store at cool room temperature for up to 5 days; the high moisture content from the shredded apples keeps it tender for much longer than a standard quick bread.
How to achieve a professional looking, slightly crisp crust on top?
Sprinkle 1 tablespoon of coarse turbinado sugar over the batter right before baking. The large sugar crystals do not fully dissolve during the bake, creating a beautiful, slightly crackled shatter on the surface.
Shredded Apple Bread Recipe

Ingredients:
Instructions:
Nutrition Facts:
| Calories | 248 kcal |
|---|---|
| Protein | 3.3 g |
| Fat | 10.1 g |
| Carbs | 36.7 g |
| Fiber | 0.7 g |
| Sugar | 19.7 g |
| Sodium | 196 mg |
