Vanilla Buttercream Frosting Recipe: Velvety & Stable
- Time: Active 15 minutes, Passive 5 minutes, Total 20 minutes
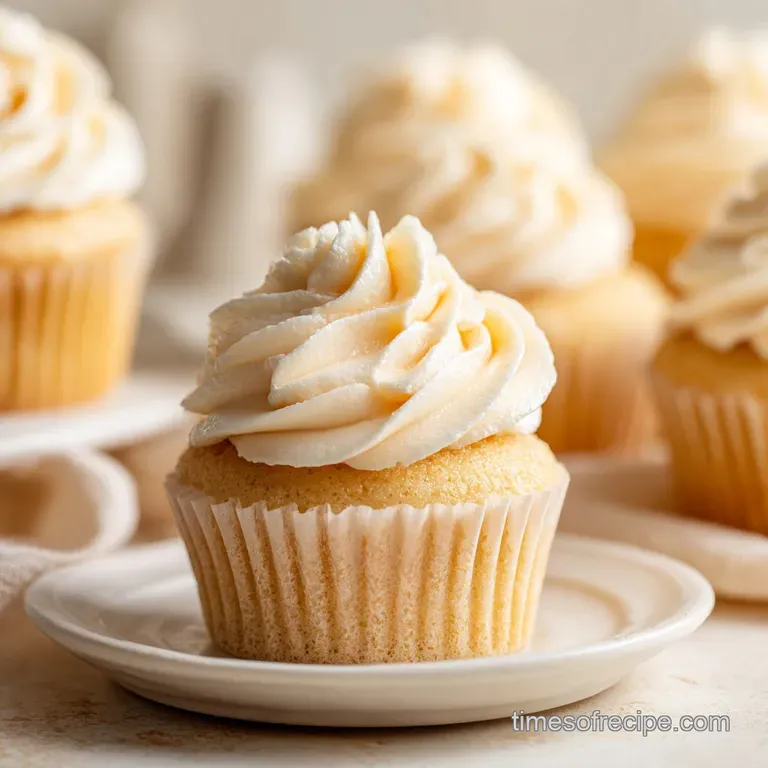
- Flavor/Texture Hook: Velvety, whipped cream-like consistency with a deep bean flecked aroma
- Perfect for: Birthday cakes, detailed flower piping, and filling delicate macarons
- Success Secrets For This Vanilla Buttercream Frosting Recipe
- Important Stats For This Recipe
- Choosing Quality Ingredients And Swaps
- Best Tools For Whipping Air
- Follow These Simple Mixing Steps
- How To Fix Common Mistakes
- Creative Ways To Customize Flavor
- Keeping Your Frosting Fresh Longer
- Beautiful Designs For Your Cake
- Recipe FAQs
- 📝 Recipe Card
Success Secrets For This Vanilla Buttercream Frosting Recipe
The clink of the whisk against the bowl and the sight of yellow butter turning into a pale, ghostly ivory always feels like a bit of kitchen sorcery. I remember my first attempt at a homemade frosting; I was so impatient that I didn't let the butter soften enough, and I ended up with a lumpy, greasy mess that slid right off the cake.
It was a total disaster, but it taught me that the temperature of your ingredients is the invisible hand that guides your success.
When you get this vanilla buttercream frosting recipe right, the texture is nothing short of ethereal. It shouldn't just be "sweet" it should be a complex experience where the salt cuts through the fat and the vanilla bean paste provides a fragrant, floral depth.
We are aiming for a finish so silky it looks like polished marble on the side of a layer cake. Trust me, once you move past the store-bought tubs, there is no going back to that plastic like aftertaste.
This is the reliable, sturdy companion every home baker needs in their repertoire. Whether you are swirling it onto cupcakes or using it to build a four tier masterpiece, it behaves beautifully under pressure.
We’ll focus on the aeration process today, ensuring we trap just enough air to keep it light without creating those pesky bubbles that ruin a smooth finish. Let's get into the details of how to make this work every single time.
Important Stats For This Recipe
The Physics of Aeration: Beating the butter at a specific speed stretches the fat molecules to trap tiny air bubbles. The fine particles of confectioners' sugar then act as a structural scaffold to keep those bubbles from collapsing.
- Fat Emulsification: high-quality grass fed butter has a higher plastic range, meaning it stays stable at room temperature better than cheaper alternatives.
- Sugar Suspension: Sifting the sugar isn't just about lumps; it introduces air into the powder, allowing it to dissolve faster into the butter’s moisture.
- Temperature Control: Keeping the butter at 65°F ensures it is soft enough to expand but cold enough to hold its shape.
- Salt Ionization: Fine sea salt suppresses the perception of bitterness and heightens the floral notes of the vanilla bean.
| Method | Time | Texture | Best For |
|---|---|---|---|
| Fresh (This Recipe) | 20 minutes | Velvety and light | Wedding cakes and gourmet cupcakes |
| Shortcut (Store Mix) | 5 minutes | Grainy and stiff | Quick treats for kids |
| Whipped (Longer Beat) | 30 minutes | Like whipped cream | Light sponge cakes or fillings |
Choosing the fresh method gives you complete control over the sweetness level and the quality of the fats involved. While shortcuts save time, they often rely on palm oil or stabilizers that leave a filmy coating on the roof of your mouth.
Fresh buttercream using this vanilla buttercream frosting recipe provides a clean, decadent finish that shortcuts simply cannot replicate.
Choosing Quality Ingredients And Swaps
| Ingredient | Science Role | Pro Secret |
|---|---|---|
| Grass Fed Butter | Primary structure | Use European style for higher fat content and less water. |
| Confectioners' Sugar | Stabilizing agent | Always sift twice to ensure a shatter smooth finish on the tongue. |
| Vanilla Bean Paste | Flavor anchor | Paste provides those beautiful black flecks that signal "homemade." |
| Heavy Cream | Emulsifier | Cold cream helps regulate the final temperature of the bowl. |
- 1 cup (227g) Unsalted Grass Fed Butter, softened to 65°F Why this? Provides a richer, cleaner flavor profile than standard butter.
- 3.5 cups (420g) Organic Confectioners' Sugar, sifted Why this? Organic sugar often lacks the metallic aftertaste of beet sugar.
- 1.5 tablespoons (22ml) Pure Vanilla Bean Paste or high-quality Extract Why this? Paste offers a more intense, layered aromatic experience.
- 2 tablespoons (30ml) Heavy Whipping Cream, cold Why this? Adds necessary moisture and fat for a silky mouthfeel.
- 1/4 teaspoon (1.5g) Fine Sea Salt Why this? Essential for balancing the high sugar content.
| Original Ingredient | Substitute | Why It Works |
|---|---|---|
| Unsalted Butter | Salted Butter | Works well, but omit the extra 1/4 tsp of salt from the recipe. |
| Heavy Cream | Whole Milk | Thins the frosting but yields a slightly less creamy, "lighter" texture. |
| Vanilla Bean Paste | Pure Vanilla Extract | Same flavor profile. Note: You lose the visual aesthetic of the bean flecks. |
Best Tools For Whipping Air
To get the best results from this vanilla buttercream frosting recipe, you really need a stand mixer such as a KitchenAid. While a hand mixer works in a pinch, it often lacks the sustained power needed to truly aerate the butter for the full five to eight minutes required for a professional texture.
Use the paddle attachment rather than the whisk; the whisk incorporates too much air, leading to large bubbles that make the frosting look like a sponge rather than a silky coating.
A sturdy silicone spatula is your best friend here. You will need to scrape the bottom of the bowl frequently to ensure no "butter streaks" remain unmixed. I also recommend using a fine mesh sieve for the sugar.
It might seem like an annoying extra step, but biting into a lump of dry sugar is the fastest way to ruin an otherwise elegant dessert. Finally, keep a digital thermometer handy testing your butter temperature takes five seconds and prevents the frosting from becoming soupy.
Follow These Simple Mixing Steps

- Place the 1 cup of softened butter into your mixer bowl. Note: Ensure it is exactly 65°F for the best aeration.
- Beat on medium high speed for 5 minutes until the butter is pale ivory and fluffy.
- Add the 1/4 teaspoon of sea salt and the 1.5 tablespoons of vanilla bean paste. Note: Adding these now ensures the flavor is evenly distributed through the fat.
- Turn the mixer to the lowest setting and add 1 cup of the sifted sugar.
- Mix until the sugar is mostly incorporated and no longer dusty.
- Repeat the process with the remaining 2.5 cups of sugar, adding it in two batches.
- Pour in the 2 tablespoons of cold heavy cream while the mixer is running on low.
- Increase speed to medium and whip for 2 minutes until the mixture looks like soft clouds.
- Stop the mixer and use a spatula to stir the frosting by hand for 60 seconds. Note: This manual stirring removes large air pockets for a smooth finish.
- Use immediately or cover with plastic wrap pressed directly against the surface.
How To Fix Common Mistakes
Why Your Frosting Is Grainy
If your frosting feels like sand on your tongue, the sugar hasn't properly integrated with the fat. This usually happens if the butter was too cold or if you used a low quality sugar with large granules. You can often fix this by adding a tiny splash more cream and beating it for an extra three minutes on high.
Salvaging Greasy Or Soupy Frosting
This is a temperature issue. If your kitchen is too warm or the butter was too soft, the emulsion breaks and the fat starts to melt. It looks shiny and won't hold a peak. To save it, put the entire bowl in the fridge for 15 minutes, then re whip it. It should come back together as it cools.
Removing Large Air Bubbles
Air bubbles are the enemy of a smooth "naked cake" look. If your frosting looks like Swiss cheese, it’s been over whipped with a whisk attachment. The fix is simple: use a wooden spoon or a heavy spatula to "mash" the frosting against the sides of the bowl for a few minutes. This forces the air out.
| Problem | Root Cause | Solution |
|---|---|---|
| Yellow tint | Under whipped butter | Beat the butter alone for at least 5 full minutes. |
| Too sweet | Lack of acidity or salt | Add a tiny drop of lemon juice or another pinch of salt. |
| Breaking/Curdling | Temperature shock | Ensure cream is added slowly and butter isn't too cold. |
Common Mistakes Checklist ✓ Never use melted butter; it will never aerate properly. ✓ Sift your sugar even if it looks fine in the bag. ✓ Don't skip the salt - it's the difference between "sugary" and "gourmet." ✓ Stop the mixer to scrape the very bottom of the bowl twice during the process.
✓ Use the paddle attachment, not the whisk, for a smoother finish.
Creative Ways To Customize Flavor
Once you have the base of this vanilla buttercream frosting recipe down, you can start layering in different notes. For a deep, rich profile, you might try adding a tablespoon of espresso powder dissolved in the cream. If you're looking for something more decadent, consider making a Boston Cream Cheesecake Recipe and using this buttercream as a top border for an elegant contrast.
If you want a fruity twist, avoid adding fresh juice, which can break the emulsion. Instead, use freeze dried fruit powders. They add intense color and flavor without changing the moisture content of the frosting.
For a floral version, a single drop of high-quality lavender or rose oil can transform the entire batch into something truly magical for a spring tea party.
| People | Ingredient Adjustments | Recommended Use |
|---|---|---|
| 5 People | 1/3 cup butter, 1.2 cups sugar | 6 large cupcakes |
| 15 People | 1 cup butter, 3.5 cups sugar | Two 8 inch cake layers |
| 30 People | 2 cups butter, 7 cups sugar | Full sheet cake or 3 tier mini cake |
When scaling this recipe up, be careful with the salt and vanilla. Spices and flavorings don't always scale linearly. If you are doubling the batch, start with 1.5 times the salt and vanilla, taste it, and then add more if needed.
For large batches, work in segments if your mixer bowl is smaller than 5 quarts to avoid a sugar cloud in your kitchen.
Keeping Your Frosting Fresh Longer
This frosting stays fresh in the refrigerator for up to 7 days. Make sure it is in an airtight container because butter is like a sponge for smells you don't want your vanilla cake tasting like last night's onion soup.
Before using it again, you must let it come to room temperature naturally and then give it a quick whip with a spoon to restore that velvety texture.
For long term storage, you can freeze this buttercream for up to 3 months. I like to freeze it in a flat freezer bag so it thaws quickly. If you have leftovers, don't throw them away! Use the extra frosting to make "cookie sandwiches" or store it to use as a crumb coat for your next baking project.
Zero waste in the kitchen is all about finding a second life for those sweet scraps.
Beautiful Designs For Your Cake
Achieving a professional look with this vanilla buttercream frosting recipe is all about your technique with the spatula. For a rustic look, use the back of a spoon to create "swooshes" in the frosting. For sharp, clean edges, you will need a bench scraper. Hold the scraper at a 45 degree angle against the side of the cake and spin the turntable in one smooth motion. If you're working on cookies, this frosting provides a much softer, creamier alternative to a traditional Sugar Cookie Frosting recipe.
Chef's Tip: If you are piping flowers or intricate borders, pop the piping bag in the fridge for 5 minutes every so often. The heat from your hands can melt the butter inside the bag, causing your designs to lose their sharp definition.
When you're ready to serve, remember that buttercream is best enjoyed at room temperature. If the cake has been in the fridge, take it out at least an hour before slicing. This allows the butter to soften back to its intended silky state, ensuring every bite is as cloud like and fragrant as the moment you finished mixing it.
Debunking Buttercream Myths
"Clear vanilla is better for white frosting." While it keeps the color pure white, clear vanilla is synthetic and lacks the complex flavor of real bean paste. To get white frosting naturally, whip the butter longer or add a tiny dot of violet food coloring to neutralize the yellow.
"You must use milk to thin it out." Heavy cream is actually superior because its high fat content helps maintain the emulsion. Milk can sometimes make the frosting look "pock marked" or slightly translucent if too much is added.
"store-bought sugar doesn't need sifting." Even the most expensive brands develop clumps during shipping and storage. If you want that professional, velvety mouthfeel, sifting is a non negotiable step in the process.

Recipe FAQs
How to make the best vanilla buttercream?
Use high-quality room temperature butter and sift your sugar twice. The butter must be softened to exactly 65°F to trap the maximum amount of air during the creaming stage for fluffiness.
This perfect aeration is a key transferable skill that will improve all your baking, much like mastering the right folding technique in a [Red Velvet Cookies in 30 Minutes] recipe.
What is the secret to good buttercream frosting?
Temperature control and slow ingredient addition are the secrets. If the butter is too warm, the frosting breaks; if the sugar is added too fast, the mixture won't emulsify smoothly.
Mastering the stable emulsion here is crucial; if you enjoy this textural challenge, you will appreciate how the same principles of slow incorporation lead to perfect stability in our [Strawberry Kiss Cookies Recipe with Cream Cheese].
What is the difference between vanilla frosting and buttercream frosting?
Buttercream frosting is a specific type of vanilla frosting that uses butter as its primary fat. Standard vanilla frosting might use shortening, cream cheese, or even meringue (like Swiss or Italian), which fundamentally change the final texture and stability.
Buttercream is richer and holds intricate piping shapes better than many lighter frostings.
What are common buttercream mistakes?
The most common mistakes are adding liquid too fast or using butter that is too warm or too cold. Adding cold liquids to soft butter causes the mixture to curdle or break, resulting in a greasy appearance.
If this happens, refrigerate the bowl briefly and then re-whip vigorously to force the emulsion back together.
Can I substitute shortening for butter in this recipe?
No, you should not substitute entirely with shortening for the best flavor. While shortening provides excellent stability for piping, it lacks the rich, clean flavor profile of grass fed butter which is essential here.
A 50/50 mix can work for very hot weather stability, but for pure flavor, stick to the butter as directed.
How long do I need to beat the butter before adding sugar?
Beat the softened butter on medium high speed for a full 5 minutes before introducing any sugar. This process, known as creaming, incorporates necessary air which lightens the fat and sets the foundation for that airy, cloud like texture.
Proper aeration prevents the final product from tasting heavy or greasy.
Is it true that you must use the paddle attachment, not the whisk?
Yes, the paddle attachment is strongly recommended for a smooth, professional texture. The whisk attachment incorporates large, unstable air bubbles that often collapse, leaving the final frosting porous and prone to weeping, whereas the paddle creates a denser, finer bubble structure perfect for
coating cakes like our [Valentine Ganache Cookies recipe].
Vanilla Buttercream Frosting Recipe

Ingredients:
Instructions:
Nutrition Facts:
| Calories | 229 kcal |
|---|---|
| Protein | 0.2 g |
| Fat | 13.0 g |
| Carbs | 28.2 g |
| Fiber | 0 g |
| Sugar | 27.9 g |
| Sodium | 39 mg |
