Mint Julep Mocktail: Refreshing and Frosty

- Time:10 minutes active
- Flavor/Texture Hook: Frosty, effervescent, and zesty
- Perfect for: Garden parties, summer brunches, or a sophisticated non alcoholic treat
- The Refreshing Mint Julep Mocktail
- The Secret to Better Mint
- Essential Recipe Specifications
- Gathering Your Fresh Components
- The Necessary Tool Kit
- Easy Assembly Step-by-Step
- Solving Common Drink Issues
- Troubleshooting Common Issues
- Flavor Twists and Variations
- Adjusting for Different Sizes
- Debunking Drink Lore
- Keeping Your Mint Fresh
- Serving With Visual Flair
- Recipe FAQs
- 📝 Recipe Card
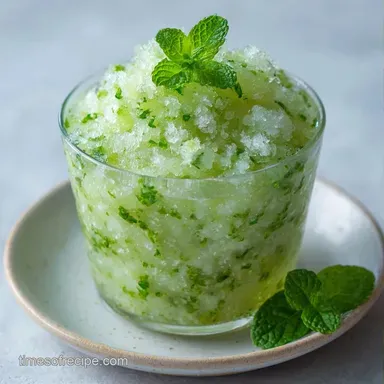
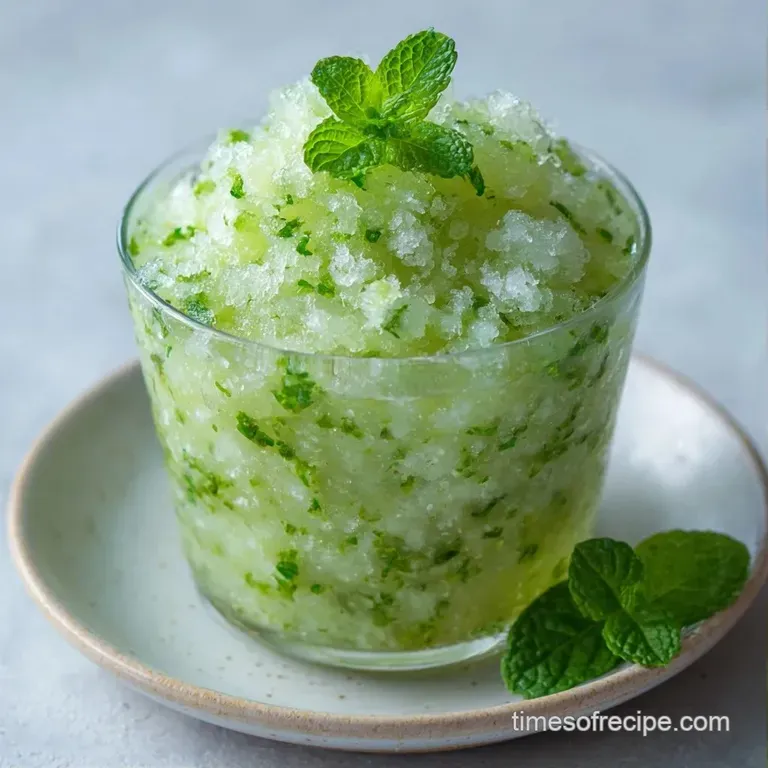
The Refreshing Mint Julep Mocktail
The first time I tried making this for a summer soirée, I committed the ultimate sin: I treated the mint like I was making pesto. I mashed those poor leaves into a green paste, thinking more "extraction" meant more flavor. The result?
A drink that tasted exactly like a lawnmower had gone rogue in a glass of sugar water. It wasn't elegant, and it certainly wasn't the crisp experience I wanted for my guests.
I realized that the magic isn't in the destruction of the leaf, but in a gentle nudge to release the aromatic oils. Once I stopped shredding the mint and started bruising it, everything changed. The drink transformed from a muddy mess into a sparkling, translucent masterpiece that looked as stunning as it tasted.
Now, this Mint Julep Mocktail is my go to whenever I want something that feels like a celebration without the buzz. It's all about the contrast between the biting cold of the ice and the warm, aromatic hit of fresh mint.
Trust me, once you get the muddling technique right, you'll never go back to the "mash it-until it's gone" method.
The Secret to Better Mint
To get this right, we have to think about what the mint is actually doing in the glass. It's not just a garnish; it's the soul of the drink.
Aromatic Release: Gently pressing the leaves breaks the oil glands without rupturing the cell walls that hold bitter tannins. This keeps the flavor bright and clean rather than medicinal.
Temperature Shock: Using crushed ice creates more surface area than cubes, which chills the liquid instantly. This prevents the syrup from feeling cloying and keeps the bubbles tight.
Carbonation Lift: The club soda doesn't just add fizz; it carries the mint aromatics upward toward your nose. This is why the drink smells so inviting before you even take a sip.
The Citrus Bridge: A tiny bit of lime juice acts as a bridge between the sweetness of the syrup and the coolness of the mint. It cuts through the sugar to keep the profile balanced.
| Method | Time | Texture | Best For |
|---|---|---|---|
| Fast (Shaken) | 3 mins | Aerated/Frothy | Quick weekday refreshment |
| Classic (Muddled) | 10 mins | Frosty/Layered | Elegant parties and slow sipping |
Essential Recipe Specifications
Before we dive into the assembly, let's look at what makes these specific components work. I've spent way too much time experimenting with different sweeteners, and honestly, a simple syrup is the only way to ensure a velvety consistency.
| Ingredient | Science Role | Pro Secret |
|---|---|---|
| Fresh Mint | Primary Aromatic | Slap the garnish sprig against your hand to wake up the scent |
| Simple Syrup | Viscosity & Body | Use a 1:1 ratio for a clean sweetness that doesn't coat the tongue |
| Club Soda | Effervescence | Pour slowly to keep the bubbles from dissipating too quickly |
| Crushed Ice | Thermal Mass | Freeze water in a bag and smash it with a mallet for the best "snow" |
Gathering Your Fresh Components
For this recipe, quality is everything. Since there are so few ingredients, you can't hide a wilted leaf or a cheap soda. If you can, grab organic mint from a local market; the oils are usually more potent.
- 10-12 large fresh mint leaves (approx. 5g) Why this? Provides the core aromatic base
- 1 tbsp simple syrup Why this? Dissolves instantly in cold liquid
- 1 tsp fresh lime juice Why this? Adds necessary acidity to balance sugar
- 4 oz club soda Why this? Provides the light, lifting bubbles
- 1.5 cups crushed ice Why this? Essential for the signature frosty dome
- 1 sprig of fresh mint Why this? Essential for the olfactory experience
- 1 thin wheel of lime Why this? Visual contrast and a hint of zest
Substitution Options:
| Original Ingredient | Substitute | Why It Works |
|---|---|---|
| Simple Syrup | Agave Nectar | Similar thickness. Note: Adds a slight earthy sweetness |
| Club Soda | Sparkling Water | Same fizz. Note: Check for mineral tastes that might clash |
| Lime Juice | Lemon Juice | Similar acidity. Note: Shifts the flavor toward a brighter, sharper note |
If you're looking for something slightly different, you might enjoy a 5 Minute Virgin Mint Julep recipe which uses a slightly different build. But for the true, frosty experience, stick to this method.
The Necessary Tool Kit
You don't need a professional bar setup, but a few specific tools make this Mint Julep Mocktail much easier to assemble.
I usually use a heavy bottomed highball glass or a traditional copper julep cup. The copper is stunning because it frosts over almost instantly, creating a beautiful white coating on the outside. For muddling, a wooden muddler is great, but the end of a wooden spoon works just as well.
The most important "tool" is actually your ice. If you don't have a crushed ice attachment on your freezer, just put ice cubes in a sturdy freezer bag and hit them with a rolling pin. This creates those irregular, jagged pieces that trap the mint leaves and keep the drink ice cold for longer.
Easy Assembly step-by-step
Now, let's build this beauty. Remember, we are aiming for a gentle touch. We want the mint to be "awake," not "exhausted."
Phase 1: The Gentle Bruise
- Place the fresh mint leaves and simple syrup in the bottom of a julep cup or highball glass. Use a muddler to press down firmly 3-4 times until leaves are wilted and aromatic; do not shred the leaves. Note: Over muddling releases bitter chlorophyll.
Phase 2: The Build
- Stir in the fresh lime juice. Note: This ensures the acid is evenly distributed before the ice goes in.
- Fill the glass 3/4 full with crushed ice. Until the ice is packed firmly around the mint.
- Pour the club soda over the ice. Note: Pour slowly to maintain as much carbonation as possible.
- Use a long spoon to gently lift the mint leaves from the bottom to incorporate them throughout the drink. Until you see flecks of green floating at different levels.
Phase 3: The Frosty Finish
- Top with an extra mound of crushed ice to form a dome above the rim. Note: This "snow cone" effect is what keeps the drink chilled.
- Garnish with a fresh mint sprig and a citrus wheel. Until it looks like a professional cocktail.
Chef's Note: For a truly professional look, take your mint sprig and give it a firm "clap" between your palms before placing it in the glass. This bursts the capillaries in the leaves and sends the scent straight to the drinker's nose.
Solving Common Drink Issues
Even with a simple recipe, things can go sideways. Usually, it comes down to the balance of sweetness or the state of the ice. If your drink tastes more like a salad than a cocktail, you've likely gone too far with the muddler.
Another common gripe is the "watering down" effect. This happens when you use old ice that has already started to melt in the tray. Always use fresh, hard frozen ice for the best results. According to techniques suggested by Serious Eats, the quality of your ice directly impacts the dilution rate of your drink.
Troubleshooting Common Issues
| Issue | Solution |
|---|---|
| Why Your Drink Tastes Bitter | This is almost always caused by over muddling. When you tear the mint leaves into tiny pieces, you release bitter compounds. The solution is to press, not grind. |
| Why Your Drink Lacks Fizz | If the bubbles disappear instantly, you might be stirring too vigorously or using soda that has been open too long. A gentle lift with a spoon is all you need. |
| Why Your Ice Melts Fast | Using large cubes instead of crushed ice actually allows the liquid to warm up faster because there's more open space for air to circulate. Pack the crushed ice tightly. |
Pro Checklist for Success:
- ✓ Mint leaves are bruised, not shredded.
- ✓ Ice is crushed and packed tightly to the rim.
- ✓ Garnish sprig has been "clapped" for aroma.
- ✓ Soda is poured slowly to preserve bubbles.
Flavor Twists and Variations
While the classic Mint Julep Mocktail is stunning, you can easily tweak this to suit your mood or the occasion. I love playing with the "body" of the drink to make it feel more like a treat and less like a refresher.
For a Zesty Kick
If you want a non alcoholic mint julep lemonade, replace the club soda with a high-quality sparkling lemonade. This increases the sweetness and adds a punchy, citrusy depth that's wonderful for kids.
For a Spicy Undertone
For a non alcoholic mint julep with ginger ale, swap the soda for ginger ale or ginger beer. The spice of the ginger creates a sophisticated contrast with the cooling mint. This is my favorite version for autumn evenings.
For a Sweet Effervescence
If you prefer a virgin mint julep with Sprite, use Sprite or 7 Up instead of club soda and skip the simple syrup. The soda provides all the sugar you need, making it a faster, more convenient build.
For a Crowd Pleasing Party
To make a mint julep mocktail punch, scale the ingredients up in a large glass dispenser. Instead of muddling individual glasses, lightly bruise a large amount of mint in the bottom of the pitcher, add the syrup and lime, and then fill with a massive amount of crushed ice before topping with liters of club soda.
Adjusting for Different Sizes
Scaling a drink is easier than scaling a cake, but there are a few rules to keep the balance. If you're making just one, the schema above is your gold standard.
Scaling Down (The Taster): If you're just testing a batch, use 5 leaves, 1.5 tsp syrup, and 2 oz soda. Use a small rocks glass to keep the proportions correct.
Scaling Up (The Party Batch): When multiplying by 4 or more, don't quadruple the lime juice immediately. Start with 3x the lime and taste it. Acid can become overwhelming in large volumes. For a party, work in batches of four to ensure the ice doesn't melt before the last guest is served. If you're serving this alongside other treats, like a Homemade Granny Cake, keep the sweetness of the drink moderate to balance the dessert.
Debunking Drink Lore
There are a few things people tell you about Juleps that just aren't true. Let's set the record straight.
"You need a copper cup for the flavor." False. The copper cup is for temperature and aesthetics. It makes the drink feel colder and look beautiful, but it doesn't change the taste. A glass highball is perfectly fine.
"More mint always means more flavor." Not true. Too much mint can make the drink taste "swampy" or overly medicinal. Stick to the 10-12 leaf range for a balanced, elegant profile.
"You must use a professional muddler." Nope. As long as you have something flat and firm to press the leaves, you're good. A wooden spoon or even the bottom of a heavy glass works.
Keeping Your Mint Fresh
Mint is notoriously temperamental. If you leave it in a plastic bag in the fridge, it turns to slime in about two days.
Storage Guidelines: Treat your mint like a bouquet of flowers. Trim the stems and place them in a glass with an inch of water. Cover the top loosely with a plastic bag and keep it in the fridge. This keeps them crisp for up to two weeks.
Zero Waste Tips: Don't throw away the stems! While the leaves are the stars, the stems are packed with flavor. You can freeze mint stems in ice cube trays with water and use them in other drinks or even in a pot of tea.
If you have leftover simple syrup, it's great for sweetening iced coffee or drizzling over pancakes.
Serving With Visual Flair
Presentation is what turns a simple beverage into an experience. Since this Mint Julep Mocktail is all about the "frost," lean into that.
Start by chilling your glassware in the freezer for 15 minutes before assembly. When you pour the soda and add the ice dome, the glass will begin to frost over instantly.
Place the lime wheel snugly against the side of the glass, tucked into the ice. Position the mint sprig so it stands tall and proud, leaning slightly against the rim. This ensures that every time the person takes a sip, their nose is right next to the fresh mint.
For a truly stunning effect, serve the drink on a small saucer with a few extra mint leaves and a slice of lime scattered around. It creates a professional, curated look that makes your guests feel like they're at a high end Southern lounge.
This recipe is a reminder that elegance doesn't require complex ingredients just a bit of care and a lot of ice.
Recipe FAQs
Is there a non-alcoholic version of a mint julep?
Yes, this mocktail is a refreshing non-alcoholic alternative. It uses club soda and fresh lime to replicate the crisp profile of the original drink.
What ingredients go into a mint julep mocktail?
It contains fresh mint leaves, simple syrup, fresh lime juice, and club soda. The drink is served over crushed ice and finished with a mint sprig and a lime wheel.
Is this mocktail suitable for special diets?
Yes, it is naturally vegan and gluten-free. It contains no animal products or grain based ingredients.
Why does my drink taste bitter?
You likely over muddled the mint. Tearing the leaves into tiny pieces releases bitter compounds; instead, press down firmly 3-4 times until they are wilted.
How to keep the drink fizzy?
Lift the mint leaves gently with a long spoon. Stirring too vigorously or using soda that has been open too long will cause the bubbles to disappear.
How to muddle mint leaves correctly?
Press the leaves and simple syrup firmly 3-4 times. Avoid grinding or shredding the mint to keep the flavor clean and aromatic.
Can I use regular ice cubes instead of crushed ice?
No, stick with crushed ice. Large cubes allow the liquid to warm up faster and prevent the signature dome shape used in the classic mint julep.
Mint Julep Mocktail